Picture for dad's birthday. Postcard for dad. Volumetric and stylish crafts
Father is the most important person in the life of each of us. It is very important to please him with pleasant and original gift for a birthday.
A handmade postcard is a win-win option, because in any case you put a piece of yourself into the craft. In addition, with your own hands you can make a postcard original, creative, display in it the interests, desires, dreams, profession of your father. He will be very pleased to receive such a gift from his son or daughter.
All the ideas of how to make a birthday card for dad can be roughly divided into three groups:
- simple and effective;
- made in scrapbooking style;
- voluminous and stylish.
In the following, we will discuss several options related to each of these groups. Remember that these are just concepts that do not have to be repeated one to one - you can add something of your own, special to them. Making such a card is not difficult: even a child can handle it.
Simple and effective options
Making such a gift will not take much time. For this you will need: colored paper, cardboard, paints or felt-tip pens, glue. You can find all of these materials at any school supply or stationery store.

Scrapbooking style cards
Scrapbooking style greeting card decorated with decorative elements, clippings and various small details. For its manufacture, parts are used from several materials: paper, cardboard, wood, plastic, polymer clay etc. Buttons, beads, ribbons, bows, or even old ones are suitable as decorations. jewelry. When all these items are combined into a single whole, a very original and beautiful thing is obtained.
 At first glance, it may seem that it is very difficult, but in reality, even Small child. If you want to give your father not just a homemade card, but a product that will have an original look, do something in this style.
Below are a few of these ideas. Which one to give preference to and in what order to place the elements of the cover of the card, decide for yourself. You can show your imagination and create something of your own.

Volumetric and stylish crafts
On such postcards is recreated picture or image in 3D format. They look much more interesting and attractive than flat images on thick paper or cardboard, and at the same time, there is nothing complicated in their manufacture. To see this, check out a few ideas for such postcards.
If anyone thinks that fathers do not welcome gifts for their holidays, then they are mistaken. They may not show their emotions too much, but they really like gifts. And the best and most expensive gifts for these adult boys are gifts from their children. Of course, you can choose something in the store together with mom and dad will be happy. But you can really make him happy by making a postcard with your own hands, because you can’t find it anywhere else. After all, it is precisely with such a manifestation of attention that dad will be suitable.

IN big hand- tiny handle
A do-it-yourself birthday card for dad, that is, the hands of a daughter or son, will be the most the best gift him this holiday.
How to make a card for dad to show how much the child loves him? The kid will need several items - scissors, glue, one piece of cardboard and several sheets of colored paper.
First of all, a piece of cardboard is folded in half (like an ordinary postcard), then a rectangle is glued on the first outer side, which must be cut out of a colored piece of paper. Now cut out a slightly smaller rectangle from a piece of paper of a different color. On this, the second rectangle, the child needs to depict the contours of a large palm, and inside it - the contours of a child's, small (that is, his) palm. Carefully cut out the palm along the inner contour bigger size, and on the outside - a small one and glue this part onto the base.
To beautifully arrange the spread of a holiday card, you just need to stick pictures of the appropriate subject and write a congratulatory poem suitable for dad's holiday.
Now that it has become clear how to make a card for dad on your own, it will not be difficult to do this.
Do-it-yourself postcard for dad: draw from the heart

This is not difficult to do, the main thing is to get down to business with imagination
It is clear that not every child can draw beautifully. And yet, do not be shy if artistic talents leave much to be desired. How to draw a birthday card for dad so that he likes it? This is not difficult to do, the main thing is to get down to business with imagination. To do this, you need ordinary pencils of different colors and paper. Paints with a brush or felt-tip pens are also suitable. This is someone who loves to draw.
To make dad happy, you can draw something that is very important to him. For example, dad wants to buy a summer house or a car. This is how he will find the answer to the question of how to draw a postcard for dad. In the first case, the child will draw a beautiful house, from the window of which his parents and himself look out. In the second - a car and dad sitting behind the wheel. This will be a reminder to him of a dream. Even a small son or daughter can make such a gift for his beloved daddy. If dad is thinking about a summer vacation for the whole family, then you can turn to mom for help: draw the whole family with your child on vacation. And do not forget about the palm trees and the bright sun.
Custom postcards

Older children may think about a custom postcard
How to make a birthday card for dad? Moreover, no one else had such a postcard. Older children may think about this. And here their mother, their own imagination or the all-powerful Internet will come to their aid. The result of the work will be very beautiful and unusual postcard for Dad. You can do a lot with your own hands. You can take an ordinary disposable white paper plate, draw a picture on it and write congratulatory words. It is impossible to find such a postcard in any store. Dad will be very happy.
A fun gift will be an original drawing, which is easy to complete. This will be a continuation of dad's photo. A photograph is taken that shows a smiling or laughing dad. Dad's head is cut out, glued to a white sheet of paper. Further - a matter of the child's imagination. He can portray dad the way he sees him, or the way the child would like to see him in the future.
Shirt and tie or tuxedo: what will dad like?

You can congratulate dad on his birthday with a postcard in the form of a tuxedo or tailcoat
Dad's birthday should be remembered for a long time. Therefore, each child will have to try and very carefully prepare a birthday card. You can not only draw a postcard. You can make it yourself. Made by a kid on his own, it will make any father very happy.
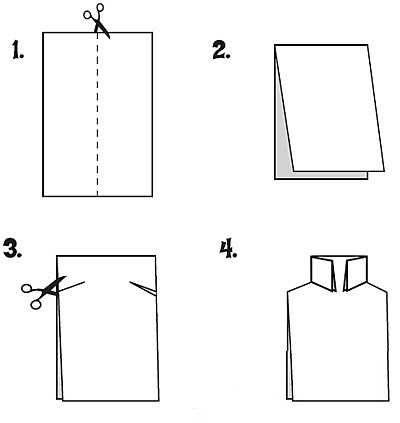
If dad prefers classic clothes or he often attends ceremonial events, then the question of which one and how to draw a birthday card for him will disappear by itself. Because the style of daddy's clothes will be a weighty clue. For kids younger age it will be easier to draw dad in a suit and hat with pencils, felt-tip pens or paints. Older children can be offered to prepare a craft in the form of a shirt with a tie. You will need scissors, glue, buttons and sheets of paper in two colors. First, fold a sheet of paper in half and make small cuts in it on both sides, then gently bend the corners to make a collar. A tie can be cut out of paper of a different color and glued to the base. The corners of the collar can also be glued - so they will look neater. At the very end, glue the buttons.
And you can also wish dad a happy birthday with a postcard in the form of a tuxedo or tailcoat. To do this, you will need two pieces of white and black paper, buttons, glue and scissors. A sheet of white paper should be folded in half, and a rectangle should be cut out of a sheet of black paper, in which a cutout should be made.
Stick the prepared piece on the base. Again, take a sheet of black paper and cut out a bow tie from it. We also glue it to the base. After that, you can glue a couple of identical buttons, decorate the opening of the postcard beautifully and the gift is ready.
So, we made sure that it’s not difficult to make a postcard for dad with your own hands. The main thing is desire, patience and a little imagination.
How to make a DIY card for dad
The whole family is preparing for dad's birthday. Mom comes up with holiday menu, buys a gift, and the children make it in advance. Even the most strict fathers are very sentimental at heart, so a homemade gift for them will be pleasant surprise. Adult children can also add a handmade postcard to the main present - it will be unexpected and pleasant for the father.
How to make a birthday card?
You can make a birthday card for dad with your own hands, while not spending a lot of time and money. A unique gift will turn out from improvised means: colored paper, cardboard, buttons, beads, lace, felt, etc.
Card ideas that the birthday boy will definitely like:
- Prints of the palms and feet of the little ones on cardboard. This is the most affordable way to touch the papule. A similar option is to leave prints of dad's boot and tiny sandals on the template for postcards. Mom will have to sign the gift and arrange it from the inside.
- Dad's portrait. Children will be happy to draw an image of dad with paints, felt-tip pens or pencils. To make the postcard even more interesting, invite the children to lay out daddy's portrait with curly pasta or cereals.
Advice! Add for the similarity of the image the characteristic features of the birthday man: a cap, mustache, pipe, headphones or anything else that distinguishes the father.
- Postcard in the form of a typewriter. Dad-car enthusiast will be pleased to receive a postcard-typewriter as a gift from children, into which you can paste photos of the whole family.
- Scrapbooking technique. Adult children can make such a postcard using decorative elements and small details.
- Volumetric postcards. There is a mass various options three-dimensional postcards: from the simplest to complex compositions. In addition, a small gift can be hidden in a 3D postcard.
- Vintage postcard. Make a composition from old photographs, blend napkins, copper buttons, artificially aged paper. This craft looks impressive and original.

Gift from the little ones: how to draw a birthday card for dad
The most touching version of the postcard is a drawing of palms or legs. What you will need to make a children's gift:
- Cardboard sheet;
- Scissors;
- Glue;
- colored paper;
- Pencil.
How to make a postcard:
- Fold the cardboard in half to make a template for a future gift.
- Cut a slightly smaller rectangle out of colored paper, glue it to outside postcards. You will have a beautiful frame.
- Take paper of a different color, circle the contour of the palm, carefully cut it out.
- Glue the colored paper palms to the front of the card.
- On the inside, adults (mother, grandmother, older brothers and sisters) can write a congratulatory poem and wishes.
On a note! Be close to the baby, because he still does not know how to cut and paste shapes beautifully. But be sure to give the child the opportunity to participate in the process of creating a presentation, do not do all the work for him!
Everyone knows that little children love to draw. Use their passion to make greeting card for daddy's birthday. You will need paper, pencils, paints or felt-tip pens (depending on what your child likes to draw with).

To please dad, you can draw what he has long dreamed of. For example, a birthday boy is looking at new cars or wants to buy a country house. Draw a car with dad driving or a house in the garden of which the whole family is located. And if the father wants to fly to the sea, you can depict the beach, palm trees and all family members with soft drinks and fans. Of course, you can’t do without the help of your mother here: she will be happy to help the children finish drawing small details and think over the plot of the picture.
Another version of the postcard is an application. It can be air balloons, cars, ships and planes, a birthday cake with candles. You can use pictures from magazines, print from the Internet or cut out from colored paper. Complete the applique with buttons, beads, ribbons, twine and other decorative elements.
Kids can present a postcard to the papule with his photo in an unusual frame. For example, you can paste over the picture with images of cars, military equipment, balloons or cakes with candles.
Advice! A postcard with plasticine elements looks cute. Kids like to sculpt all kinds of simple figures from plasticine or salt dough that can be used to decorate dad's surprise.

From daughter
With the advent of a daughter, a man becomes not just a father, but a loving and beloved daddy. Handmade gifts from girls for dads are the most touching and valuable surprise that touches even a respectable and strict man.
What kind of cards can a daughter make to dad with her own hands?
- Funny IDAD craft - a postcard in the form of a tablet. You will need the following materials: black and white cardboard, felt-tip pens, scissors, glue stick, silver gel pen. Cut out 2 rectangles from black cardboard, stick a sheet of white paper on one of them. Round the edges, then print and cut out the iPad icons and fold them into envelopes. Glue the icons to the "screen", draw a button from below using a silver helium pen. Glue the two parts of the card together. It will remain inside each icon to write a congratulation.
- A simple postcard with buttons. Even a very small daughter can cope with such a craft, of course, with the help of her mother. On the front of the card, draw a father and daughter with felt-tip pens, who walk by the handle. Glue the buttons in place of the head. Let mom write congratulatory words from below, and inside - wishes from the baby.
- Volumetric card with a flower. A simple, but at the same time, a beautiful surprise from my daughter - a flower with wishes. It is done very simply. Multi-colored ribbons in the form of petals are glued to the cardboard base. A circle of fabric edged with braid is glued to the center. Leaves with wishes are attached between the petals. It remains to decorate the craft to your taste.
- Hearts with buttons. Glue a light-colored rectangle of a smaller size onto the base for the postcard to make a frame. Glue hearts cut out of colored paper on light paper, place smaller hearts in contrasting shades in the middle. Decorate the hearts with small buttons.
Older girls can fold an origami card. Find a master class or detailed instructions with step-by-step execution, and you will be able to make an amazing gift yourself, which will remain with your beloved daddy for a long memory.

From son
Boys usually cook with a male pattern, choosing cars, military equipment, tools, etc.
Options for postcards from my son:
- Scrapbooking technique. Such a card will delight the birthday man, because it looks like a professional work of a master. In fact, making a gift is not that difficult. Use materials that you can find at home: cardboard, paper, buttons, twine, ribbon, decorative clothespins, plastic and wooden trinkets. You can decorate the present with lace, ribbons, beads, old jewelry.
- Postcard with ties. Cut out rectangles of two colors of cardboard: one is slightly smaller to make a frame. Make a hanger out of the wire, on which you “hang” several multi-colored ties (cut them out of colored paper). Attach the hanger to a smaller rectangle, stick on the base. Write a congratulatory message at the bottom.
- Image from coffee beans. original postcards made using coffee beans. Draw any pattern on the cardboard (for example, a coffee-addicted father will like a cup of coffee). Glue the coffee beans in such a way that there is no blank space left in the picture. Glue a ribbon with a bow at the bottom, and write “Happy Birthday, Dad!” on top.
- Steampunk style. For the manufacture of unusual crafts use unnecessary incandescent bulbs, gears, various mechanisms and parts. With their help, you can lay out a unique, brutal drawing in the form of an airship, balloons, ships.
It is worth noting that men's style in homemade postcards, you can create using the image of various accessories:
- Vest watch;
- A tube;
- Hat;
- Classic ties and bow ties;
- Men's shirt or tuxedo;
- Pens, feathers.

Advice! Men appreciate gifts with meaning, so choose a specific story for crafts. Decor should also carry a semantic load. For example, a picture for a fisherman can be supplemented with reeds, mesh fabric, plastic floats.
What text to write?
Father's birthday is a good occasion to say once again how proud you are and respect him, love and appreciate him. Small children can write on a card: "Happy birthday to dad!", And that will be enough. Adult sons and daughters need to try to find the right words for congratulations and wishes to their beloved dad. This can be done in poetic form, preferably with the help of quatrains of your own composition. Also, the birthday man will be delighted with congratulatory prose if the words are written from the heart with the most sincere wishes.
What poems can be written on a postcard:
Dear daddy, dear,
The closest, dear!
Congratulations on your birthday
And I wish you inspiration.
Do not get sick, do not grow old, smile,
Never ever give up.
The whole family is behind you
Like behind a stone wall.
I wish you the best
Congratulations from the bottom of my heart!
Our dad is, of course, the best,
And success is always waiting for him,
honor and respect,
Daddy, happy birthday!
Daddy, on this day I wish you
Health and smiles, and all kinds of blessings.
I never, ever forget you
You are my protector, and let it be so all my life.
My birthday dear, I'm so proud of you
Since childhood, you are my best example and my main hero.
I'm sorry that I get offended at you, and sometimes I get angry,
I congratulate you, dear daddy!
Sincere respect, love and appreciation are much more important than expensive things. Let the card that you make yourself dad show how much you appreciate native person. Spend some of your time, inspiration and imagination to surprise and delight the birthday boy.
If you want to make a person happy, give gifts, and the best ones are given to loved ones. In this article we will look at: how to make a gift for dad from his daughter with his own hands.
You will need: black cardboard, scissors, felt-tip pens, segment knife, white cardboard, white sheet of paper, spray glue or glue stick, printer, cutting mat, silver gel pen.
Master Class

Book safe
You will need: book with a hard cover, pva glue, water, stationery knife, brush, simple pencil, ruler.
Master Class

You will need: deep cardboard box, disposable paper plates and cups, acrylic paint, pencil, ruler, tape, stationery knife, long wooden spatulas, 2 orange corks, red flat button, colored paper, felt-tip pens.
Master Class
- Close and seal the box with tape.
- Draw a silhouette of the doors with a pencil.
- Cut out the doors.

- Cut the windshield across the box.
- Bend the windshield forward and make a wide slot.
- Secure with tape.

- Make the seats by bending the back down.
- Color the car acrylic paint.
- Cut off the base of the paper cups and glue on the headlights. From the rest of the glasses make an exhaust pipe.

- Make a radiator grill with 6 spatulas.
- Make a sight glass separator from the seventh spatula.
- Make emergency lights out of traffic jams.

- Glue the wheels using plates.
- Draw logos with a felt-tip pen.

- Paste the interior with colored paper. It is better to use a brown color that resembles natural leather.
- Glue on a red button with a smiley face on it.
You will need: 2 rapan shells of different sizes, a small stone, large round shells, small spiral-shaped shells, glue gun, toothpicks, wooden skewers, varnish, thick cotton thread.
Master Class
- Apply glue to the stone and glue the larger rapana shell. The shell should not stagger, it should be firmly fixed on the stone.

- Glue a wooden skewer inside the smaller rapana shell. This will be the bow of the ship.
- Glue a skewer with a nose to the base of the sailboat.

- Glue 3 wooden skewers perpendicular to the base of the ship.
- Trim the first and third skewers so that they are just below the middle skewer.
- Glue large shells as sails with front side mast, and on the reverse side, glue the toothpicks, which will be as rails. Each mast should have 3 shells.

- Make ropes from cotton thread in this way: tie the thread to the back of the ship, then pull it over the top of the masts to the very bow, then pull the thread from bottom to top, winding it on the yardarms on each mast, and if the thread slips in some places, fix it with glue.

- Glue spiral shells to the tops of the masts.
- Cover the craft with varnish.
The shell ship is ready!
You will need: open cones (from 50 to 300 pieces), wire, glue gun or superglue, varnish.
Master Class

Tank in modular origami style
You will need: sheets of colored paper, scissors, 6 matchboxes, glue, a round blank for the base (for example: a perfume bottle).
Master Class
- Fold the modules according to this scheme. For the entire tank, 1408 modules will be needed.

- Assemble a circle of 24 pieces, then add 24 pieces to the second row of the circle and 24 pieces to the third row.
- Place 12 modules in the center.

- Make a total of 7 wheels this way - 6 for the tracks and one for the turret.
- Make the tank a caterpillar by preparing 204 modules - the width of the caterpillar is 6 modules, the length of the almost finished circumference of the caterpillar is 34 modules.
- Place 3 wheels on the almost finished circle of the track, then continue to finish it by adding 56 modules.
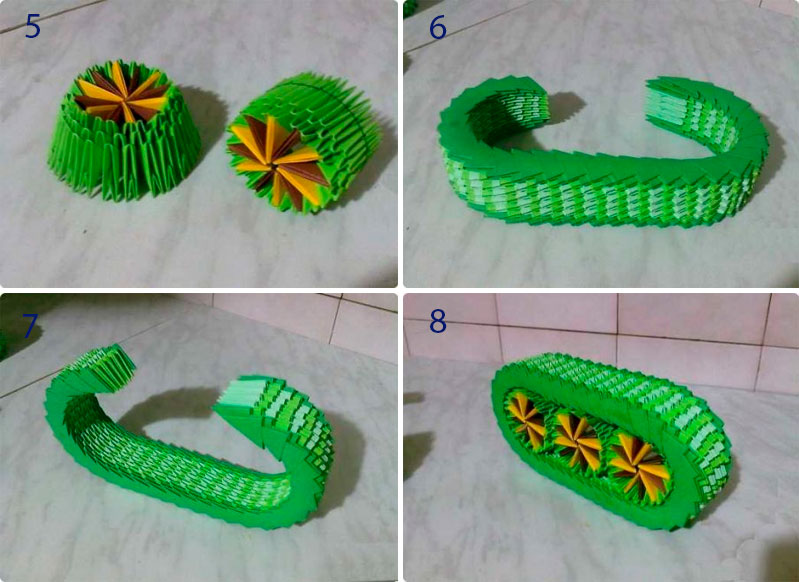
- Make the second caterpillar in the same way.
- Make a turret for the tank like this: make a hole in 4 matchboxes as shown in the picture and glue them together.
- Paste the base of the tower with colored paper.

- Insert a round blank into the hole and glue 2 matchboxes as tower stands.
- Assemble the front of the tank from 42 modules - 7 modules wide, 6 modules long.
- Assemble the back of the tank from 30 modules - 6 modules wide, 5 modules long.
- Glue the front and back to the base of the tower.
- Glue on the caterpillars.
- Take the seventh wheel and add 192 modules - 24 in length and 8 in width. Don't forget to leave a hole for the cannon.

- Assemble a cannon from 36 modules - 3 modules wide, 12 modules long.
- Glue the cannon to the tower.
- Attach the tower to the base, it can rotate.
Postcard "Shirt with tie"
You will need: A4 color cardboard, scissors, ruler, glue, felt-tip pens, a simple pencil, decoration elements (buttons, sequins, threads).
Master Class
creative indoor flower
You will need: pot, styrofoam, skewers, artificial grass, glue gun, candy bars, chewing gum, gift cards, etc…
Master Class

creative indoor flower ready!
coffee mug
You will need: mug, coffee beans, cotton pads, thick white thread, acrylic paint Brown, Super glue.
Master Class

coffee heart
You will need: coffee beans, paper, wire, thread, glue, cardboard, jute thread, sponge, iron can, brown paint, ice cream sticks, decoration elements - flowers, ribbons ...
Master Class
- Fold a piece of paper in half and draw a half heart, then cut it out.
- Circle the heart on the cardboard and cut it out in 2 copies.
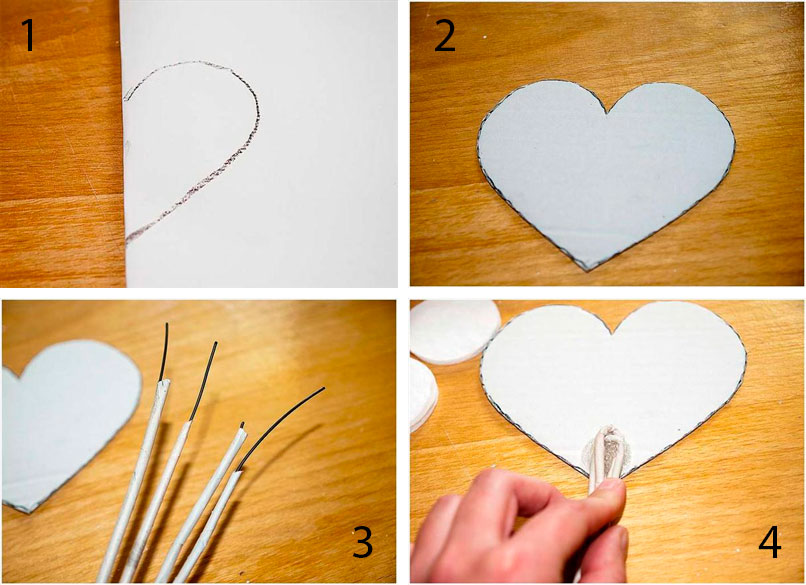
- Wrap 2 pieces of wire in paper and glue to one heart. Repeat this process for the second heart.
- Glue cotton pads in several layers between the hearts to make the design voluminous.

- Paste cotton pads whole heart and wrap with a thick thread.
- Color the heart.
- Glue the coffee beans in 2 layers.

- Cover the jar with ice cream sticks.
- Wrap the wires with jute thread.

- Paste a coffee tree in a sponge, then place in a pot.
- Decorate to your liking.
The coffee heart is ready!
You will need: shells of the desired size, cardboard, scissors, a glue gun, a simple pencil, an awl or a hole punch, twine or rope, sesal, burlap, decoration elements as desired - beads, beads, starfish ...
Master Class
- Draw a heart on the cardboard.
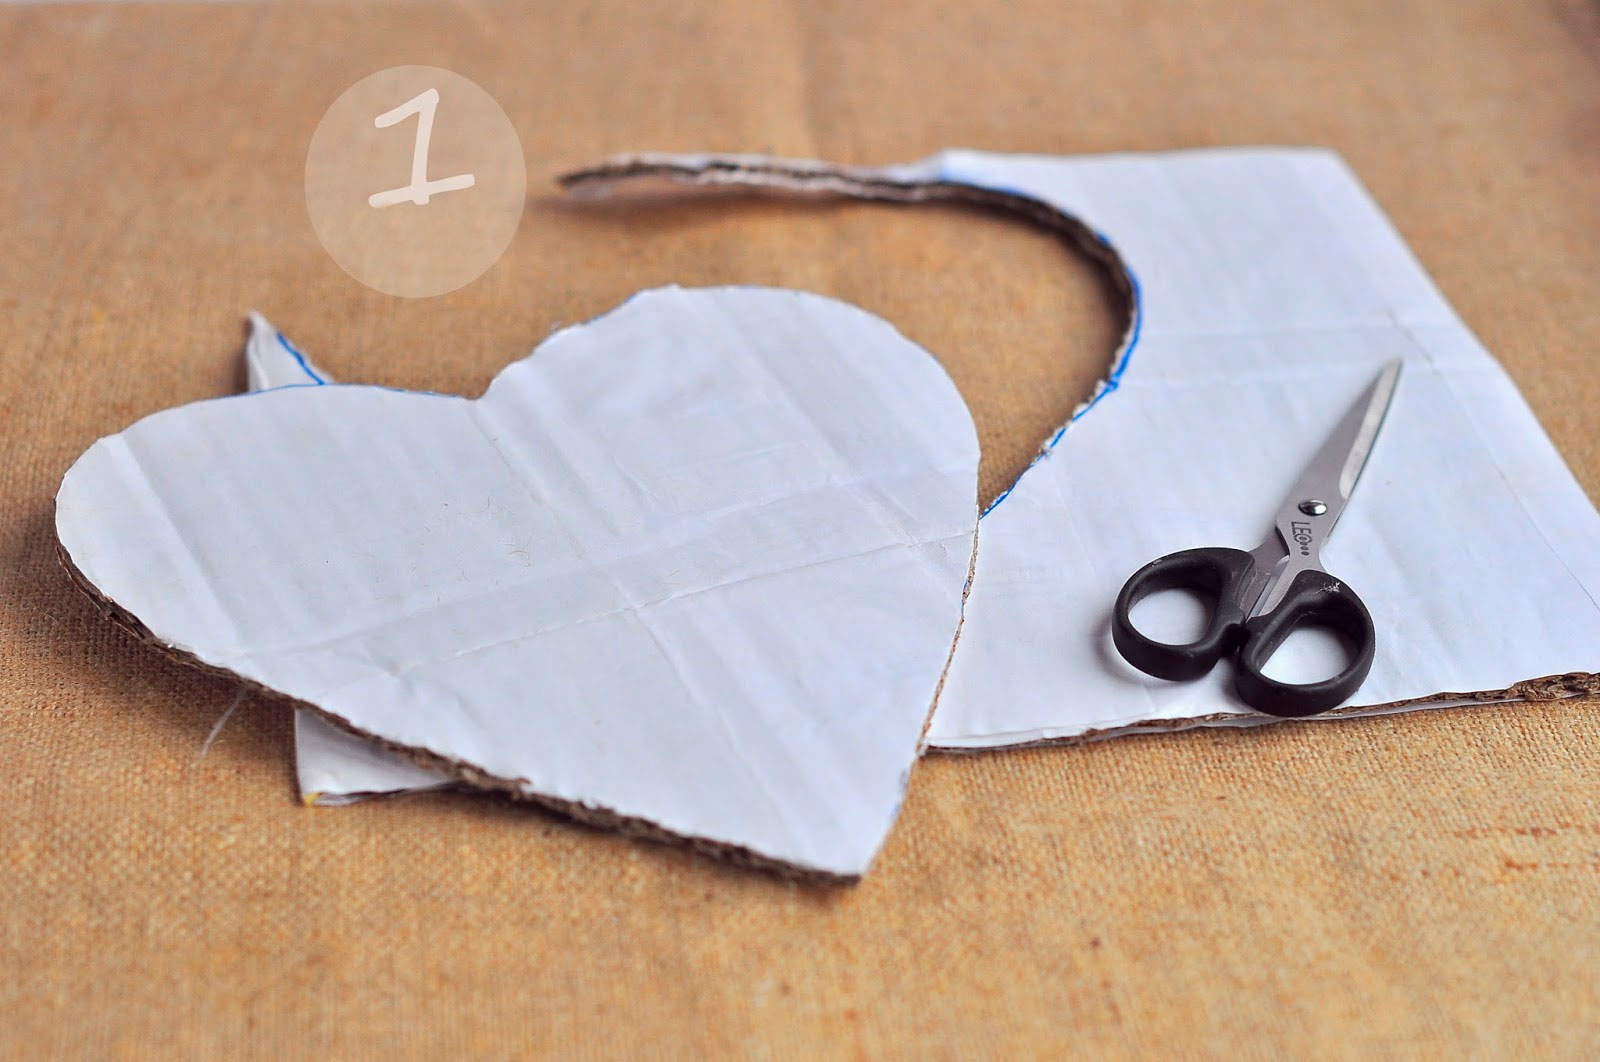
- Cut it out.

- Make 2 holes for hanging using a hole punch or an awl.
Do you know that a handmade postcard can be an original and welcome addition to a gift for dad?
This will require very simple materials, which are sure to be found in every home and quite a bit of time. The main thing is to show your imagination and have a great desire to please dad!
In addition, you will need materials and tools such as:
- colored paper;
- colored and white cardboard;
- glue;
- acrylic paint;
- scissors;
- Double-sided tape;
- buttons - 3 pcs.
For the base of the postcard, you need a sheet of cardboard, preferably white, but if there is none, you need to choose the lightest shade.

The middle of the card will be voluminous! To do this, from colored paper, in the middle of the postcard, with the help of a glue stick, a sheet of a smaller size is glued.

The shade of the sheet used can be chosen to your taste. Leave the product to dry for a few minutes!
Meanwhile, the middle of the postcard is made from colored paper of a different shade. The sheet of paper must be folded in half.

Apply on the side of the fold, lines along which cuts will be made in the future.

As a result, you get such a blank, which will be located in the middle of the postcard.

Using a glue stick, you need to glue the workpiece in the right place, that is, inside the craft. When applying glue to the surface of the sheet, do not treat the walls of the “cubes” with glue, they must remain unglued! It should turn out like this.


Now it must be left until the glue dries completely. It is better if it is in this case in expanded form.
After, on the cover, stepping back a little from the edge, draw a square with acrylic paint.

Then, supplement it with such "lines". By the way, if you have a sewing machine, then you can make these lines with it. This will be a small piece of a shirt.

After the "shirt" is ready, it is worth starting to make a butterfly. A blank for a butterfly is cut out of colored paper.

The shade of this element of the postcard can be chosen at your discretion! Further, folding the blank and fixing it with glue, you get such a butterfly.

It must be attached to the cover using double-sided tape. You can put white dots on the butterfly, it will look great!

After the butterfly is fixed, three buttons must be attached in the same way.

On the "shirt", you need to place white dots.
Then, it is necessary to cut out thin strips from colored paper, which decorate the craft and give it a finished look.


After, attach with double-sided tape, such an inscription - to the Pope.

Now there are only a few finishing touches in the middle of the postcard ... From wrapping paper wide strips are cut out, and then they are glued to the walls of the "boxes".


And on top of the stack of "boxes", on double-sided tape, a small bow is glued.
That's all, the card for dad is ready!

The final look of the craft. Photo 1.

The final look of the craft. Photo 2.

The final look of the craft. Photo 3.
Dad will surely appreciate your efforts and the time spent on making crafts. In addition, such a wonderful addition to the gift will be very original and exclusive!

The final look of the craft. Photo 4.