Postcard to the newlyweds do-it-yourself templates. We make original wedding cards with our own hands. Photo gallery - do-it-yourself wedding card
- black cardstock;
- scrapbooking paper - black background, white pattern;
- scrapbooking paper - White background, black drawing;
- a stamp for creating an imprint depicting figurines of the bride and groom;
- embossing ink;
- acrylic block;
- antistatic pad;
- white embossing powder;
- heat source (ideally an embossing hair dryer);
- decorations - flowers of white, gray and black colors;
- stickers - red heart;
- liquid pearl;
- tracing paper for scrapbooking;
- double sided tape.
Have you decided to make a card for the newlyweds with your own hands? Do not hesitate - this wonderful little thing will be treasured by the newlyweds, because such gifts are valued much more than bought ones. Moreover, a scrapbooking postcard is an incredibly beautiful product that will surprise everyone around with its uniqueness and originality.
We suggest moving away from the white-pink-muslin stereotypes of the wedding theme. If you like the charm and elegance of contrasts, let's start making a stylish black and white card for modern newlyweds. So, how to make an original scrapbooking wedding card?
We will create our wedding scrapbooking card using the embossing technique. The little tricks of this technique are described in detail in a post published on our website earlier: do-it-yourself wedding invitations. Therefore, in this master class, we will not dwell too much on all the intricacies of embossing.
Step by step description with photo
So, let's get down to the incredibly exciting creative process.
Step 1: select materials
It is better to prepare in advance, to collect everything you need so that the search for the right element for work does not spoil the mood.

Step 2: the base of the postcard
The first thing to do is to decide on the desired size and shape. This step is up to you.

Step 3: embossing the postcard
Antistatic treatment
We process the surface of the base for the postcard with an antistatic pad (Photo 1) . This is necessary for the powder to adhere. exclusively in place of the impression.

impression
We take a stamp, attach it to an acrylic block and, dipping it in ink, put the stamp on the cardstock.
Powder
Without waiting for the ink to dry, quickly sprinkle the print with embossing powder (Photo 2) . Pour the rest of the powder back into the container intended for it. (Photo 3) . The right amount of powder is already in place (Photo 4) .
hair dryer
Now you can start heating the cardstock sheet with powder with a hair dryer. Let the hair dryer warm up a little and only then bring it to reverse side of the cardboard. Instead of a hair dryer, you can use an electric hotplate as a heat source. The optimal distance of the heat source from the paper is 5-8 cm. Quite quickly, the powder will begin to melt, forming a convex pattern. The pattern is ready!
Step 4: cardstock + scrap paper
From scrap paper, cut out rectangular pieces larger than the cardstock. We stick to each other with double-sided tape. At the same time, we place them at an angle relative to each other.

Step 5: tracing paper
We decorate the card with a special tracing paper for scrapbooking.

Glue a strip of tracing paper with adhesive tape to the back of the cardstock.

Preparing for a wedding is no less exciting event than the wedding itself. To make the event memorable, extraordinary and stylish, you need to think through everything to the smallest detail, including preparatory activities. There are some details that you need to think about first of all, which often set the tone for the whole event, and subsequently remind you of the happiest day of your life. These are, of course, wedding cards, congratulatory and invitation cards.
In order to amaze and impress with such a thing as a postcard, you need to make it with your own hands, make the thing exclusive and beautiful. Using our tips and scrapbooking techniques, you can easily make a scrapbooking wedding card, as well as delicate Provence-style wedding invitations.
We like to impress, surprise and surprise. With an invitation card, guests will get their first impression of the upcoming event, so it must be unique. The same can be said about a gift card. After all, we want such a gift not to be forgotten the next day and not thrown into the wastebasket, but admired and kept for a long time.
As an example and for inspiration, you need to study the master classes, but do everything in your own way. You don't have to be a designer to do this, the main thing is the desire to create.
How to make wedding invitations
The main condition is that the wedding invitations reflect your personality and your tastes. We are accustomed to perceive the wedding ceremony in delicate pastel colors, in openwork decorations and in a sea of white flowers. But in fact, a wedding may differ from the generally accepted perception. The main thing, having taken the wedding invitation in hand, guests should understand in what style the holiday will be held, in what color, with what features.
 Unusual wedding invitation for family and friends
Any master class will step by step show the version of a particular product. We will tell you about the main criteria for creating a wedding invitation, so that you can show your imagination and create your own unique masterpiece.
Necessary preparations
In creating a wedding invitation, every detail is important: paper quality, colors, format, accessories, content, font, and so on.
The materials we need:
- scrap paper and designer cardboard;
- scissors, pencil, glue, double-sided tape;
- figured hole punch;
- stamps, stencils;
- various decorative ornaments;
- artificial flowers, herbariums;
- braid, piping, ribbons, lace, bird figurines.
Tips for buying the necessary materials and tools, everything you need for beginners.
It will be beneficial to use scrapbooking techniques such as stamping, layering and texture in the work. Using a figured hole punch to add texture and originality to the future product.
Three types of wedding invitation cards.
Subject
If the wedding style is already defined, try to transfer it to paper.
For example:
- In the classic version, soft delicate colors are usually used: white, pink, blue, peach, vanilla, turquoise, beige. From the decor, silk and satin ribbons, lace, delicate flower buds, hearts of various configurations, rings, beads and pearls are ideal. Embossing, monograms and wedding pictures will look great. For the main inscription "On the wedding day" use a stamp or a ready-made chipboard. The font of the text should be thin and elegant. Ideally, if the card will be in harmony with the bride's dress, repeating lace or pattern elements.
- Nautical style involves the use of brighter colors, especially if the ceremony will take place on the beach. In this case, you can use shells, anchors, red and blue stripes, stamps, stamps, tropical motifs in the form of palm trees, sun and sea.
- An invitation in a comic style will look very original. Use cartoon images, drawn silhouettes, doll clothes, buttons, ruffles, fun fonts, joke phrases, or fun information about the newlyweds.
- The vintage style uses the effect of aged paper, ink, gold, old letters, sealing wax, braid, ropes, dried flowers.
- If the wedding is of a certain direction, such as oriental, Indian or rock style, try to use the main elements and colors of these directions. If it's rock, then use shades of black, red, blue, records, discs, metal, silver. If you choose East style, you will need sandalwood, cinnamon and anise sticks, lotus flowers and orchids, sparkles, rhinestones and ribbons.
Thematic invitations


Don't be afraid to experiment and you'll end up with an original scrapbooking card in your own style.
Format
Invitations can be in different formats:
- unilateral or bilateral;
- from two parts and fastened together;
- square or round;
- in the form of a box;
- in the form of a scroll;
- in the form of silhouettes;
- with sliding elements;
- in the form of a photograph;
- in the form of a leaflet or a plane ticket.
Master - a class on creating an invitation in the form of a scroll.
It is important that the paper is of high quality and thick. This will give a representative invitation.
Text
 Invitation card for friends will be remembered for its originality
If desired, you can supplement the invitation with a verse or a brief history love. For example, when the couple met, the meeting place, how long they have been together and that everything finally ends with a wedding. Decorate in a comic form or in pictures. You can write a holiday plan in a cheerful tone or scheme. It all depends on the nature of the event.
In the end, the invitation will turn out to be voluminous, so it is better to arrange it in an envelope, even if you hand this invitation to the guest in person, and not send it by mail.
 Invitation cards in an envelope look beautiful and intriguing
Master class how to make a wedding card
Postcards - universal gift for any celebration. Making postcards with your own hands is not difficult. All necessary materials and work requirements repeat the scrapbooking invitation card master class.
An example of a postcard design with retractable elements.
Making a wedding card with your own hands.
In order for a scrapbooking wedding card to be remembered for the bride and groom, and kept in their family album, it must be original and interesting.
If you already know the theme of the wedding, then it is preferable to make a postcard according to this style.
Cooking step by step
What we can use in our work:
- Lace, bows, ribbons, flowers.
- Embossed paper, scrap paper in different colors.
- Pearls, beads, rhinestones, sequins.
- Bradtsy, paper clips, harnesses.
- Openwork napkins, shreds of fabric.
- Stencils, heart templates, stamps.
It is not necessary to use everything at once, the main thing is a harmonious combination of all the details so that there are not too many of them, at the same time enough to delight the recipient.
Manufacturing highlights
Layering is one of the main techniques of scrapbooking and it will find the best use in a wedding card.
To create volume, you need to take a postcard blank, then stick a substrate of a different texture and size. You can make a frame, it can be with ready-made openwork edges or cut out with a figured hole punch. Then follows the main element of the composition. It can be a big heart or a little smaller, it can be a wedding picture or drawing, or it will be a composition of a bouquet of flowers and figurines of doves. Then you can add lace, pearls and other decor of your choice. Lettering and main elements can be lifted with adhesive 3D pads. A variety of patterns, curls, wings, and more can be completed by hand or using stamps.
Master - a class on creating a three-dimensional postcard.
Based on the master class, come up with your composition, think over and try on every detail, then you can already glue, sew or fasten everything.
The inner page can also be decorated with patterns, curly stickers. Write the text of congratulations on tracing paper, then glue or fix with corners.
What else can be used in a postcard:
- You can use doll clothes, pieces of cloth, openwork napkins to depict the outfits of the bride and groom.
 The original postcard will complement the album of the newlyweds
- A two-part scrapbooking card, fastened together, will look original. Basic slightly bigger size, the second smaller size with a wish.
 An interesting option for congratulations with a glued pocket for money
will also a good gift scrapbooking wedding anniversary card. Such a gift will resurrect sentimental memories of the wedding day and will undoubtedly be appreciated.
Master - a class on creating a postcard in the form of a box.
french provence wedding invitation
Romanticism, simplicity and sophistication are the main components of the Provence style. And, of course, invitations in the Provence style will undoubtedly delight and amaze guests with their grace and taste.
 Gentle and romantic version of a postcard in the style of Provence
The lavender trace, as the main motif of this style, must be present in the invitation - in color, in smell, in drawings, or you can put the lavender flower itself.
Provence style invitations must meet the following criteria:
- colors and shades of lavender;
- delicate pastel colors and smooth lines;
- minimalism and simplicity (without glamorous, bright and unnecessary details);
- wicker details, straws;
- lace accessories, floral ornament;
- decorative elements with the effect of antiquity;
- calligraphic font.
We make a card in the style of Provence.
The master class shows the main points of manufacture, now all you need is a creative impulse, a bit of imagination and your Provencal invitation card can delight and surprise your guests.
Any celebration begins to prepare for it. The list of preparatory processes also includes the acquisition or creation of invitations from those who organize the holiday and business cards for those who come to this celebration. Consider how to make wedding day cards yourself.
Although there is less trouble with purchased greeting cards, hand-made invitation or greeting cards will pleasantly surprise everyone. In creating a postcard, a person will invest his talent, a piece of warmth. Therefore, such invitations will delight future guests, and do-it-yourself wedding cards will pleasantly surprise the newlyweds.

What you need to create greeting cards
- Several sheets of cardboard (patterned or plain).
- Some beautiful artificial flower (preferably a few).
- A sheet of paper of any color.
- Ribbon for a bow.
- Glue.
- Needle, thread.
- Bead.
- Clip.
- Lace.
- Scissors.
The process of creating wedding cards
From a cardboard sheet, you need to cut one and a half centimeters from one edge, the rest must be divided in half. This narrow cut off strip will still be useful to us, so we do not throw it away. Now we take colored paper and cut out several rectangles from it. Their edges must be trimmed with curly scissors. As a result, we get interesting figures.
From the ribbon you need to fold a bow. One end of the tape must be left longer. You can make a design with a simple paper clip. Making such a masterpiece with your own hands is much more pleasant than just buying a ready-made greeting card in a store. Next, we attach an artificial flower to the bow using a regular thread. Sew a bead in the center of the flower.
From another artificial flower cut off a few petals and glue them to our flower. So you can make the main flower more lush and beautiful. The names of the bride and groom can be printed on a white sheet of paper. If you have a beautiful calligraphic handwriting, then you can write the names with your own hands. Now the names need to be cut out of the sheet in the form of a small narrow strip. The edges of the strip can also be curly. Paste the names in the empty space.
Glue lace on the prepared part of colored paper. Now you need to write or print congratulatory words and place them on the inside of the postcard. It is better to come up with congratulations on your own, but if nothing beautiful comes to your mind, then find the most original congratulatory verse or beautiful wish happy wedding.
The main part of the card is the outer side. It is she who must be treated most responsibly. For gluing, use only high-quality glue so that the wedding cards do not fall apart while you give them. We take the remaining strip of paper that remains from the first stage of preparation, and glue it a little below the center of the leaflet. We paste our flower with a bow on it, on top of this beauty we place a strip with the names of the bride and groom.
Everything - congratulatory is ready. In the same way, you can make do-it-yourself wedding anniversary cards. Or apply this technology to make invitation cards for guests. But if there are a lot of guests at the wedding, then it will be difficult to make so many cards. Therefore, it is better to buy ready-made beautiful invitations and enter the names of the guests in them.
Creating a greeting card using the quilling technique

The main advantage of this technique for creating postcards is that both flat and voluminous greeting cards can be made in this way. The process of creating postcards using this method is quite simple and calms the nerves well. Therefore, if the bride has all important matters resolved before the wedding and has a lot of free time, then she may well occupy herself with creating beautiful and original invitation cards.
Handmade quilling wedding anniversary cards will be an original additional gift for newlyweds. Such a congratulatory card will look expensive, elegant and will be a great addition to your main gift. Moreover, to create such a product you do not need special skills, special materials or a lot of experience.
In most cases, you can get by with plain A4 white cardboard, PVA glue, scissors (regular and curly), tape, a hole punch, a ruler, origami paper, and a pencil. Depending on the model of the postcard, some more rhinestones and special quilling tools may be required.
A wedding celebration is an event that everyone is looking forward to: the newlyweds themselves, their relatives and friends. Relatives of the newlyweds, as a rule, spend a lot of time choosing a gift, a festive bouquet and postcards where they write wishes to the newlyweds. Not a single congratulation is complete without the last little thing, and therefore the invited people must go in search of it to specialized stores. An alternative to this is making an original postcard with your own hands. Let's figure out how to make a greeting card yourself.
How to make a beautiful wedding card with your own hands?
If you decide to make a postcard for the newlyweds with your own hands, there is no doubt that it will be cherished by the newlyweds, because such gifts are valued much more than bought ones. Thick paper or cardboard is used as its basis, decorated using a variety of techniques - scrapbooking, quilling. Decorate a wedding card with rhinestones, beads, ribbons, lace, dry or artificial flowers, drawings, patterns. The master classes below will help you create an original product that will appeal to the heroes of the occasion.

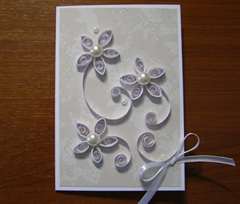
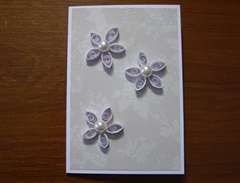
Greeting card in quilling technique
Quilling or "paper rolling" is a technique used in many areas of needlework. Craftsmen create greeting cards by folding and twisting narrow strips of paper. They also make photo frames, albums, jewelry, paintings. Thanks to a large selection of paper in different colors and weights, you can easily find materials that are ideal for decorating a wedding card.
Necessary materials
- A sheet of thick white paper (or other light shade).
- Sheets of thin paper that will be needed to roll the rolls. You can use special quilling kits, which include the original material, already cut into thin strips. In this case, the process of making postcards will go much faster.
- Scrapbooking paper with patterns or patterns matching the color.
- Satin ribbons.
- Beads, pre-cut into halves.
- Pencil.
- Scissors.
- Ruler.
- Stationery or other knife.
- Paper rolling tool. This part can be replaced by toothpicks, matches, empty refills of ballpoint pens.
Stages of creation


Happy wedding day card using scrapbooking technique
Greeting cards made using the scrapbooking technique are cute, airy and touching. Such postcards can be minimalistic, using only two or three colors and a small number of decorative elements. It is extremely important for scrapbooking to correctly combine shades, patterns and designs on scrap paper in order to ready product it didn't turn out too sloppy. The harmonious selection of details of such a postcard guarantees its magnificent appearance.
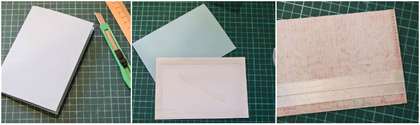
Necessary materials
- Thick paper or a sheet of cardboard (A4 format).
- Two sheets of scrapbooking paper in matching colors.
- Stationery knife.
- Scissors (curly ones can be used for edges).
- Ruler.
- Double sided tape.
- Glue.
- Lace.
- White satin ribbon.
- Decorative "bouquet", which must first be made independently or purchased at a specialized store.
- A small printout that says "Happy Wedding Day!"
- Half of pearl beads.
Stages of creation


Postcard in the form of an envelope for money
An excellent gift for newly-married spouses is money. Newlyweds have enough expenses in the beginning family life. There are many options for cash wedding envelopes on the counters of souvenir shops, but it is even better to make such a little thing with your own hands. In addition to the gift amount, guests can put a card with congratulations there. Let's see how to make wedding envelope using scrap paper, satin ribbons and other beautiful decorative elements.
Necessary materials
- Double-sided scrapbooking paper with matching pattern.
- Creasing tool.
- Carpet, cutter.
- Satin ribbon (Organza ribbon is fine).
- Border hole punch (stationery knife).
- Glue.
- Double sided tape.
- Decorations.
Stages of creation


DIY wedding card ideas
When making a wedding card on your own, you can safely experiment with the shape, size, and color scheme. The main thing is that all elements of the greeting card look appropriate and harmoniously combined with each other. Rectangular, square, round postcards, products in the form of a heart or two doves look good. Check out some photos below interesting ideas for wedding cards.
In the form of a dress for the bride and groom
Decorating your wedding greeting card with the outfits of the bride and groom is a cool and unusual idea that the newlyweds will definitely like. For the manufacture of such a product, paper, satin, lace, chiffon fabrics, various beads, decorative flowers, quilling rolls can be used. Two gold rings will look good.

in the shape of a heart
The heart shape is perfect for making a wedding card. This is a symbol of sincere love between spouses. A greeting card can be created in the form of a heart, decorated with one or more of these elements. This version of the card will look good in red or any other color that suits the theme of the celebration.

Bouquet of flowers
Delicate flowers are the perfect solution for decorating a wedding card. It can be a small bouquet, as in the master class above, or a real "flower meadow". As decorative elements, you can use natural dried flowers, artificial plants, paper elements, flowers from polymer clay, fabric or plastic.

Video: a master class on making wedding cards
Creating a wedding card for the newlyweds is an exciting process that will bring pleasure to the donor, and subsequently - pleasant emotions to the newlyweds. To make a truly beautiful greeting card and not miss anything, watch the video tutorial below with detailed step by step instructions. The hosts will help you create an elegant beige and snow-white card, using thick paper for the base, elegant lace, satin hearts for decoration, voluminous butterfly, painted with golden paint, a ribbon and a small piece of paper with an inscription.
Do-it-yourself wedding cards will certainly stand out among all those presented. The newlyweds will be struck by home-made ones, which are distinguished by their elegant shape, bright coloring and scale. They can be made voluminous, they capture the whole story. Of course, such a masterpiece will require a lot of time, skill and skill.
Greeting Cards may include not only nicer words or quatrains, but also a way of giving money. For this, a separate pocket is glued. Tickets or certificates will also look good in addition to the postcard. A postcard can be made in standard sizes or large-sized, in which you can put a pleasant surprise.

The video shows the current options for decorating cards for newlyweds
Postcards for guests
Not only guests can please with their imagination, but also the heroes of the occasion. First of all, they offer their guests to get acquainted with the wedding theme with the help of homemade invitations. In order to quickly and efficiently make invitations, many newlyweds use standard templates that allow you to save time on creating text at times.
To make creating stylish and interesting invitations a joy, you can invite your spouse or girlfriends to help. It will be difficult for a single bride to make 50 or more cards. Working together only brings people together.
Today, it is easy to find interesting options. And not only photos are presented for public viewing, but also video from detailed description all work. Therefore, creating unforgettable invitation cards will not be difficult, you just need to decide in which topic it will be done.

Video on creating wedding invitations
Current mastery options
Master class on creating a greeting card using the quilling technique.

To make a congratulation with your own hands, you need to purchase:
- a white sheet of thick paper;
- satin ribbon;
- thin paper for making rolls (quilling kit);
- scissors;
– colored paper for scrapbooking;
- pencil;
- sequins;
- ruler;
- stationery knife;
- a tool for quilling (toothpick, pen rod).


A technique such as scrapbooking has become very popular today. Greeting cards look unusually tender. In this case, you can use several shades and a minimum of decorations. The main rule when creating scrapbooking is a competent ratio of colors and patterns. Do not use a lot of elements, it will look too sloppy.
When making an interesting postcard, you should prepare:
- cardboard A4;
- 2 scrapbooking sheets of the same shades;
- Double-sided tape;
- stationery knife;
- curly scissors;
- white lace;
- light-colored satin ribbon;
- sticker "Happy wedding day";
- ruler;
- artificial bouquet;
- small beads
Progress:
- To make the basis of a future postcard, you need to fold the sheet in half. Using scissors, cut off the excess, leaving a blank of 10:15 cm.
- Cut out a similar shape from scrap paper, stick it to the sheet with double-sided tape.
- Having determined the center of the postcard, stick adhesive tape at the bottom. Stick 2 thin ribbons on it so that the edges hang down a little. They must be processed with a lighter so that the threads do not crumble.
- Above the tape, you need to apply a little glue, attach lace. When the glue dries, glue on the beads.
- Cardboard needs to be cut nicely.
- A small sheet is cut out of colored scrap paper, more than a blank. The edges should be similar to the edges of the workpiece itself. Tape connects two elements.
- Scrap paper is glued onto the top of the postcard with adhesive tape. The shapes of the edges must be made the same as for the inscription blank. Blanks are placed above the lace, on the right side of the product.
- The decorated bouquet is attached with glue so that it does not cover part of the text and does not protrude beyond the edges.
- Complete with beads. A beautiful postcard is ready.


Unusual cards for newlyweds
most desired and perfect gift for a newly-made family - an envelope with money. Many prefer not to complicate their task by buying a regular gift card. However, it will be more pleasant for young people to receive maybe a modest, but home-made, made from pure heart. A postcard or an envelope is created within an hour, maybe less. It is enough to comply with the parameters set by the experts. In addition to money, you can put a card with congratulations and warm wishes in a gift envelope.
To make a wedding envelope you will need:
- paper on which the necessary drawing is located on both sides;
– a special tool for creasing;
- satin ribbon;
- lined rug;
- stationery knife;
- jewelry in the form of rhinestones or sequins.
Progress:
- Put a colored sheet of scrap paper on a special mat. A 28 square is cut out: 28cm. Cut diagonally across the floor.
- Folds for creasing must be smeared with glue.
- Stick 2 strips of double-sided tape about 0.6 cm.
- At the base of the envelope, you need to bend the line. Stick tape.
- The sides of the envelope are bent, the base and the top line are fixed.
- A 50 cm ribbon is glued to the adhesive tape, which adorns the envelope in front and behind.
- By using openwork paper the envelope is decorated at your discretion (hearts, flowers, butterflies).
- The envelope for money is ready. You need to make a small insert 17:7 cm. Write good wishes.
Handmade photo of a gift envelope.

Video tutorials on making a money envelope for young people