Knitted plaid crochet knitting patterns and description. Bedspreads crocheted. Crochet blankets: you can do it! Crochet bedspread "Flower romance"
Craftswomen decide to crochet a plaid not at all because of saving money, but because manual work allows you to create high-quality and original things.
Such products are able not only to please the eye, but for many years to serve faithfully to their owners in everyday life. In addition, handmade gives the right to claim the title of a real exclusive, which you will not find in any store.
When choosing a pattern and description of crochet blankets, you should consider what season the finished product will be for, how it will fit into the interior. After all, modern handmade bedspreads are so chic that you don’t want to hide them in the far corner from prying eyes. Moreover, some models are specially purchased to decorate the house and designate the style of its design. As a rule, they cost a pretty penny, although why spend that kind of money if you can crochet a blanket yourself by creating a real one.
wool blanket for winter
Currently very popular volumetric wool blankets crocheted or knitted, for the manufacture of which the thickest yarn from 100% merino is chosen. Such products are very warm, soft and not at all heavy, despite their impressive dimensions. It is noteworthy that they can serve as an elegant bedspread. As an illustrative example, modern photo studios can be cited, in which such accessories are often found, serving as a substrate for couples in love being filmed or even for newborn babies.

Knitting such a blanket is so simple that, if desired, even the most inexperienced needlewoman can cope with the task. The speed of the process of making a bedspread from the thickest yarn will also please, because if you fill your hand, you can manage it in one day.
Despite this, the cost of such handmade is very high, so favorite hobby it is quite possible to turn it into a profitable business, successfully combining business with pleasure.
Light bedspreads with a fantasy pattern
What could be better than cool spring and summer evenings, which you can meet on the veranda, sitting in a cozy rocking chair, wrapped in a light, like a cloud, blanket. Meanwhile, such a blanket can be made with your own hands, using the simplest diagrams and descriptions. Yes, they are very beautiful openwork plaids, consisting of many identical elements, crocheted in the likeness of napkins. For this you need:
- Choose a pattern of patterns of the same size.
- Use a contrasting thread, fixing it on the wrong side of the element.
- Steam knitted blanks.
- Connect them together with air chains.
These elements may show the same or different patterns, drawings and ornaments, the main thing is that they have the same size, otherwise it will be difficult to combine them into a common canvas. This is how, for example, colorful summer blankets with a floral pattern look.

It is easiest to crochet such simple flowers using this scheme.

If you want something more original and unusual, then you can try to knit a 3D plaid, which will be decorated with three-dimensional flowers. The principle of manufacturing such bedspreads, which have been fashion trend, differs little from previous model. Indeed, in this case, it is also necessary to crochet many individual elements, which are then connected together.
At the same time, the result will be completely different, since the 3D knitted blankets outwardly resemble a real flower meadow and it is really very difficult to take your eyes off such beauty.

Such roses are knitted in a spiral. If a novice craftswoman cannot understand how this is done, then such an easy-to-use scheme.

Alternatively, you can make a real composition from multi-colored crocheted elements using the principle of a kind of mosaic. Such blankets look amazing, they will look especially appropriate in an interior decorated in a gentle Provence or Shabby chic style.

If you look closely, it becomes obvious that a master class for making such a summer bedspread involves performing the simplest manipulations, because all the elements in the presented canvas are exactly the same, only their color is different.
Minor difficulties may arise when combining multi-colored motifs into a single canvas, but in order to avoid confusion, it is recommended to lay them out on a horizontal surface according to the scheme and only then proceed to combine them.
Beach mats
The so-called cruise bedspreads can be used not only at home, but also on the beach, because it is a very practical thing, which in the vast majority of cases adequately survives the test of water, sand and sun. There are many options for such bedding, but the most popular of them are striped models that combine all the colors of the sea.
 Beyond direct horizontal stripes, you can knit zigzags that look even more original.

Such products are most often knitted with single crochet or single crochet, although for a zigzag beach coverlet, it is best to use this simple pattern:

Knitting on it is much faster, and if you add one crochet to the posts, you can, in addition to everything else, save threads. In addition, you can knit beach rugs in a spiral, making your own model, which has been a real hit for the third summer in a row.

Thick synthetic yarn is ideal for this model. In addition to a bright watermelon, you can knit any other gifts of summer, be it bright strawberries or juicy kiwis and oranges.
Children's models
Especially popular recently are elegant children's blankets, because they are used instead of envelopes when a newly-made mother with a baby is discharged from a maternity hospital. At the same time, crocheted plaid patterns for a newborn are striking in their diversity and their choice, as a rule, depends not only on the sex of the child, but also on the main purpose of the bedspread.
So, for discharge, monochromatic snow-white bedspreads are most often used, which can be openwork if it is warm outside, and also very dense (relevant for winter childbirth). In the latter case, a plain padding lining is attached to the blanket, which is hidden under the knitted fabric (it can be purchased separately).

There is nothing complicated in making thick winter envelopes-envelopes of small size, as they are knitted with single crochets, which cannot be said about lace bedspreads. Nevertheless, it is not difficult to find a simple and understandable diagram and description. baby blanket crochet, on which it will be possible to make both the main fabric and the openwork edge.
An older baby can be pleased with a blanket with some kind of pattern. An example is a blanket with a three-dimensional image of a bear, which is equally popular with both boys and girls.

It is not difficult to knit such an animal on a children's blanket and experienced craftswomen can sketch detailed diagram to make it in just a few minutes.

As can be seen from the above figure, the body of the bear cub is knitted in a circle, like an ordinary napkin, although all other elements of its body (head, paws, ears, etc.) can be knitted in the same way, combining them at the end of the work process into a single composition.
Materials and decor
Having decided on the model of the plaid and its scheme, the novice craftswoman will have to choose the optimal materials for the implementation of her own idea into reality. And in this matter it is important to be guided not only by aesthetic views, but also by practical considerations. And in order not to get lost among all the abundance that can be found in needlework stores, and make right choice, it is recommended to use the following tips:
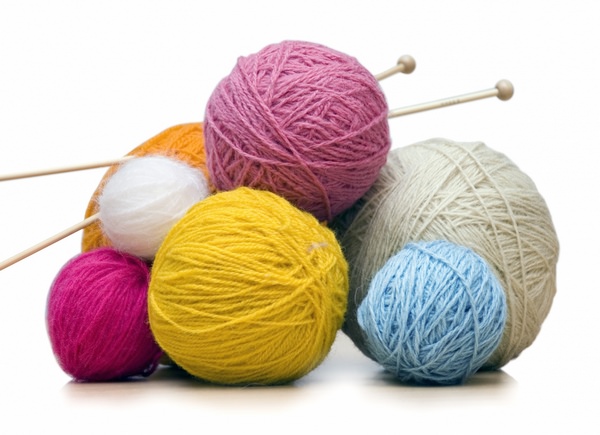
- For a winter bedspread, thick natural wool is suitable, while for summer version ordinary cotton or iris with its pearly sheen will do.
- Beach mats best made from coarse synthetic fiber or compressed bamboo, which is highly resistant to wear.
- When choosing multi-colored threads to create patterns, it is important to ensure that they all have the same thickness and composition, otherwise the finished product will turn out to be uneven and caring for it will turn into real torture.
- The hook must match the thickness of the yarn, as too small a tool will make the fabric too dense and rough, and a large one will make it loose and shapeless.
- It is best to avoid acidic colors, unless you are talking about making bright beach rugs, because delicate pastel shades and rich dark tones are in fashion.
The workflow itself has several subtleties and secrets, and their knowledge will certainly benefit the novice craftswoman. So, a master class on making blankets with your own hands involves the implementation the following manipulations:
- Before starting knitting, several samples of small sizes are necessarily made, with which you can determine the density of knitting, as well as the compatibility of the colors and patterns used.
- Before stitching the finished elements into a single canvas, they must be steamed with an iron and a thin layer of cotton fabric or gauze.
- The individual parts of the overall composition should be interconnected by an air chain.
- The finished product is steamed again, after which you can start decorating it.
Decorating crocheted blankets is even more exciting than the process of making them, because at this stage it becomes possible to show all your creative potential. So, children's openwork bedspreads, as a rule, are decorated with thin silk ribbons that are threaded through the fabric, delicate lace and pearl beads. Beach rugs will look even more interesting if you decorate their edge with a thick fringe. The binding of the fabric also plays a role, especially if it is done with a contrasting thread or some other material.
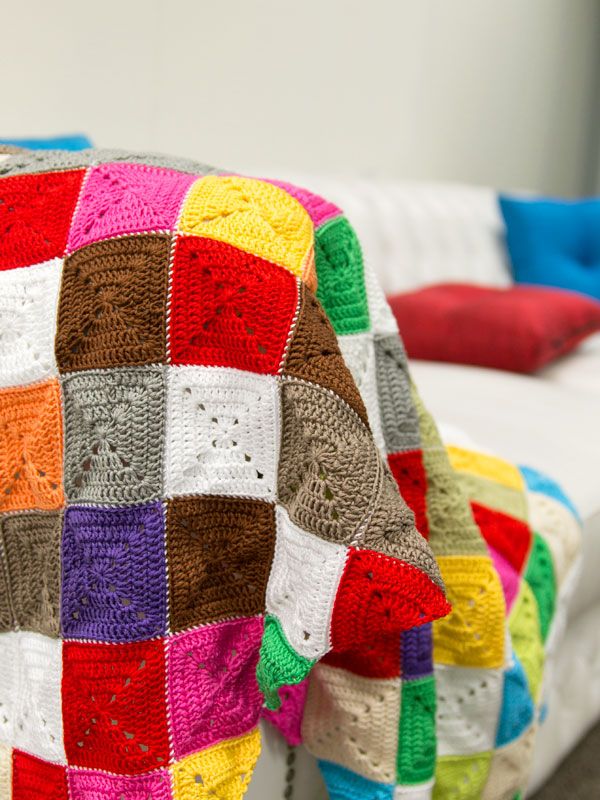
Today we have prepared for you step by step master class how to crochet a blanket with your own hands. Because of the bright colors, we called this multi-colored bedspread “Kaleidoscope”. To make the process of work as easy as possible for you, below we provide diagrams and a step-by-step description with a photo.
Tools and materials Time: 2-3 days Difficulty: 6/10
- yarn of bright colors;
- crochet hook (we used a 3.5 mm hook);
- darning needle for hemming ends;
- scissors.
Crocheting bedspreads is a rather laborious process, but the result of the work done will delight you for more than one year! Soft, cozy and incredibly beautiful - this crochet bedspread will be your perfect "Hug" after a hard day's work!

If you want such a cover for yourself, follow our instructions. This master class uses the following terms and loops: magic or magic ring, air loops(chain), half single crochet or connecting stitch, single crochet and double crochet.

What you will need:

Step by step description with photo
Numbers and dimensions
To make this bedspread, we wove 196 elements into 14 different colors. The squares are made diagonally, so you will also need triangular parts to align the corners.
For this bedspread with dimensions of 140 cm by 110 cm, you will need 158 squares and 38 triangles. Each square is approximately 10 cm across. You can use any color of thread you like to connect the parts.
Abbreviations:
- V.p. - air loop;
- conn. Art. - connecting stitch / half-column without crochet;
- RLS - single crochet,
- CCH - double crochet.
Step 1: knit a square
Row 1
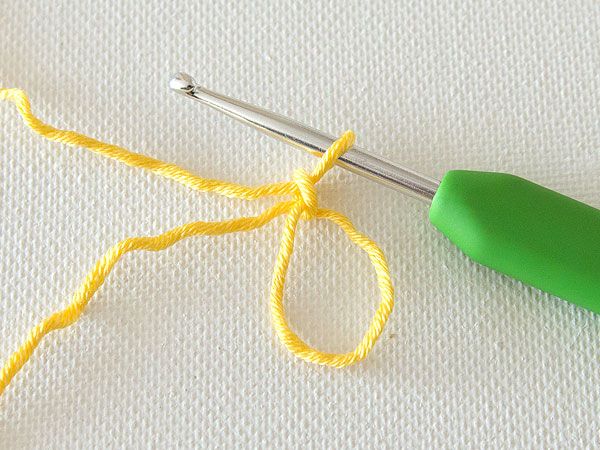
Make a magic (magic) ring and secure the stitch.

Row 2
Ch 2, then do 2 dcs in the ring. 2 ch, then 3 CCH in the ring. ch 2 and do 3 dc 2 more times. Close the ring and connect conn. Art. to the top v.p. two initial air loops.

Row 3
Ch 3, and work 1 dc in 2 original dc loops. Next * 2 CCH, 2 ch, 2 CCH * in 2 ch. gaps from row 2. Knit further around the perimeter, making a dc in each loop of the dc of the previous row. Make *2 dc, ch 2, 2 dc* in each corner with gaps. At the end, make a connection. Art. in the upper c.p. three initial air loops.
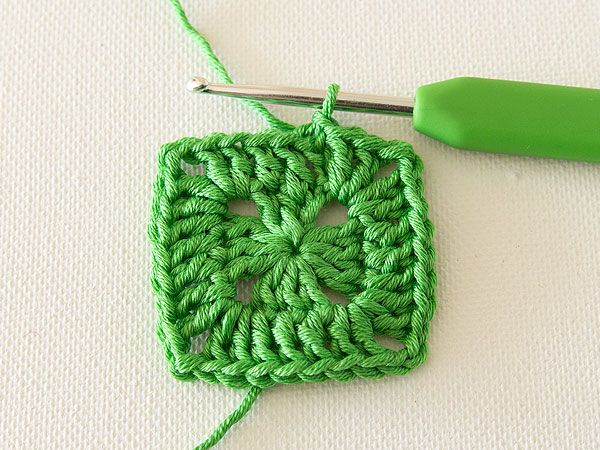
Row 4
Repeat Row 3.

Row 5
Repeat Row 3 once more, but do not join the row into a circle. When you have made the last stitch, cut the yarn and pull it through the loop on the hook. The total number of stitches on one side of the square should be 15.

Take your darning needle and insert it into the cut thread. Insert your hook through both loops of the first dc you made, skipping ch 3. at the start of the circle.

Insert the hook back through the last stitch you made, through the back loop only.

Sew both ends of the square.

Step 2: crochet a triangle
Row 1
Make a magic/magic ring and secure the stitch.
Row 2
Ch 3, then do 2 dcs in the ring. Ch 2, then do 3 dc in the ring. Close the ring, but not too tight.

Row 3
Ch 4, and turn your work. Work 2 dc in the same stitch, then do 1 dc in each dc until you reach the corner. In the corner with a hole, make * 2 CCH, 2 ch, 2 CCH *. Next, work 1 dc in each dc, plus 2 additional dc in the last stitch.

Row 4
Repeat Row 3.

Row 5
Repeat Row 3, cut the yarn and use your crochet hook to pull it through the loop. The total number of stitches on one side of your triangle should be 15.

Finally, sew both ends of the triangle with a darning needle.

Step 3: Connect the Squares and Triangles
Put the triangle on top of the square, front side to each other.

Weave a slip knot and place it on the hook. Next, from right to left, start connecting your parts using RLS. Insert your hook through the back loops of both pieces to create almost invisible connections.


When you have connected all the squares and triangles together, it's time to connect the remaining open seams.
Using the same method, make a slipknot with your fingers and use your crochet hook and sc to connect the remaining loose ends.

When you reach the crossroads, ch 1. and continue connecting the next pair of squares.

When you connect all the sections, on the back of the bedspread should look something like this:

The seams should be almost invisible from the front.

Use a darning needle to hide the remaining ends of the threads. A wonderful do-it-yourself crochet bedspread is ready!

People will admire your skill and the effort you put into creating all those squares and triangles! Because you've woven it diagonally, your quilt will stand out from the rest. Just don't mention how nice it is for them to wrap themselves up with a cup of tea or coffee in their hands!
We hope you enjoyed this tutorial. According to the same pattern and description, you can create a crochet bedspread in a different color scheme or a different size. We'd love to see your work! Let us know below if you have any questions or comments. We wish you good luck!
Experienced knitters can create real masterpieces with a hook and yarn, but even for beginners, it will not be difficult to crochet a plush blanket. Despite the fact that this product is quite large in size, the process of its manufacture is very simple and interesting. Armed with schemes and all necessary materials, you can safely start knitting, as a result of which you will be able to create your own masterpiece.
Experienced knitters are able to create real masterpieces with a hook and yarn.
Detailed description and simple patterns will help even beginners cope with knitting. A plaid knitted with squares of different sizes will exceed all expectations, it will become not only a salvation on cold evenings, but also an original decoration.
What is necessary:
- 6 skeins of yarn of different colors;
- hook number 4.5.
We knit according to the scheme:
- Cast on 8 loops and close them into a ring by connecting the first and last of them.
- Tie the resulting ring with single crochet columns and connect the first loop to the last.
- Start the second row with three air stitches, then make a couple of columns with one crochet, a pair of air loops, three columns with one crochet, two air loops. Repeat the last two steps twice more.
- Before connecting the initial loop with the last one, attach a yarn of a different color.
- Start the next row with 3 chain stitches and 2 double crochet stitches in the columns of the previous row, make a couple of chain stitches and 4 chain stitches.
- After that, knit a couple of columns with a crochet in air loops and three in the columns of the bottom line, continue according to the pattern to the end of the row.
- Perform the next row by analogy with the previous one, increasing only the number of columns in the corners.
- Tie the finished square with single crochet columns.
- By the same principle, increasing the number of rows and columns in the corners, tie the required number of squares.
- All details are well ironed and sewn into a single whole.
At the final stage, it is necessary to tie the finished product with single crochet columns.
Plaid crochet (video)
How to knit a cute baby blanket: instructions for beginners
Baby blanket with funny bears will definitely please the baby. This blanket is suitable for both girls and boys. Despite the huge number of motifs used in the knitting process, creating an amazing product, measuring 115 x 115 cm, will be simple and exciting.
What is necessary:
- yarn of different colors;
- hook number 3;
- satin ribbon.

Baby blanket with funny bears will surely please the baby
Progress:
- Knit nine motifs that will be located in the center (four with a circular pattern and five with a bear pattern).
- Perform alternating colors and small motifs.
- Knit 64 small motifs.
- Connect all the details together and crochet the product around the perimeter.
- Sew along the edge of the tape.
First motive:
- Cast on 24 stitches and knit the base row in single crochet.
- Make an additional loop and additionally knit a single crochet into the first stitch of the previous row.
- In the second stitch, make a double crochet.
- Knit by alternating columns with and without a crochet the entire row.
- On the next line, knit an air loop again and knit the entire row with single crochets.
- Repeat these two rows until the very end.
Second motive:
- Cast on 31 stitches.
- In the eighth loop, knit a double crochet and dial a couple of air loops, then make another double crochet, forming an arch.
- Cast on three stitches, skip four stitches of the base and knit the arch again.
- According to this principle, continue knitting until only three loops remain in the row.
- Cast on a couple of loops and knit a double crochet into the very last of the loops.
- Start the second line with three air stitches and on two of them make five columns without a crochet, forming a kind of shell.
- Thus, knit the entire row.
- The third line, start with five stitches of the rise, make an arch in the central stitch of the shell. Finish the entire row in this pattern.
- Start a row with three air loops, knit a shell and repeat this pattern until the entire line is completed.
- Repeat the scheme of the second and third row until the work is completed.
Third motive:
- Dial a total of four stitches and close them in a circle.
- In the first line, make five air stitches, then knit three columns with crochets in the center of the ringlet and additionally dial a couple of loops. Repeat these steps twice.
- Knit a couple more columns in a circle and connect with a column with the third stitch. Repeat the steps again.
- In the next row, knit a half-column of six air stitches into the arch, knit three more half-columns into the same arch.
- Skip three stitches, knit three half-columns and cast on a couple of loops.
- In the next arch, using a couple of additional loops, knit three half-columns.
- Repeat the pattern a couple more times, then pick up an extra stitch, skip three columns and knit a couple of half-columns into the same arch that was knitted at the very beginning of this line.
- Close the row and continue knitting according to this pattern, alternating the colors of the yarn.
Fourth motive:
- Make a chain of 26 stitches, then, starting from the fourth of them, knit double crochets.
- In addition, dial three stitches and knit a line by analogy with the previous one.
- Thus fulfill the whole motive.
Fifth motive:
- Cast on 33 stitches and work the baseline with double crochets.
- Start the next of the lines with three additional loops, knit one column to the back wall, and the other to the front.
- Pattern to execute according to the given scheme.
Sixth motive:
- Start with a set of 24 loops.
- Knit a couple of lines with double crochets.
- Only on the third line make three air stitches, and then follow this pattern to the end: three columns with a crochet and pulling the thread from the inside out.
- From the fourth to the eighth line, knit by picking up three additional stitches, and double crochet.
- Knit the ninth row in the same way as the third, and all the rest according to the scheme of the fourth.
Seventh motive:
- Make a chain of 26 loops and knit all the loops of the base with columns.
- Add three air stitches and knit with regular stitches to the end of the line.
- Continue knitting according to this scheme, alternating the colors of the thread.
Important! The height of each piece should be 11 cm.
Crochet plaid for a newborn for discharge: a master class
An openwork plaid is ideal for a newly born baby. After discharge from the hospital, such a product can be put in a stroller during evening walks, covered with a light blanket for a baby in a crib. For children, such a blanket will be simply indispensable.
What is necessary:
- 300 g of white yarn;
- hook number 3.5.

An openwork plaid is ideal for a newly born baby
Progress:
- Guided by the scheme, tie 25 identical parts.
- In the process of knitting, connect all the elements to each other.
- The finished product must be tied around the edge in three rows in this order: five columns in one stitch of the warp, a pair of air and skipping two loops, one column and a pair of air, skipping two stitches again. The cover is ready.
How to knit a blanket
Crocheted blankets and blankets look perfect, original and at the same time they turn out to be very warm. If desired, they can be additionally decorated with patterns of small flowers and even large flowers. A small volumetric ornament and a flower meadow looks incredibly beautiful. But even without such details, the product looks amazing.
What is necessary:
- 800 g of yarn;
- hook number 10.
Crocheted throws and blankets look perfect
Progress:
- Make a chain with 122 stitches.
- Knit one line with single crochets
- In the next row, all columns are already double crochet, knitting three air loops in each column of the previous row.
- Do the next row in the same way.
- Alternate the scheme of the second and third lines until the work is completed.
The very last of all rows must be knitted in single crochet columns.
Choice of yarn for a blanket
The size and density of the future product depends on the yarn. Soft threads of medium weight are ideal. Knitting with them will be easy even for beginner knitters.
When choosing, you should also consider the following nuances:
- for a small children's blanket, only three skeins of yarn are enough, and for a larger product, you need to purchase at least six;
- it is advisable to take threads “in reserve”, since it is difficult even for experienced needlewomen to calculate the required amount;
- when buying, you need to carefully consider the articles on all skeins. If they are different, then the color of the yarn will be slightly different.
The size and density of the future product depends on the yarn.
What should be the size of the blanket
Before you start the process of making a blanket or blanket, you need to decide on its size. It will depend directly on who it is intended for and for what purpose it will be used. The main types of products should be as follows:
- baby blanket - 90 × 90 cm;
- children - 90 × 105 cm;
- teenage - 120 × 150 cm;
- for an adult - 125 × 175 cm.
Naturally, if desired, any product can be made a little larger or smaller. The main thing is to correctly calculate the required amount of yarn and follow the instructions clearly. In this case, the plaid will turn out exactly the way the needlewoman herself wants to see it.
Plaid of large squares crochet (video)
A do-it-yourself plaid is the pride of any knitter. After all, it turns out surprisingly beautiful and warm. The process of its manufacture is quite lengthy, but the result is worth the time and effort.
Every mother tries to protect her child from all sorts of worries and hardships. As the child grows, this becomes more difficult. And when he is small, he is ready to take all the affection and care for himself. Baby needs a blanket to sleep well. Only when warmed up, he relaxes and falls asleep peacefully. A wonderful blanket can be a substitute for a blanket, which any mother who loves her child dearly can knit.
Crocheted baby blanket
A do-it-yourself children's blanket, even using the most expensive threads, will be much cheaper than a purchased product. For knitting, you can use a hook or knitting needles. It depends on the pattern you have chosen. It is most reliable to knit a product to which there is step by step description and diagram.
Functions of a knitted baby blanket

If a child appears in the house, a blanket is one of the main things that should be. A white blanket, pink or blue will definitely be needed when the baby is taken from the hospital. In the future, you can use it, or you can link the product already bigger size because the child is growing.

Depending on the season, different threads are used for his knitting, whether it be a hook or knitting needles. Patterns are also selected depending on the thickness of the threads and on the season for which the bedspread is being prepared.

It's good when there are two blankets in the arsenal of children's things - one for the house and the other for the street. It is useful both for the crib in the apartment, and for the stroller on the street. In cool weather, it is simply irreplaceable. It is desirable to knit products from threads of different thicknesses using a motif. Then the blankets can be used in different weather.
Advantages of a knitted product
A product that can be knitted for a child with your own hands is much warmer than the purchased counterpart. The same can be said about the blanket. Watch crochet baby blankets video.

Knitting is considered simple and soothing activity. Over time, when the drawing is already familiar, the work moves faster. Difficulties arise when you need to knit intricate patterns. If needed simple circuit for knitting, then you can only work with single crochets, or with one crochet. Bedspread knitted like this simple pattern, can be decorated with toys, crocheted, different little animals, for example, bears or other children's decor.
Below are diagrams and descriptions for products. The main thing about them is that you can knit any product of the length and width that you need.
Crochet a simple baby blanket
For knitting, alternation of double crochets and air loops is used. The finished canvas looks like a mesh through which threads of different colors can be threaded. It turns out a beautiful and elegant product.

You can also try knit a similar product, but complicate the process a little. To do this, colored threads are not threaded into the net, but are knitted. So let's get started. The first row of the mesh is knitted with the main thread, for the second row it is used colored yarn and you need to knit a row with single crochets. Where the threads connect, the ends do not need to be cut, but on the contrary, leave them longer, so that later it will be possible to tie a brush. In this sequence, the entire blanket is knitted, up to a certain length.

The option using two colors is good because the product can be knitted from the remnants of yarn. Tassels on the product can be made both in one color and in color.
The finished product is very beautiful, and its density directly depends on the thickness of the threads.
Knitting in a circle
This product has the shape of a square, since knitted in the round from the middle. It can have different sizes, depending on the age of the child and your preferences. For a baby blanket, you can use both single-color threads and multi-colored ones. The finished product, knitted from threads with a gradient effect, looks beautiful. You can independently choose bright threads for such a product, there is only one motive.

The heart is knitted from the middle, in a circle.

Work begins from five air loops connected in a circle. The second row is knitted with double crochets, and two air loops are knitted at the future corners. Next row- simple posts above each loop, and in the corners they must be knitted from two air loops of the previous row - three.

The next row is more difficult than the previous ones. To lift, three air loops are cast on, then three double crochets are knitted from three columns and connected together. Then two air loops and the same combination. For the corner: two air loops, three columns with a crochet, connected together from one column of the previous row, three air loops and again three double crochets from one loop connected together.

Such a blanket can be knitted from dense threads and put on the floor so that the baby is comfortable playing on the floor.

Openwork
Such a product can be knitted as a gift for a newborn. Threads need to choose high-quality and soft, for baby knitting. Getting started - a chain of air loops, in the amount of one hundred ninety-six.

The finished product is tied with single crochets, and the next two rows with double crochets, not forgetting to make five columns in one loop in the corners.
According to the scheme, the product is knitted to the desired length.
- row: all loops are air.
- row: five air loops are knitted, and a single crochet is fixed in the fourth.
- row: nine double crochets in one received cell, and a single crochet in the next cell, in the middle.
- row: over nine double crochets, seven double crochets are knitted, between which you need to knit an air loop.
- row: three air loops and a single crochet - so you need to knit over seven double crochets. The pattern should be repeated five times over the seven columns of the previous row.
- row: as second.
You can decorate the finished plaid with an air ribbon. For her, you need to knit such a row: three single crochets, three air loops, a base through three loops, etc. Roundings are knitted according to the second pattern.

into the finished product we pass the ribbon- the update is done. Every mom loves the happy smile on the baby's face when he sleeps under such a blanket.
Crocheted motif plaid size 125x125
Description matches finished product, whose dimensions are 125x125 cm. It will take only one hundred squares, knitted from yarn of different colors. The total weight of the yarn must be at least 1.5 kg. But all these indicators will depend on the thickness of the threads, the motif can be of different sizes.

Such a product can be tied, decorated with a ribbon or daisies tied separately (if the plaid is intended for a girl).
Getting Started.
- Tie one square for the sample. Measure its dimensions, calculate how many squares you need for a blanket of this size. Start making.
- Using different colors yarn of the same thickness, knit the desired number of squares.
- Connect them together with a needle or hook to get a solid canvas. You can take a contrasting thread if you are sure that the seam will be beautiful.
Conclusion
Considered in more detail, some knitting patterns will help you make a unique product for your baby. Choose the most suitable option for you and create. Create comfort and warmth for your baby. It is customary to pick up a child in a white blanket from the maternity hospital upon discharge. The decoration can be a pink or blue ribbon, for a girl and for a boy.