Fairy fairy dolls with their own hands. Cardboard doll - fairy Do-it-yourself fairy dolls made of fabric
With this tutorial, you will be able to beautiful doll from threads with your own hands in a few simple steps. We have prepared for you detailed photo instruction and a few useful tips. This step-by-step master class uses extremely affordable materials, the process of making a fairy doll will take you just a few minutes.
This thread fairy doll can become great decoration interior and will fit well into the living room, and into the bedroom, and into the kitchen as a small eye-pleasing accessory. However, this lesson is useful not only for lovers of cute little things, but also for those who have children. Fairy can be a great craft in primary school for any holiday. In addition, this doll will be a good addition to any gift to a loved one: for example, from a child to a grandmother.
What will we need?
- skein of thread for knitting
- decorative wire
- large wooden bead
- braid
- acrylic paints
- fabric for decoration
- any decorations (rhinestones, beads, ribbons, etc.)
How to make a doll?
The first step is to prepare the threads. To do this, we wind them on a small piece of cardboard (its size depends on how long you will make the hair for the doll). It is best to take with a margin, and then just cut off the excess.

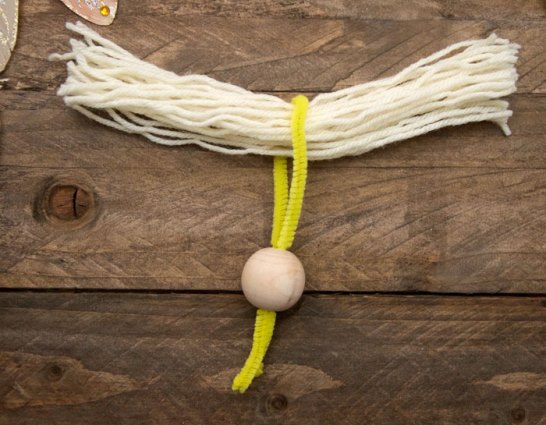
Next, you need to cut the wire so that, when folded in half, it is equal to the height of our full-length thread doll. Please note that in this case, decorative wire is used, but you can easily replace it with a regular one. The main thing is that it should not be too thin: otherwise, bend the wire in several layers.

Pass the wire through the hole in the bead and pull it up until it stops. If it is much thinner than the hole, make a knot at the exit - twist the wire.

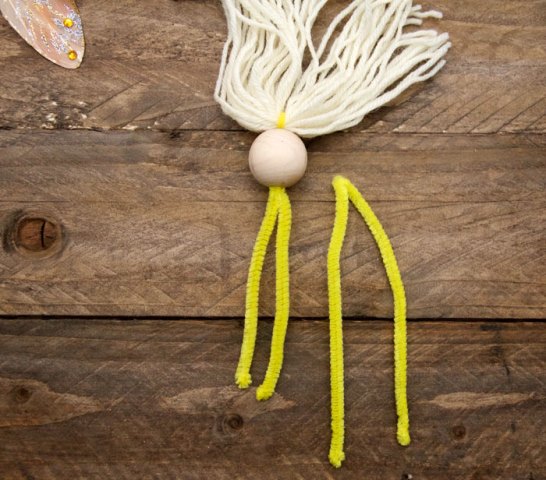
Next, we need to take another wire. Its length is equal to the span of the hands of our future doll. We make a wire binding just below the fairy's head and fix this place with a thread. Then, with the same thread, we continue to braid the body of the doll to the place where we define the beginning of her legs.

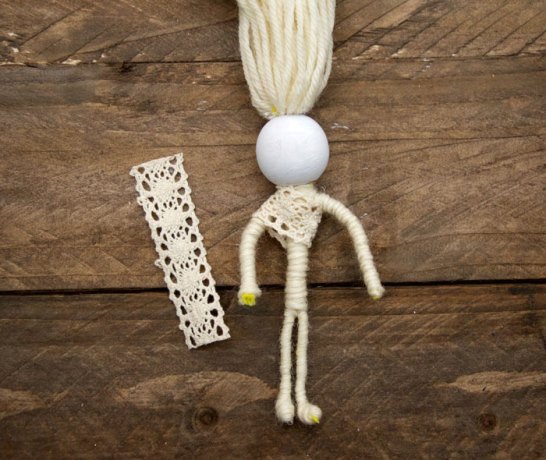
Let's separately wind the arms and legs of the doll. If the wire is thin enough. You can make a winding in two or more layers. Then we take a beautiful decorative braid (preferably not satin, as its small pieces will spread) and make a shirt for the fairy. If there is no braid, you can cut an old lace doily or handkerchief into narrow strips that are easy to work with. At the same stage, the bead is painted white so that the head of our doll is not just wooden.

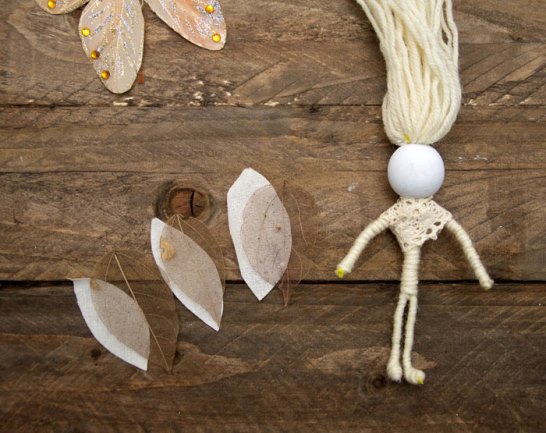
Details can be sewn or glued - as you prefer. Cut out some leaves from the fabric. This is done so that the skirt is quite fluffy and looks beautiful. Better take different fabric- two or three kinds. The nylon tape looks very nice in this case. We sew, glue or fasten the fabric with wire.

To make the junction of the skirt and shirt look beautiful, add a horizontal ribbon-braid. Separately, we will glue the wings to our fairy. You can take a ready-made version (butterflies-hairpins for curtains and gifts are perfect), cut it out according to a stencil or simply fold it from wire and then cover it with a cloth. Add rhinestones or beautiful beads around the edges of the wings.

Fairy is a beautiful girl with wings and a magic wand. This is how most modern girls imagine fairies. And this is no accident. After all, cartoons are full of these heroines who must fight evil, and, of course, defeat it.
Well, how can you not want to become a fairy too! Or at least be like her. Well, there are several ways to become a fairy. But before moving on to practice, you need to understand who a fairy is, what she does, and what kind of fairies there are. Only by choosing an element for yourself and deciding on an outfit, you can proceed to the rituals. Here are the most common ones.
The first way is very simple. In the evening, write your desire on paper, drink a glass of water, and throw the leaf out the window. It is desirable that it be picked up by the wind. Then go to bed. In the morning you will become a fairy. The second way to become a fairy is at home. You need to catch the moment when you will be at home alone, so that no one will distract you from the ritual. Close your eyes tightly, say 3 times: “I am a fairy!” and clap your hands over your head. Do this for a few days and after a while you can become a fairy.
The third way is asking. You can turn to the fairies with a request to give you a magical gift. To do this, you need to choose an element and be next to it at this moment. If this is the element of fire - sit near the fire, the water element - near the water, etc. At this time, you need to quietly call the fairies of the chosen element.
As soon as you feel a slight breeze, it means that the fairy has appeared. Now you can dare and ask. Don't forget to tell her that you won't use this power to harm a person. Then you can go home and go to bed. In the morning the magical power will be with you.
If for some reason it didn’t work out to become a real fairy, you can do it differently. For example, sew a fairy costume and wear it to a New Year's ball. Or gather girlfriends who also love fairies and arrange a Fairy Festival, while each girl should dress up in a costume. And finally, you can get yourself a little fairy friend by creating her yourself.
How to make a fairy with your own hands? Yes, very simple. You need to take an old doll up to 10 cm in size, wash, dry and comb it, styling your hair the way you like. Then sprinkle this hairstyle with varnish so that it holds, and proceed to sewing the dress. For a fairy outfit, it is best to choose translucent lace or beautiful fabric, which can be decorated with beads or sequins, artificial flower(if it is a fairy of flowers) or something that will be related to the elements of the fairy.
Moreover, the color of the dress also depends on the choice of elements (water - blue, nature - green, etc.). Drape the doll figure with a needle and thread. Fairy hairstyle can also be decorated with a flower or a headband made of beads and beads. For the wings you will need an artificial butterfly. It must be glued on the back, on the back of the doll. That's all. Your new girlfriend is ready. And who knows, maybe at night she really flutters around the room while you sleep, and brings you fabulous dreams.
Using simple materials for needlework, we suggest making miniature fairy dolls with your own hands, which kids will play with pleasure.
Tools and materials Time: 1.5 hours Difficulty: 5/10
Materials:
- 1 wooden bead with a diameter of 4 cm with a central hole;
- 2 pieces of wire with villi (pipe cleaner) 29 cm long each;
- a small ball of wool yarn;
- a small piece of lace 2 cm wide;
- 3 skeletonized leaves;
- 3 leaves of cotton fabric, cut out according to the pattern of skeletonized leaves;
- ready-made feather wings or 4 decorative feathers;
- 4 small ribbon flowers;
- white and black gouache paint.
Tools:
- glue and glue gun;
- brushes;
- scissors;
- a rectangle made of thick cardboard measuring 12.5 x 10 cm.
These adorable DIY fairy dolls can be made pretty quickly. You can also involve children in the work.


Step by step master class
So, let's make fairy dolls with our own hands.
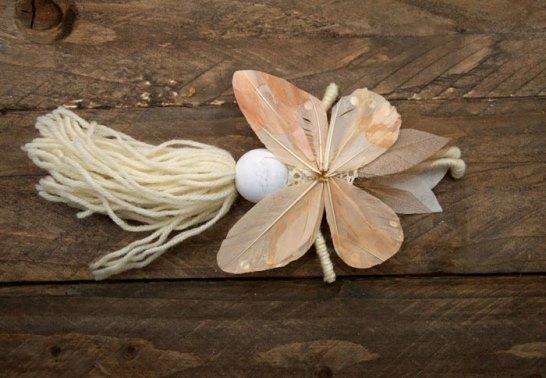
Step 1: make thread hair
Wrap a thick wool thread around the cardboard rectangle about 30 times.

On one side, cut the wound threads and remove the cardboard.

Step 2: make the head
Bend one piece of wire in half and insert into the hole of the wooden bead.


Insert the bundle into the loop formed woolen threads, so that the loop covers them exactly in the center, and pull the wire through the hole in the bead.

Step 3: make hands
Fold the second piece of wire in half.
Wrap it around the fairy's neck several times, forming the arms. Turn the fairy's body halfway and bend the bottom of each piece of wire forward to form the feet.

Step 4: shape the torso
Wrap the thread around the wire, starting at the neck and down the body, up and down each leg, through the arms, until the wire is completely covered. Secure the end of the thread with glue.

Step 5: paint your face
Coat the wood bead with two coats of white gouache paint and let dry well before continuing.

Step 6: make a blouse
Wrap a small piece of lace around the upper body diagonally over the shoulder and glue a small bead of glue on the back of the body. Repeat the same action with the second piece of lace, wrapping it over the second shoulder.
Step 7: Make a Skirt
Wrap the skeletonized and fabric leaves around the fairy's waist, placing them on the glue. At the same time, alternate leaves and fabric, evenly placing them around the body.
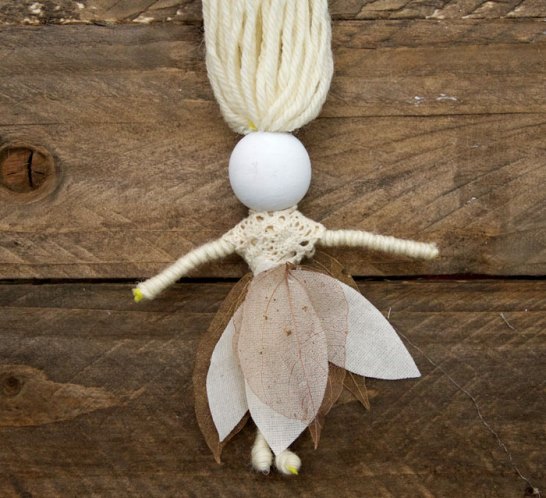

Step 8: Attach the Wings
Glue the wings on the back of the fairy. If you are using separate feathers instead of a finished part, first fasten them together with wing-shaped wire.
Step 9: Shape Your Hair
Lubricate the back of the head with glue and style the filament hair beautifully.
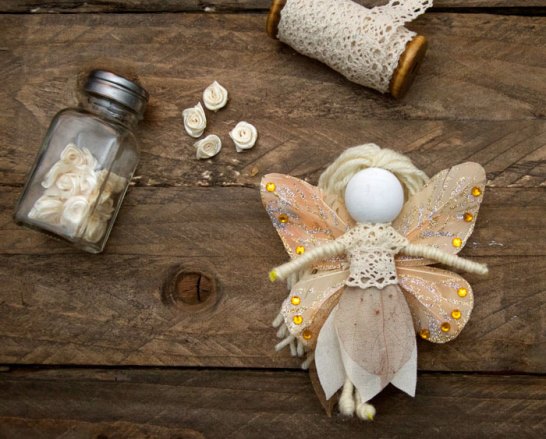
Step 10: Make a Wreath
On the front of the head along the conditional hairline, attach small satin flowers to the glue.

Step 11: draw the eyes
Use the thinnest brush to paint the eyes in the form of two dots on the face with black paint.
Almost every little girl dreams of meeting a beautiful fairy. And it is in your power to make this meeting a reality. Of course, our fairy does not own magic, but .. A thin, graceful paper origami fairy can be an original Christmas tree decoration or a decor element for a child's room. Origami technique in some situations is quite complicated. To make such a beautiful fairy, we have to work a little. But the results are sure to please. We offer you step by step master class for the manufacture of this fabulous beauty from paper. For manufacturing, we need only one thing - a square sheet of paper of the required size and an additional triangular half of the same sheet - for the head and wings. And of course, a little diligence, attentiveness and perseverance. So let's start..
Making the main paper fairy figurine

To make a fairy fairy figurine, we need a square sheet of thick double-sided colored paper. Before starting the formation of the fairy figurine, we make two transverse and two diagonal folds perpendicular to each other on this sheet. To do this, first fold a sheet of paper in half, iron the fold line. Then straighten the sheet and repeat the fold, but in the other direction. Similarly, we will make folds along the diagonals. For the wings of the fairy and her head, we need a triangular half of another of the same sheet.

It looks like this.

Fold the paper square diagonally. We get a triangle. Based on the fold lines, we fill the lower peaks inside a double-folded square, as shown in the photo above.

We get a kind of paper rhombus.

We bend one of the outer side vertices of the rhombus inward until a right angle is formed, oriented to the center of the rhombus. Then we straighten and repeat the bend, but in the opposite direction.

Straighten the formed corner along the fold lines to the sides.

And lay it out, as in the photo.

We bend the outer corners of the formed section to the center.

When bending the outer corners, make sure that the combined sides are symmetrical. Carefully smooth the fold lines with your finger.

Then we unfold the folded, and fill the edges inward, focusing on the fold lines.

During folding, we control the symmetry of the edges.

..
We get such a figure. All fold lines are carefully ironed until a stable border is formed. We bend the corner protruding in the middle in two directions perpendicular to the paper web.

We turn the figure over to the other side and repeat all the previous steps in the same order.

Then we add the formed middle part along the fold line in half, inward. We bend the remaining outer free part, forming a right angle, to the middle.

We straighten the outer free part and fill it inward, along the fold line. We repeat the same action for the opposite free side.

...
We have such a design.

The smaller middle part is again bent to the center. The action is repeated for both parts on one side.

...
It should turn out like this.

...

We flip the piece. We bend the outer corner to the center, as in the photo.

...
Then we turn off the folded one, and fold the same fragment in the other direction so that a small overlap forms.

We repeat the action for both sides.

We turn the product over to the other side, and bend the sharp ends to the folded one.

With a pencil, put a dot on the fold line.

Also, with a pencil, we put points in control places on both sides. We draw inconspicuous lines, connecting them.

We bend the base of the figure along these lines on both sides.

That's the way.

We press the fold points to each other.

We bend the sharp corners to the folded part on both sides.

Fold them in half lengthwise. They naturally bend forward.

...
We fold the upper corner with the top to the border of the fold in two directions. Then, focusing on the fold lines, we bend its central part inward. Then bend the rest outward again.

...
It should look something like this.

...


Bend the lower part inward along the fold line.

We create bends in the middle of the lower parts, imitating the bending of the leg at the knee.

Bend inward along the fold line.

We bend the outer corners of the "back" of the figure forward, bending their top to the fold line.
Fairy head and wings / step by step /

1

2

3

4

5

6

7

8

9

10

11

12

13

14
After the assembly of both fragments is completed, the head of the figurine with wings is put on the torso of the figurine. The graceful fairy is ready.
How to make a paper fairy / video /
fairy origami
How to make a fairy
fairy fairy
Conclusion:
Paper magic is also magic .. An ordinary piece of paper turns into a beautiful fairy. And you created this magic yourself, with your own hands .. Even if our fairy does not quite know how to work miracles, she can perform one small miracle .. By doing it together with your child, you will give each other a piece of goodness and warmth.
In the article you will learn how to make a little fairy costume for a New Year's party with your own hands.
On the eve new year holidays many mothers have a question what kind of costume can be made for their daughter so that she is satisfied with her appearance. In addition, little fashionistas are not always surprised by the outfit of a princess or snow queen. They want to look modern, in the style of cartoon characters. For such a girl, a fairy costume may be suitable. Let's find out in detail how it can be made from improvised materials.
How to make a Christmas Winx Fairy costume with your own hands?
All fairies love outfits made in the latest fashion. And Fairy Winx also dresses stylishly. Her attire consists of:
- pink dress
- Wings of the same color
- Shoes to match the outfit, high knee socks
You can sew a dress with your own hands. To do this, prepare the following tools and materials:
- Satin for the top
- Tulle for a skirt
- Threads, needles, scissors
- sewing machine
 Top pattern for the Winx Fairy costume
 How to sew a dress?
- First, make a pattern of a top and a flared sun skirt on paper.
- Transfer the cut details to the material, and to make the skirt fluffy, make several tulle hemlines.
- It remains to sew the details of the top, and assemble upper part skirts, waistband waistbands.
- You can use ribbons, brooches, fabric flowers, etc. to design the outfit.
 Wings for Winks Fairy costume
 How to make your own wings?
- To make fairy wings beautiful, just take a wire, bright nylon tights, glue, glitter.
- Then make the desired shape of the wings out of the wire. And gently pull tights on top.
- Dip the brush in glue, draw a pattern on the surface of the wings, then sprinkle the pattern with glitter.
How to make a carnival costume of a flower Fairy with your own hands?
As an outfit for a flower Fairy, a beautiful fluffy dress or a top and a stylish skirt. If you yourself sew a dress with flowers that you will make yourself from multi-colored satin ribbons or bright pieces of matter, then the dress will look advantageous against the background of other festive outfits.
To decorate the hairstyle, you can make a wreath of paper flowers. And make wings from wire, beautiful guipure fabric.
 Beautiful costume for a girl - Flower Fairy
 How to make a carnival costume of a forest Fairy with your own hands?
The outfit of the Forest Fairy can also be in the form of a dress and a top, a skirt. Let's look at the second option - how to make a Forest Fairy outfit from a top and skirt. The top can be used ready-made, and for the skirt you will need:
- orange and green satin fabric
- elastic waistband
- thread, needle, machine
 Costume for a girl - Forest Fairy
 How to sew a skirt?
- Cut the orange satin into rectangular strips.
- Work the edges of the strips with a zigzag so that the fabric does not fray.
- Sew the clapti neatly to the elastic waistband.
- From the green satin, cut out large petals and stitch them along the edges too so that they do not fray.
- Sew the petals to the belt, decorate the outfit with flowers, leaves.
How to make wings for a Fairy costume out of paper with your own hands?
If you have papyrus paper, then making wings for the Fairy costume will not be difficult. Prepare in advance:
- Wire - for the frame
- Scissors, glue, markers
- Tape

Progress:
- Think of the shape of the wings, and make it out of wire
- Wrap this wire with ribbon to make the wings look pretty.
- Glue the frame gently with papyrus paper
- Decorate the product with drawings, applications
DIY tulle fairy wings
Any mom can make these wings at home if she puts in a little effort. For them you will need:
- Small piece of tulle
- Wire
- silicone adhesive
- Ribbon
- Scissors
 Tulle wings - do it yourself for a little Fairy
 Progress:
- Make a frame, wrap it with tape
- Then glue the tulle onto the finished structure with silicone glue.
- Trim the rest of the fabric neatly.
- Make a pattern with glitter on the wings
How to make fairy wings from wire and gelatin?
If you want to make gelatin wings, then know that you can’t make them big. Such wings are suitable for toy fairies.
How to make wings?
- Soak gelatin at the rate of: 1 tablespoon of gelatin, 2 tablespoons of water.
- Make the frame of the wings out of wire.
- Take a regular file for documentation, grease it with vegetable oil.
- Place the frame on the file and use a brush to place gelatin inside the wing so that it covers the borders of the frame.
- Wait until it freezes. Carefully remove the file from below.
- That's it - the wings are ready.
How to make a crown for a Fairy costume?
 Crown for a fairy - do it yourself
 In order for the crown to go well with the Fairy costume, you need to choose its shade to match the outfit. A wire crown decorated with beads, beads, sequins will look beautiful. In order not to lose the accessory during the holiday, you should fix the crown to the hair with hairpins.
How to make a paper Fairy wand with your own hands?
Fairy is a fairy tale character. And what is a fairy tale without miracles? And miracles happen when the Fairy waves her magic wand. In order for the costume of a fairy-tale character to be completed, you will need to make a wand. Let's learn how to make it out of paper.

 Fairy Wand
 Materials, tools for making sticks:
- velvet pink paper, red color cardboard
- scissors, glue, tape for decoration
Progress:
- Cut out two hearts from red cardstock.
- To make the magic wand look beautiful, make two more smaller hearts from other paper.
- Glue the main part of the stick out of velvet paper.
- Decorate it with a ribbon, and glue a heart on top, as in the image above.
How to decorate a Fairy costume?
The smallest, minor additions to the Fairy outfit complete the costume. Thanks to various accessories, the image takes on a unique look.

 Fairy Costume
 - Enough to sew on the dress beautiful flowers roses, daisies made of paper or other material, and you will see how the costume will change.
- Wings, decorated with all sorts of patterns, make the image of the Fairy more natural.
- Shoes can also be decorated with leaves, flowers or beautiful accessories, for example, colored stones or brooches.
Video: DIY Fairy Costume