What to make from a plastic bottle for the New Year. Crafts for New Year from bottles Cool Dog made from clothespins for kindergarten
The symbol of the new year, 2018, will be the Dog. This animal has long become synonymous with loyalty, devotion and courage. We hope that the coming period will bring everyone reliable friends, stability in the family and smooth, deep relationships with loved ones. They say that for all these wishes to come true, there should be a toy dog on the New Year's table. The DIY Dog craft takes from five to thirty minutes to complete. It all depends on the materials at hand used in making the souvenir. For example, it will take 1-2 minutes to make a sausage ball toy, and to make a craft from threads, plastic bottles, papers, cotton pads and even nylon tights you will spend more than half an hour. Such a cute dog can be given to a kindergarten teacher or a teacher at school. After watching our video master classes and reading step-by-step instructions for making a funny New Year's animal, you can make it yourself at home.
How to make a Dog from cotton pads for the New Year 2018 with your own hands in kindergarten and primary school
Cotton wool can serve not only for cleansing the face or for medical purposes - it is also an excellent material for making various souvenirs. After reading everything about how to make a Dog from cotton pads for the New Year 2018, you will be able to explain to your child how to make a craft with your own hands in kindergarten and primary school. Such a product can be a birthday gift or become part of a greeting card.
Craft Dog for kindergarten for New Year 2018 - Master class with photos
Preschoolers simply love preparing gifts for the holidays! Our short master class will tell you how to make a Dog from cotton pads for the New Year 2018 with your own hands in kindergarten or primary school. This time it will be a three-dimensional paper-based applique. To work you will need:
- Cardboard;
- Scissors;
- Thick paper;
- Pencils;
- Stapler;
- Cotton pads.

Carefully place all the prepared materials on the table and start working.

How to make a Dog, the symbol of 2018, out of paper yourself - DIY children’s crafts at school and at home
Find out how to make a Dog, the symbol of 2018, out of paper yourself - read simple tips on creating children's crafts with your own hands at school and at home. After this, you can easily explain to your child what origami is and what toys can be made from plain paper in a matter of minutes. This art and skill develops manual dexterity and teaches children patience.

Symbol of 2018 - Paper dog for school and master class with video

Watch the video of the master class below this text. It explains in detail how to make a Dog, the symbol of 2018, out of paper yourself - children's DIY crafts at school are not very complicated. The “biter” dog, made at home, looks very cool here. Follow every step of the master, and in three or four minutes a very cute animal with a large mouth will “sit” in your hands.
How to make a symbol of 2018 - a dog from a sausage ball: video at home with explanations
You have probably watched with admiration more than once how balloon sellers with enviable dexterity twist these balloons into intricate figures of animals, while enchanted children crowd around, begging their parents to buy them such a miracle. Now you will finally learn how to make the symbol of 2018 - a Dog from a sausage ball, by watching a video created at home and hearing detailed explanations. You won't need anything other than accuracy and dexterity.
Dog made from a sausage ball - Master class with video
In order to make the most “airy” dog, you only need one long, elongated inflated ball. You will have to work very carefully, trim your nails first and wash your hands thoroughly. Don’t be afraid to bend and twist the ball while working - it won’t burst if you are careful in the beginning. Pay attention to the master class below the text - it shows how to make the symbol of 2018 - a Dog from a sausage ball: the video was not filmed at home by professionals. Listen to the detailed explanations and you will have a great craft in a minute!
Symbol of 2018 Do-it-yourself dog made of plasticine - Master class with step-by-step instructions
Every child loves to sculpt and make things themselves. Invite him to make the symbol of 2018 Dog with his own hands from plasticine - a master class with step-by-step instructions can be found on this page.
How to make a Dog from plasticine - Master class with detailed explanation

Since the symbol of 2018 is the Dog, you can make it with your own hands from plasticine for the holiday: a master class with photos and step-by-step instructions will come to your aid.
To work you will need:
- Plasticine in white, brown, black, red colors;
- Plastic knife;
- Board for work.

- Roll 2 balls of different sizes from brown plasticine - these are blanks for the head and body of the Dog.

- Use your fingers to slightly stretch out the balls (see photo).

- Roll 5 smaller balls from white plasticine. They will become part of the Dog's paws, tail and face.

- After this, roll five identical brown plasticine sausages.

- From white, black and red plasticine, make very small balls for the eyes, nose and mouth of the Dog.

- Mold together the head and body blanks. After making a cut on the head of the craft, insert the tongue there. Use white plasticine to outline the animal's face.

- Flatten brown and white balls and make dog ears.

- Glue the ears to the head of the plasticine animal, bending them down slightly.

- Combine white balls with brown sausages to make the Dog's paws. Form a tail from white plasticine.

- Attach the paws and tail to the Dog's body.

- The dog now needs eyes - glue them on too.

- Everything is ready - the mini dog can decorate the New Year's table!

Do-it-yourself Dog toy - a symbol of 2018 from nylon tights or stockings
You can make a Dog toy - the symbol of 2018 - with your own hands, even from nylon tights or stockings! In this case, you will get a dog that looks very much like a real pet. Unlike crafts made from other materials (paper, plasticine, fabric), this product requires a significant investment of time and skill in handling threads and a needle. Only older schoolchildren and adults can make a Dog in this way.

How to make a Dog in the 2018 New Year from nylon tights - Master class on video
The Dog toy, a symbol of 2018, made from nylon tights or stockings, takes quite a long time to make. A beginner, for example, will spend more than an hour, or even two, on work. A master of his craft, who has been working with stuffed dolls for a long time, will make a cute dog in about forty minutes. Just prepare two pairs of tights of different colors, padding polyester or even simple cotton wool, thread, and scissors. Get started by doing everything as the master demonstrates in the video.
Big Dog made from plastic bottles - DIY crafts for school
What craftsmen don’t turn ordinary plastic bottles into today! They are used to make drinking bowls for animals, birdhouses, pencil holders, boats, watering cans for flowers and much more. You won’t believe it, but you can also make a large Dog from plastic bottles - a master class on making crafts for school with your own hands will tell you about this.

How to make a Dog from plastic bottles - Master class with photos

This cute poodle is easy to make yourself. A large Dog made from plastic bottles - you will find a DIY master class for school crafts just below - will be an excellent gift for the New Year 2018.
So, you will need three used 5-liter bottles, 1 dark 2-liter bottle, white opaque plastic bottles, scissors, screws, a small piece of floor insulation, tape, buttons, black varnish and wire.
- Cut off the neck of two bottles, and cut out the middle of the third “eggplant”.

- Secure the bottles with self-tapping screws.

- Having made small holes for the legs of the future Dog, stretch a wire through them (45 cm for the legs + 15 cm for fixing them).

- Wrap the legs of the craft with floor insulation and secure the structure with tape.

- Disconnect the remaining lower part of the wire to secure it.

- The poodle's neck needs to be made from a 2 liter bottle.


- Cut the bottle in half and connect the smaller part with the larger one, securing everything with self-tapping screws.


- Connect the head to the body

- Cut white opaque milk bottles as you see in the photo. You will end up with poodle hair.

- Lightly (very carefully!) burn these blanks over a lighter or gas.


- Sew around the poodle's paws, again using self-tapping screws.

- Cut out part of the milk bottle like this.

- Make a cone from a dark bottle.

- Trim the poodle's tail. Be careful when working with screws!

- Here you see dog ears cut from a five-liter bottle.

- All that remains is to trim these ears as shown in the photo.

- Make dog hair out of milk bottles (the part near the neck).

- Create a poodle mane. Try to make as many “curls” as possible.


- Make an opening for the dog's ears.

- Start working on the poodle's rear end. Check your actions with the photos of the master class.


- Make a chest for the dog and attach ears to his head.

- The poodle is almost ready. Isn't he so unusual?

- All that remains is to cut out the nose from the bottom of the bottle and cover it with black varnish.

- Attach the button eyes and bow - the dog is ready!

A simple DIY dog craft from scrap materials for kindergarten
Simple crafts depicting a Dog can be made from a variety of available materials and taken to kindergarten for the New Year 2018. Dogs can be made from cardboard, paper, fir cones and acorns, shells, fabric and even clothespins! We hope that our ideas will be liked and remembered by moms and dads, and parents and their children will definitely make funny dogs later!

Cool Dog made from clothespins for kindergarten

A simple DIY dog craft from scrap materials for kindergarten can even be created from clothespins! See how ordinary clothes clips turn into a cheerful dog in just a few minutes! Such a playful puppy will decorate any child’s shelf.

Making toys from woolen threads for children is both simple and very enjoyable. For the coming Year of the Dog, you can make a wonderful souvenir - a toy puppy made from thread pompoms. Such a dog will decorate both a schoolchild’s briefcase and the New Year’s table. A simple master class on children's crafts for the New Year 2018 will help you make a cute Dog out of threads with your own hands.
Making a Dog from threads - New Year's craft master class

Look how cute this little puppy looks! It will be a great gift for a friend, teacher or mother. A do-it-yourself dog made from threads and a master class on children's crafts for the New Year 2018, photos and explanations of which you will find below, will delight you with their simplicity and originality.
For work take:
- Threads in two colors of your choice;
- Fabric glue;
- Scissors;
- Small black pompoms;
- Felt fabric (for the doggie's ears).

- First, make three pompoms - two larger and one small.

- This video will remind you how to make pom poms.

- Tie a thread around one of the pompoms.

- Trim the back of the pompom a little, making it slightly sharper.

- Trim the other 2 pom poms, almost turning them into balls.

- The darkest pom pom will become the Dog's nose - glue it to the large pom pom (untrimmed).


- Glue black pompoms for eyes and nose.

- Using glue and pompom strings, attach the puppy's head and body.

- Cut out ears for the dog from felt.

- Glue the ears to the puppy's head.

- You have a wonderful dog!

Now, knowing how to make a Dog with your own hands from plastic bottles, cotton pads, sausage balls, nylon stockings, threads and other available materials, you can make a craft for yourself. kindergarten or schools. The symbol of the New Year 2018, created at home, will decorate the New Year's table or shelf with the most dear gifts collected on it. We hope that our videos and master classes with detailed explanations will help you make the best souvenir!
Find out how easy it is to make a rooster craft from bottles, coffee beans, and fabric. See how to make a salt dough rooster from egg trays.
Craft rooster from egg trays

This is what you can make a rooster from. This is completely waste material, but it makes wonderful crafts. To work you will need:
- egg trays;
- acrylic paints;
- thin white paper;
- cardboard;
- newspapers;
- scissors;
- glue gun;
- tassels;
- pencil.
Cut out bird wings from cardboard using a glue gun and cover them with leaf-like blanks from egg trays.

Most of your time will be spent waiting for the papier-mâché rooster's body to dry. Therefore, it is better to start working with its formation. Cut newspapers into strips, dilute glue with water in a 1:2 ratio in a container. Dip the paper here and stick it onto the inflated balloon. It will take more than one hour for this part to dry. When this happens, pierce the ball with a sharp object and remove it through the small hole left.
This rounded piece needs to be cut into two unequal parts, insert the smaller one into the larger one to increase the strength of the part. Glue these elements together using a glue gun.
While the papier-mâché was drying, you had enough time to form the head and neck of the rooster. To the part that looks like a flower with elongated petals, made using petals from an egg tray, glue two triangular beak blanks and a comb cut out of cardboard.
Insert a second one of the same type into this flower blank, then a third, fourth and fifth. The head and neck of the bird are ready. Glue this piece to the side of the papier-mâché ball half. To do this, use a glue gun to attach a strip of cardboard inside the neck so that it looks out from below. We glue this label to the papier-mâché half of the body.

To make the tail, draw semicircular lines on the egg lid and cut along them.

Glue the tail to the back of the body. That's it, you can paint the cockerel with acrylic paints, when it dries, hand the craft to the recipient or place it in the most prominent place in your home as a bright attribute of the holiday.
You can make a rooster with your own hands not only for the New Year, but also for Easter. Then you will put colored eggs in its semicircular body, thus decorating the festive table.
Symbol of 2017 made from plastic bottles
If you decide to celebrate the New Year at the dacha, then make a rooster - a symbol of 2017, which is not afraid of either snow or water. Plastic bottles are perfect for this.

To make a rooster with your own hands for the year of the Rooster, prepare everything necessary materials, in particular
- five-liter canister;
- 5 liter plastic bottle;
- metal-plastic tube;
- 2 plastic bottles with a volume of 1.5 liters;
- corrugated pipe;
- thick copper wire;
- plastic bottles for feathers;
- perforated tape;
- acrylic putty;
- fine mesh;
- sandpaper;
- awl;
- construction foam;
- stationery knife;
- glue gun;
- self-tapping screws;
- scissors;
- screwdriver

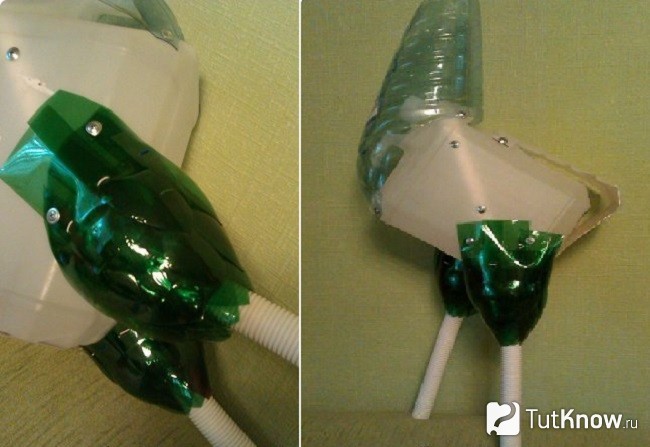
Bend a metal-plastic pipe to make two rooster legs. Attach them to a five-liter canister using self-tapping screws. To make the animal’s neck, cut a large piece of cloth from a 5-liter bottle, fold it into an envelope, and secure it with self-tapping screws. From one and a half liter bottles, cut off their upper parts below the shoulders, diagonally. Place them on the top of the bird's legs, and also attach these parts with self-tapping screws or a glue gun.
To make bird feathers, cut off the neck of the bottle. Using scissors, cut out 5 longitudinal feathers.

Place corrugated tubes on the rooster’s legs and begin decorating the thicker parts with feathers. To secure them, use an awl to make two holes in each, insert a piece of wire here that needs to be tied to the base.
Cover the bird's body with feathers, starting from where the tail grows. We are not finishing the back yet.

Roll the wire so that you get two paws, each with three fingers, put pieces of corrugated pipes on these blanks.

Cut long and narrow claws from the bottom of the bottle. Attach them to a glue gun or "Moment Montage".

Cover the resulting workpiece with spray paint, using one color for the body and another color for the legs.

Cut out the cockerel's head from construction foam using a utility knife.

Take sandpaper, sand this part with it, then apply acrylic putty.

When this coating has dried, make the surface smooth again with sandpaper, then coat with PVA.
To ensure that the paint adheres well to the cockerel’s head, they use a trick by first covering it with PVA. In this case, the paint adheres well and its layer will be more durable.

From a fine-mesh mesh, cut out a part that will become the wings, back and tail of the rooster, glue long blanks from a plastic bottle to it to decorate this part with feathers. The wings at the top are made from corrugated bottles.

Paint the wings, when the solution has dried, attach this body part using perforated tape and self-tapping screws. Cut elongated feathers from 2.5 and 2 liter bottles, cutting each container into 5 parts. Paint them on both sides, after drying, attach them to the metal mesh using wire.

To make it easier to paint plastic bottles a light color, take transparent ones and cut them into feathers for the back. Attach them with wire, 4 pieces at a time on self-tapping screws.

Attach the bird's head to its place using long self-tapping screws, cover the already painted parts with plastic, and paint the rest. Make spurs for the rooster from wire, after which you can place it in its designated place in the country house or at home.

It's even easier to make your next bird from plastic bottles.

For this you will need:
- two plastic bottles with a volume of 2–2.5 liters with small necks, and one of the same volume, but with a large one;
- disposable plastic cups in two colors;
- disposable plates;
- wrapping paper or trash bag;
- plastic ball;
- eyes for dolls;
- scotch;
- stationery knife;
- glue;
- scissors.

U plastic cups cut the top into strips 8–10 mm wide. In length they will take up a third of the height of the glass. Place these blanks on the high neck of the bottle, alternating in color. Cut off the bottom of the last glass. Chop this container not only on one side, but also on the other side into thin strips. The middle will remain intact.
Just below the rim of the plates, cut out semicircular feathers from plastic plates, cut them on one side with scissors to create thin feathers. In the bottle, which is located on the opposite side of the neck, make a cut, insert the tail feathers here, and secure with tape.

Place the ball on the top cup and secure it with tape. Cover the cut for the tail wrapping paper or a piece cut into the shape of a fan from a colored garbage bag. Cut out wings from plastic plates and glue them to the sides of the bird with tape.

From plastic plates, cut out the comb, beard, and beak of the cockerel. Make three cuts in the foam ball, insert these blanks here, and glue them for a stronger connection. Take ready-made eyes for toys, or make them yourself from a white foam plate, cut out the pupils from a black garbage bag. Glue on the eyes.

If you want to learn how to make a rooster out of bottles even faster, then watch the third master class in this section.

- Cut off the bottom of a large plastic bottle, put it on a fence peg or a stick specially dug into the ground for this occasion.
- If the bird will stand in the house, then cover its lower part with strips of colored paper, make the wings and comb from cardboard in the appropriate shades. If the rooster will be outdoors, then these parts should be waterproof.
- Create stripes from colorful garbage bags(by tying or gluing those), wings, nose, comb, beard made of colored plastic.
- Take two white bottle caps and draw a black one here acrylic paint pupils, glue them to the head.
- The tail is made from bottles of different sizes and colors. Cut off their bottoms and use scissors to chop them almost to the shoulders into thin strips. Insert one bottle into another, secure them with wire, tape or glue.
Salt dough rooster
Looks great like this three-dimensional picture, but it is performed in an unusual way.

To make such a panel, take:
- 120 ml water;
- 180 g fine salt;
- 370 g flour;
- 1.5 tbsp. l. vegetable oil;
- acrylic paints;
- rooster template.

- You will make a cardboard image of this bird when you transfer the presented drawing onto paper.
- Mix flour and salt, pour here vegetable oil and water. Knead the dough well, cover it cloth napkin to stand for 20 minutes.
- Now you can roll it out into a layer, put a template on top, and cut out a rooster from salt dough using it. Using the same knife, apply feather veins on the tail, wings, and neck to the workpiece.
- If you want the bird to be voluminous, then separately sculpt the wings, buttons, and the upper part of the scallop.
- Leave this creativity to dry. To do this, you need to place the product in a well-ventilated area to give the workpiece greater strength. Dry it for 24 hours using this method, then heat the oven to 50 degrees.
- Using two spatulas, transfer it to a baking sheet lined with paper and sprinkled with flour. Turn the heat to low and dry at this temperature for 2 hours. Take the product out and cool it.
- Now we need to paint ours fire rooster acrylic of different colors, and then varnish.
if you have clear varnish for nails, it is perfect for painting a salt dough rooster.
You can also sculpt a three-dimensional rooster from salt dough. Then the figure needs to dry well for two days.

DIY roosters made from coffee beans

This is not a simple rooster, but a magnet. To make it, you need to stock up:
- a piece of burlap;
- a piece of red felt;
- coffee beans;
- a sheet of cardboard;
- rhinestones and sequins;
- crochet;
- threads;
- glue gun.
Use a brown pencil to color the cardboard body of the cockerel. Below, using a needle with a matching thread, form two legs of a cockerel from it, make the paws from cardboard painted in Brown color, as well as the tail blank, which needs to be glued into place.
Make a beautiful fluffy tail out of threads and glue it onto a cardboard blank. Also glue coffee beans to the body, bypassing the wing, and attach them to the ends of the legs. Glue a magnet to the back of the body. Decorate the wing with sequins and rhinestones.

We sew, knit, embroider rooster crafts
These needlework techniques will also help you create crafts for the year of the rooster 2017. If you know how to embroider, then the following pattern will help you. This way you can decorate a small decorative pillow, the pocket of an apron made of plain fabric, or make a panel.

If you decide to knit a sweater for a child as a gift, calculate the stitches so that this poultry is displayed in the center front.
The diagram shows which colors to use. To make them all look good, knit a sweater from white yarn.
If the listed types of needlework are not yet within your capabilities, then make a cockerel on a stick from the remnants of ribbons, threads, and fabric.

Here's what you should prepare:
- square of linen fabric with sides 15 cm;
- red canvas measuring 5×20 cm;
- multi-colored ribbons;
- soft filler;
- threads;
- jute;
- twig;
- red yarn;
- a needle;
- wooden stick.

- Fold the linen fabric diagonally, trim one corner slightly. Sew one and the other side with a basting stitch, but leave the space between these sides, which is marked with a pencil in the photo, free. Through it you will subsequently fill the figure with filler, and insert a wooden stick here.
- Insert the twig into the cut hole in the corner and secure with twists of red yarn. This is the head and beak of a cockerel.
- Fill the blank with padding polyester. Insert a stick there, secure this part by tying it tightly with red thread.
- Take a strip of red felt, fold it in half, and place it on one and the other side of the cockerel's head. Wrap thread at the top and bottom to separate the comb and beard. Cut the beard at the bottom with scissors.
- Fold satin ribbons of different colors in half, attach them to the tail, and tie with red thread. Also form the wings of the rooster, just sew them on the sides.
- Use black thread to embroider the bird's eyes or make them from beads. After which the wonderful rooster, the symbol of 2017, is ready.

Check out another idea by watching the video. It tells how to make a rooster craft from nylon.
If the children want to learn how to make it out of paper, then show them the second video.
New Year is a holiday of magic and fulfillment of desires. According to Eastern calendar, every year has its own patron. For the upcoming 2019 it is a Pig (Boar). To attract good luck, health and prosperity to your home, it is advisable to make souvenirs with the image of such a philosophically calm and good-natured animal. Of course, you can buy ready-made souvenirs, but items made independently retain the warmth of the master’s hands and a piece of his soul. The topic of today's article is the symbol of 2019: the Yellow Pig (Boar) with your own hands. Choose a suitable master class, prepare materials and experience all the joys of the creative process!
There are many ways to make a talisman for the coming year with your own hands. The article describes step-by-step instructions for such methods.
- Making piggy out of paper different ways(applique, papier-mâché, origami).
- Edible souvenirs in the shape of a pig.
- Yellow Pig (Boar), made of textiles (master class for labor lessons at school).
- DIY pig sewn from felt.
- Symbol of the upcoming 2019: an applique made from cotton pads.
- Boar from a plastic bottle. The article describes step-by-step instructions for making a traditional piggy bank and original flowerpots for the garden.
- Piggy, made by hand from tights. The master class is very simple, and the DIY craft turns out remarkably beautiful and original.
- Piggy made from plasticine (task for kindergarten or junior school). In a similar way, you can make crafts from polymer clay or salt dough.
- Symbol of 2019: Yellow Pig (Boar), made with your own hands from corrugated paper.
Symbol of 2019: DIY Yellow Pig (Boar)
Paper is perhaps the most popular and versatile material. Paper products can be made with a child at home or in kindergarten, starting from the age of 4-5, and school students and experienced adult craftsmen are interested in such a complex and interesting technique as origami. Paper is a cheap, pliable material for a wide variety of manipulations. You can use it to make various crafts for home theater, games or decoration. festive table. Among other characters, the main character, the hero of the occasion, is, of course, a pig. Symbol of 2019: The Yellow Pig (Boar) can be made with your own hands in the following ways.
The easiest way, accessible even to kids, is do-it-yourself applique. Search on the Internet interesting templates with the image of pigs, print them, cut them out and paste them on thick paper or cardboard. Children 3-4 years old, of course, will need help from their elders. Preschooler in kindergarten or junior schoolboy able to handle this type of work independently. The template can be printed in color or black and white. In the latter case, the blanks are painted with a pencil, felt-tip pens or paints. The finished craft can be decorated with small shells, rhinestones or sequins
Application from leaves: from schematic to complex realistic image. This task is equally suitable for kindergarten or school.


It is not at all necessary to make images of “farm” pigs. If your baby likes such cute characters as Peppa or Piglet from Soviet or American cartoons), what are the symbols of 2019? A template for Peppa can be found on the Internet or, if your artistic abilities allow, you can draw it yourself. Do-it-yourself paper crafts are also possible.
Kit for a young fashion designer. Make an applique of Peppa Pig or some other famous pig on cardboard. Cut along the outline. From paper, cut out items of clothing with strips of paper so that you can attach them to the doll. It is advisable to use thick paper for wardrobe items.

There are many scans on the Internet for volumetric figures piggy. Just print out the pattern you like, bend the paper along the marked lines and assemble the figure. Some layouts require gluing for strength.

Children in middle and high school have access to more complex techniques: origami or quilling. A do-it-yourself pig figurine using the origami technique can be simple (from one sheet of paper folded according to a certain pattern) or complex, consisting of several modules. Beautiful and durable pig figurines are made using the papier-mâché method. Crafts can also be functional. If covered with paper (wrapping paper or newspaper) tin can with a slot, you get a classic piggy bank, a real heroine of Andersen’s fairy tale. Products made from papier-mâché look especially beautiful and original if you decorate them using decoupage. The raw material for such a product can be a roll of toilet paper or a cellulose egg tray.

An original and not at all complicated technique is volumetric applique. You will need 3 rectangles of different sizes: for the head, snout and torso. Glue 3 cylinders. Attach circles cut from paper to the end parts. Roll 4 paper legs and cut out ears. Draw nostrils and eyes with a black felt-tip pen. Color the hooves black. Connect the parts. Make a bow tie from colored paper or a piece of bright textile. The paper piggy is ready. You can use it for a home mini-performance or as a Christmas tree decoration.

Edible surprises
Symbol of 2019: Yellow Pig (Boar), made with your own hands, can be quite edible. Decoration New Year's table cookies will become in the shape of pig faces. A 6-7 year old child can make delicious pigs with his own hands with the help of his mother or grandmother. For original baking, you can use ready-made yeast or puff pastry. The piglets' faces are cut out with a glass, snouts and ears are made from the remains of the dough. The nostrils and eyes are made from raisins, prunes or candied fruits. The pig is baked in the oven, first brushed with egg.

Guests will love these unusual and non-standard cookies. And in combination with aromatic tea - it’s absolutely wonderful. Experienced housewives can come up with more intricate decor.
Pig - symbol of the New Year 2019 crochet
There are many ways to knit and crochet piglets. The simplest option is a pig - a crochet symbol of 2019 in the form round potholder with your own hands. The basis of the product is two round-shaped parts - the snout and the head. Ears – 2 parts, made in the form of beveled triangles. The legs are rectangular, you will need 2 blanks. The easiest way to embroider a pig's eyes and nostrils is with black thread.
Materials, devices
- For work you will need.
- Three hook.
- Pink yarn.
- Leftover black yarn for embroidering eyes and nostrils.
- Needle.
- Hollow fiber for stuffing.
Master class: detailed description
The crocheted pig, the symbol of 2019, is made in the following sequence.
- Knit a chain of 4 chain stitches and close the ring.
- Work the first round with single crochet stitches in each stitch of the chain.
- Continue knitting, determining the number and frequency of increases yourself, so that you get a flat surface, without wavy edges. Knit until you get a round piece with a diameter of 200 mm.
- Using the same technology, tie a patch (diameter 70 mm).
- To tie one ear, make a 6-8 cm chain of chain stitches. Knit the first row with single crochets. Continuing to knit with the same stitches, make symmetrical decreases on both sides until the workpiece takes the form of an isosceles triangle with a rounded top.
- The legs can be knitted separately and sewn or knitted from the bottom of the workpiece.
- Place the blanks together. Sew the pot holder.
- To make the face of the funny piggy more expressive, tie the finished product with contrasting threads in a circle.
- Make a squiggle tail from a chain of air loops, then sew it to the finished product.
- Sew thick fabric on the back side. It will give the craft the necessary rigidity and strength.
This is an excellent activity for labor lessons at school.


Video (detailed master class)
Video (part 2)
Symbol of 2019: DIY Yellow Pig (Boar) made from fabric
There is probably not a single child (or even an adult) who would be completely indifferent to soft toys. Dolls made in the Tilda style are very popular. This is a very special world of dolls. The founder of the style is designer from Norway T. Fennanger. A piggy made with your own hands using the Tilda technology looks simply great and will be a wonderful gift for the New Year. So, the symbol of 2019: DIY Yellow Pig (Boar) made from fabric.
Here are 2 options for tilde pigs: large and small, both flying.


For sewing, it is advisable to use natural textiles: calico, linen, cotton or poplin. This is one of the canonical rules for sewing tilde toys with your own hands. Piggy can be made from light fabric without a pattern. The symbol of 2019 looks good: the Yellow Pig (Boar), hand-sewn from fabric with a small “rustic” pattern. You can dye the white canvas yourself: with a coffee solution or tea leaves. After dyeing it takes on a flesh tone. The pig will turn out to be quite realistic, “farm-like”.
Necessary materials
In addition to the fabric, you will need.
- Filling: synthetic fluff or holofiber. Lavender or a vanilla pod added to the filler will make the toy exquisitely fragrant. Calcined buckwheat can also be used as a filler. The result is a 100% environmentally friendly option.
- A piece of felt is for the wings. Felt can be replaced with thick fabric.
- Threads, needle.
- Pencil for coloring blush (another feature of tildes).
- A simple pencil for marking.
Master class step by step
- Fold the fabric in half.
- Print the finished pattern on thick paper, cut it out and lay it on top of the material.
- Trace the patterns with a simple pencil. Don't forget to add 0.5 cm to the seams.
- Cut out the pieces. You will get 8 blanks for the legs, 4 for the ears and 2 for the body of the pig.
- Sew the ear and leg blanks from the inside out, turn the fabric right side out.
- Sew the pig's body in the same way, then stuff it more tightly with filling. You can sew the parts by machine or by hand. It all depends on your sewing skills, taste preferences and textile density.
- Using a blind stitch, sew on the pig's ears and legs.
- Make eyes from beads or paint them with acrylic paint.
- Draw a soft, “blurred” blush with a pencil.
- Make a ponytail from a sewn strip of fabric with a wire inserted inside. Sew the tail into the pig's body.
- Cut out wings from felt or thick fabric, carefully sew the pigs to the body.
- Decorate the pig according to your taste: appliqué, lace or original clothes.
This is what should happen.

Here is another technology for sewing a soft toy “pig” from textiles.
Symbol of 2019: Yellow Boar (Pig) made from felt
Felt products are durable, practical and look very beautiful. The felt toy can be used as a Christmas tree decoration, a small keychain for a backpack, or to decorate a greeting card.
Tools, materials
To make a craft with your own hands, you will need.
- Multi-colored felt.
- Threads, needle.
- Scissors.
- Filling: holofiber or synthetic fluff.
- Ribbon or braid.
- Paper for patterns.
- Pencil for marking.
- Set of toy accessories.


Symbol of the New Year: procedure
Symbol of 2019: Yellow Boar (Pig) made from felt using this algorithm.
- Print the patterns on thick paper.
- Fold the felt in half.
- Place the patterns on top of the material, trace with a pencil, cut according to the pattern.
- Carefully sew the parts together, stuff the piglet with holofiber or synthetic down. The toy will look voluminous.
- Sew a toy and decorate it to your liking. Make nostrils and eyes from special toy accessories or embroider with black thread.
This is how beautiful it turns out.


Symbol of 2019: Yellow Boar (Pig), made with your own hands from felt, is ready.
Symbol of 2019: DIY Yellow Pig made from cotton pads
Young crafters enjoy making appliqués with their own hands. Ordinary ones open up unusual opportunities for them. cotton pads, which are sold in any cosmetic store. The investment of time, money and labor is minimal, and the picture turns out nice and original. The pig will be plump and round, as it should be.

Materials, tools
For work you will need.
- Dark colored cardboard for the base.
- Cotton pads.
- Watercolor paints.
- Brushes.
- Glue.
- Black felt-tip pen or marker.
Algorithm of actions
Step-by-step instructions for making the symbol of 2019: the Yellow Pig with your own hands from cotton pads are as follows.
- Stepping back approximately 2-3 mm from the edge of the cotton pad, cut out 3 circles. Cut 2 of them in half.
- Set aside 1 cotton pad. This will be the torso.
- Paint the blanks in pink color, leave them for a while to dry.
- Glue a circle of larger diameter onto the base. This is the torso.
- Glue 1 back leg and 2 front legs (the second back leg is not visible).
- Glue the head so that it extends slightly onto the body and front legs of the pig.
- From the remaining pink blank, cut out triangular-shaped ears. Glue them to the head, turning the ends down. The pig will turn out to be lop-eared.
- Cut out the tail, crochet it and glue it to the base.
- Decorate the applique by drawing nostrils and eyes.
Symbol of 2019: DIY Yellow Pig, glued together from painted cotton pads, ready. Photos of the working process.

DIY pig (boar) from a plastic bottle
Plastic bottles are a material that is found in every home. Although it is considered junk, the products made from it are quite nice. The shape of the bottle vaguely resembles the body of a pig. Therefore, a pig (boar) made from plastic with your own hands will turn out to be quite realistic. Let's look at two step-by-step master classes: a piggy bank and an original flowerpot for a country mini-flower garden made from a bottle.


Necessary materials
You will need them.
- Bottle 0.5-2.0 l.
- Glue, scissors.
- Eyes (made of cardboard or toy accessories).
- Colored paper, cardboard.
- Acrylic paints.
- Brushes.
Master class: description of the algorithm
The step-by-step procedure is as follows.
- Shorten the bottle by cutting out the middle part.
- Connect the 2 parts so that you get the body of a pig.
- Cut out ears from thick cardboard, and from colored paper - a rectangle for pasting the body.
- Cut a slot for coins in the “back” of the pig.
- Cover the pig with paper. It is much more practical to paint the animal with yellow or pink acrylic paint.
- Glue ears and eyes to the base.
- Screw a stopper onto the bottle, painted pink with acrylic dye.
- Make the legs from bottle caps and glue them to the base.
Such decorations can be made to decorate the yard at a school or kindergarten. The pig (boar), made from a plastic bottle with your own hands, is ready.
In the same way, you can make your own pot in the shape of a pig for your garden, only the hole is larger and wider. The shape of the excavation for filling the soil is rectangular or oval. To prevent plant roots from rotting, make several holes in the animal’s abdomen. A layer of expanded clay is poured onto the bottom of such a mini-flowerbed, and a layer of fertile soil is placed on top. You don't have to do the legs. If there are a lot of bottles, you can make a whole herd of pigs.


If you have a canister of household chemicals in your house, then by painting it with pink acrylic paint and punching several holes in the plug with a hot awl, you will get a convenient watering can with a handle. It will especially appeal to young gardeners. She looks something like this.

Step-by-step video of the master class
Do-it-yourself pig from tights, step-by-step master class
Sew soft toy You can make a gift for your baby not only from pieces of new fabric, but also from outdated children's tights. The given master class on making a pig from tights with your own hands is the simplest. With a little effort, even a novice craftswoman will cope with the task perfectly. Step-by-step photo of the working process.

Materials
- Old children's tights.
- Scissors.
- Thread with a needle.
- Stuffing: holofiber, padding polyester or padding polyester. It is not advisable to use shavings or ordinary cotton wool as filling. It will be impossible to wash such a toy.
detailed instructions
So, a pig made from tights with your own hands: a master class for beginners.
- Cut off the widest part of the tights.
- Sew the workpiece on one side.
- Stuff the toy and sew the fabric on the other side.
- Using a needle and thread, form the pig's face as in the step-by-step photo.
- Form the ears and snout of the pig.
- To sew the body and legs of the pig, cut off the “shorts” of the tights. Sew the bottom, stuff the workpiece with filler and sew on the opposite side.
- Form the arms of a soft toy from tights fabric.
- Connect all the parts together.
- Now all that remains is to decorate the toy: sew on the eyes, decorate it with fabric bows and buttons.
- In a similar way, you can sew a funny pig farm from old children's socks.

Products made with your own hands turn out to be a little primitive, but so cozy and cute that children play with them with more pleasure than with store-bought ones.
DIY plasticine piggy for New Year 2019
Another master class: DIY plasticine piggy for the New Year 2019. Materials for modeling are available to children from the first years of life. You can make a plasticine farm for a competition in a kindergarten or school. In addition, modeling is an excellent means of developing motor skills in children.
What is necessary
- Necessary materials and equipment.
- Plasticine: pink, black and white.
- Stack – for drawing elements.
- Matches - for connecting individual parts together.
- Cardboard, oilcloth or modeling board.
Description of actions
Here are interesting step-by-step photos that will certainly be useful to you.


Now - a master class on making a pig from plasticine for the New Year 2019 with your own hands. Form from plasticine.
- 2 large balls: the head and body of a pig.
- 5 small balls – legs and a snout.
- Drop-shaped pieces of plasticine: hooves, ears.
- “Worm” for the tail.
- Flatten the small ball-piglet. Connect it to your head. Using a stack, mark the mouth and nostrils.
- Make eyes from plasticine in 2 colors: black and white.
- Give the ears a triangular shape and attach them to the head.
- Connect the head to the body. For a better connection, use a match.
- Attach the legs to the body, preferably with matches.
- Cut the blanks for the hooves with a stack and attach them to the legs.
- Hook the ponytail back and attach it to the body.
This is such a handsome man you will get.

Or this Peppa Pig.

Yellow corrugated paper pig
The simplest master class, which is accessible even to a 5-6 year old preschooler.
List of accessories and materials
In order for the yellow corrugated paper pig to bring you good luck, you will need.
- Corrugated paper 300x500 mm.
- Eyes – accessories for toys.
- Hot glue gun.
- Scissors.
- A piece of black paper.
Step-by-step photos and work procedure


Procedure.
- Cut 2 strips of paper 10mm thick. Cut the sheets across the corrugation, otherwise it will be impossible to glue them together.
- Roll the strips in a spiral: larger and smaller diameters. In the last turn of a circle of larger diameter, bend the “ears” and glue them.
- Secure the resulting circles with glue.
- Glue the muzzle with the snout.
- Decorate the finished product by attaching eyes.
The yellow pig made of corrugated paper is ready. Taking advantage detailed master classes, step-by-step photos and videos, you can make wonderful toys with your own hands for a competition or exhibition at school or kindergarten.
The symbol of 2019 - the Yellow Earthen Pig (Boar) can be easily made with your own hands. A small souvenir will bring good luck and prosperity to your loved ones in the new year. You can make a popular one step by step New Year's gift one of the proposed master classes. A particularly valuable and heartfelt surprise will be a pig made by a child’s diligent hands. A children's masterpiece can be given to a close relative or friend, or brought to kindergarten or school.
For simple DIY projects, various basics are used. Patterns and precise lists of materials help calculate the consumption of fabric (felt), paper, and additional elements. We offer master classes for kindergartens and schools with step-by-step photos of varying degrees of complexity. Piggy made from dyed cotton pads - perfect option for the youngest children. There is no need for a precise pattern or a sharp needle. Even a two-year-old child can work with a brush under the guidance of a mother or kindergarten teacher. An adult can only cut out the elements of the pig and help glue the painted parts. A pig made from corrugated paper or from a bottle is also suitable for teaching a child creativity, provided that cutting the plastic frame of a bottle or using hot glue is not trusted to children.

Plasticine is a material for young children, but the symbol of 2019, a funny pig, can be supplemented with more complex details. A neatly molded piggy is suitable for participation in competitions at school. In middle school, a child will already be able to hand-sew a pig from felt or make blanks from fabric. At this age, many children begin to crochet, and interest in simple paper appliqués disappears altogether. In comparison with the pigs knitted according to instructions, the symbol of 2019, the Yellow Pig (Boar) made of nylon, created with your own hands, is aerobatics. The painstaking technique of creating a piggy's face can only be understood and mastered by a high school student or an adult. Select the best option hobby for home leisure or original idea symbol of 2019 from fabric, bottles, paper and other materials for school or kindergarten.
Funny pig (symbol of 2019) crocheted - make a pig filled with padding polyester
Similar to the precise preparation of fabric parts according to sewing patterns, you need to strictly follow the mathematical calculations for crocheting toys. Considering the large selection of master classes for knitted toys, you need to start with simple options. Before the New Year, there is a reason to learn how to crochet a pig in honor of the symbol of 2019, so that you can give the finished souvenir to a friend at school, mother or grandmother. A master class with step-by-step photos of the symbol of the year for adult housewives will seem no less entertaining. The original crocheted pig (symbol of 2019) is very popular with young children, although it is too early to master the basics of such a hobby in kindergarten. The rules for crocheting in the circle can be learned on any special online resource. Step-by-step photos will only show in general terms the principle of creation knitted toys using a simple hook.

- acrylic yarn light pink (50 g/200 m)
- scissors
- hook (“three”)
- gypsy needle
- large black beads for eyes
- padding polyester or cotton wool
- marker (pin)
- light thread (for the mouth)
Instructions with step-by-step photos

Master class for school: how to sew the symbol of 2019 - the Yellow Pig (Boar) using a pattern with your own hands from fabric (on a typewriter)
Creating a soft toy based on ready-made patterns using a sewing machine will not take much time. A cute symbol of 2019 - the Yellow Pig (Boar), created from fabric with your own hands at home or in labor lessons at school, will become the perfect gift. You don't have to waste time on calculations or measurements to make a piggy. All details can be repeated exactly as in the step-by-step photos. Since the piggy elements are sewn both by machine and by hand, a fabric master class is not suitable for kindergarten level. This version of the symbol of 2019 made of fabric in the form of a Yellow Earth Pig (Boar), where you need to operate the machine with your own hands and sew small parts to the body, is suitable only for an “adult” child.

List of materials for the master class
- thick light pink fabric for the head, ears, legs and arms
- any cotton material for the body (soft toy costume)
- ribbon for decoration
- sewing machine
- scissors
- light pink (or beige) sewing thread, needle
- pink button for piglet
- large black beads - 2 pcs
Instructions with step-by-step photos

Do-it-yourself Yellow Pig (Boar) for school from felt - use an easy pattern to make a symbol of 2019
The easiest way to learn to sew is on felt. The material does not stick out or spread. Unlike paper, a souvenir made from felt will last a long time. For these reasons, felt workshops are ideal for kindergarten and school. If in kindergarten the parts of a felt pig are glued together, then at school they are already learning how to sew them on. The symbol of 2019 proposed in our master class - the Yellow Pig (Boar) made from felt with your own hands is suitable not only for labor development at school, but also for making souvenirs by adult craftswomen. A yellow pig or hog can become a keychain, a magnet, a favorite toy with which a child goes to kindergarten, or a decoration for a Christmas tree. The pattern can be increased in proportions if you want to make a large symbol of the year 2019 for a school or kindergarten with your own hands. We advise you to sew a lot of symbols of 2019 in the form of a Yellow Earthen Pig from felt in advance, so that there will be enough for all your loved ones. Useful step-by-step photos will speed up the creative process.

List of materials for the master class
- padding polyester
- hot pink acrylic thread and needle
- toy eyes - 1 pair
- pink and yellow felt
- scissors
- black marker (felt-tip pen)
- drawn patterns
- pink ribbon 0.5 cm thick

Instructions with step-by-step photos
- Cut out 2 pieces on paper. You can carefully redraw the templates by holding a sheet of paper to the monitor, or print a photo on a printer.

- Trace a large paper template on yellow felt 2 times, and a small one on pink felt.

- Hand stitch the oval with a blanket stitch. Try to make stitches of the same height with even indents. Use a marker to put 2 dots.

- Place a small portion of padding polyester between the two yellow parts of the pig. Sew along the edge using a blanket stitch.

- Use hot glue to attach the patch to the body. Glue on the eyes and a miniature ribbon bow. The self-created symbol of 2019 - the Yellow Earthen Pig (Boar) in the form of a kind animal can be given as a gift or left in your home under the New Year tree.

Yellow Pig (Boar) made from cotton pads for kindergarten - the easiest DIY craft
Why not make the first crafts in kindergarten classes not from paper, but from soft circles? One of the most common ideas for workshops is to use cotton pads as the main material. You can find many examples of step-by-step photos and videos of caterpillars, ladybugs, flowers and various animals that the youngest children like so much. Such ideas will take root well in classes in kindergartens. You can prepare the symbol of 2019, the Yellow Pig (Boar), in kindergarten with your own hands from cotton pads as a gift or just keep your child busy interesting idea Houses. If such a pig is too simple for school, then in kindergarten the work will definitely be considered very original. You don't need a pattern or paper templates. Preparing to work on mumps is too simple even for kindergarten level. In 15 minutes you can prepare the symbol of 2019, the image of the Yellow Pig, with your own hands from cotton pads. An interesting idea is to place a pig as a symbol of the year on the front of a handmade children's card.

List of materials for the master class
- cotton pads - 2 pcs.
- scissors
- gouache pink and white
- tassel
- black fabric

Instructions with step-by-step photos

Unusual pig made from a plastic bottle with your own hands for kindergarten or school (quick craft in 15 minutes)
Curriculum and educational programs in kindergartens and schools are not always diverse in creative activities. Thanks to ready-made step-by-step instructions, you can arrange interesting experiments at home with completely unexpected materials. From regular bottle you will get a fashionable transparent piggy bank, a beautiful new decor in the kindergarten yard, or just a stylish little thing in the shape of a piggy. To make a pig out of a plastic bottle with your own hands, the following provides step-by-step tips. You can print ready-made templates for ears, eyes and outfit or redraw them. The strip that will wrap around the body of the toy can be replaced with yellow paper as a sign of the coming year. Then the craft will become a real symbol of the year. A child will definitely surprise everyone at school or kindergarten with a non-standard invention for the Year of the Yellow Pig (Boar). Numerous videos on the Internet suggest using painted crafts in the garden or yard to decorate flower beds. According to the step-by-step photos, you can make a pig from a plastic bottle with your own hands in literally 15-25 minutes.

List of materials for the master class
- 1.5 liter plastic bottle (preferably with a pink cap)
- 4 caps from other bottles of the same color (white, black, or pink)
- template printing
- large scissors
- hot glue gun
- scotch

Instructions with step-by-step photos
- Cut out colored template parts from paper.

- Cut the bottle so that you get rid of the middle part and make a shorter piece from the two remaining halves.

- Insert the halves one into the other, as in the photo. They can even be glued together with tape, since the seam will not be visible.

- Glue together the individual pig ear pieces and then hot glue them to the body.

- Glue on the piggy's eyes. Glue the caps symmetrically on the bottom base of the pig with your own hands. If you want to make the symbol of the year into a piggy bank, just make a cut on the back of the case.

DIY pig from tights, master class with step-by-step photos for beginners
In order to create a pig with maximum resemblance to a real animal, it is recommended to use light flesh-colored nylon. If you manage to master simple instructions Based on the step-by-step photos, you will find it very easy to make a pig from tights with your own hands (a master class for beginners). Unlike working with plasticine or paper, or sewing according to a strict pattern, here the shape of the finished pig largely depends on manual dexterity. Make a pig out of tights with your own hands according to the simple recommendations of the master class and glue it to a magnet. You'll get a pig for the refrigerator. Many videos and step-by-step photos on the Internet offer different variants additions to toys symbols of the year. You can use your own hands to glue plastic signs, food, or messages to your finished stuffed pig. A beautiful pig on a pin instead of a magnet will appear on a child’s school backpack. The toy head can also become the basis for a puppet theater character at school or kindergarten.

List of materials for the master class
- plastic eyes for toys - 1 pair (can be drawn and cut out of paper)
- pink watercolor and brush
- light beige thread and needle
- padding polyester
- plastic parts (sandwich and glass)
- magnet
- scissors
- strong glue for the magnet (for example, silicone)
Instructions with step-by-step photos

DIY plasticine piggy for New Year 2019, children's craft
The most malleable material for creativity is plasticine. In kindergarten it is difficult to imagine exhibitions without figures made from this material. Even at home, you can make an original piggy with your own hands for the New Year 2019 from plasticine, if you add a little imagination and diversify the craft. From plasticine you can sculpt not only the pig itself, but also decorations. Make a piggy with your own hands for this New Year 2019 from plasticine right on the eve of the celebration or practice in master classes and videos now. You can take this cool little pig to kindergarten or school to show it to your peers.
List of materials for the master class
- multi-colored plasticine (beige, pink, black, brown, green, yellow and blue)
- plastic spatulas and other tools for working with plasticine (optional)
- working surface
- board, sheet of paper or cardboard for presentation
Instructions with step-by-step photos

Do-it-yourself yellow pig (Boar) made of corrugated paper, the simplest master class
A craft that even 3-year-old children can participate in is a yellow pig-boar made of corrugated paper, which is glued together from two large parts. In kindergarten, it is better to make such paper pigs (hogs) using simple PVA glue or entrust the gluing to the teacher. At school, older children can easily handle crepe paper. Step-by-step photos demonstrate how you can make the most basic image of a piggy with your own hands. The color yellow was chosen to highlight the coming of the 2019 Earth Pig. The New Year's attribute should bring good luck to those who receive such gifts under the tree. The easiest part of the master class on making a yellow pig from corrugated paper can be done even by Small child. You just need to wind identical strips in a circle one after another. Since the easiest master classes are selected for kindergarten, you can complicate the task by watching the video. From paper of different colors you can create complex designs for exhibitions and competitions at school. By the way, such easy crafts without paper patterns can be done at school even during breaks.

List of materials for the master class
- piece of corrugated paper - 30 x 50 cm
- plastic eyes for toys - 1 pair
- hot glue gun
- small piece of black paper
- scissors

Instructions with step-by-step photos
- Cut strips 1 cm thick. In this case, the paper must be cut along and across the corrugated lines. Otherwise, the pressed surfaces will not adhere.

- Wind the strips in a circle. Their number depends on the size of the pig you want. In this case, the diameter finished product- 8-9 cm. Leave one strip untouched and glue the free edge.

- Fix one end of the last ribbon to the circle with glue. Wrap it until there is a free edge about 10 cm long. At this distance, fix the tape with a drop of glue. Make a bend in the form of an ear with an indentation of up to 1 cm on the circumference and glue it again. Make the second ear in the same way and glue the free edge.

- Cut strips 6-7 cm thick for a nickel. Twist and secure with glue.

- Cut out two small peas from black paper. Glue them onto the patch, and then glue the small part onto the large one. Add the eyes and you're done.

On the eve of the New Year, men, women and children who prefer to create gifts and souvenirs for their loved ones with their own hands can try to independently recreate souvenirs associated with the Eastern horoscope from improvised means. Such a creative approach will certainly attract the attention of the patroness of 2019 - the Yellow Earth Pig (Boar), giving the home atmosphere a little magic and the feeling of a fairy tale. Well, if children also participate in the process of repeating one of the master classes, then it is possible that they will take a good example from their parents, repeating this tradition from year to year. Moreover, as the belief goes, Eastern horoscope, if a thrifty, but not too careless pig likes him, he will give his admirer good luck, health, and just a happy year - interesting, isn’t it?!
The pig is a domestic animal considered sacred by Muslims. Therefore in New Year's Eve Not only should you not prepare dishes from her meat, but you must also respect her person. Crafts with the image of a cute pig or a charismatic boar are something that will be a good addition to the festive interior decor and the main gift for family and friends. Embroidery on towels, pillowcases for decorative pillows with classic cross stitch and satin stitch, weaving from beads and small beads, the art of macrame, appliques on thick material and cardboard, handmade postcards, origami art, figurine made of plastic, dough and elastic plasticine - only part of it , which can be seen in the article below.
Pig (Boar) symbol of 2019 with your own hands, what crafts can you make?
The choice of a suitable craft with the image of a pig depends on what it is created for. For example, if you really want to decorate a room, ideal solution will become an intricate fold of white paper, but beautiful origami, garlands of many shiny snowflakes cut out of foil, as well as original toys in the form of a pig’s heel or muzzle for decorating a Christmas tree.
You can also highlight your kitchen interior by sewing an oven mitt in the shape of a pig. Well, for bedroom and nursery decor, a good idea would be to sew pillowcases with hand embroidery, tilde pigs and knitting little piglets from yarn.
Little crafters can be offered simple beading patterns, puff pastry modeling and cutting out protrusions for window decoration. It is very important to be nearby step-by-step master class with a photo, then the symbol of 2019 with your own hands will come out no worse than that of a professional.
First master class - embroidery on a decorative pillow (pillowcase)
To highlight the interior of one of the rooms where there is a sofa or bed, it is enough to embroider a pig on small pillows or the pillowcases that come with them. Her image can be located on one part of the pillow or on the entire front side products. The sketch can include one pig, lovers, little piglets or fairy-tale pigs from your favorite Soviet and foreign cartoons.
To repeat the master class step by step with your own hands, depicting the symbol of the year using a gypsy needle and floss threads, you will need not only these tools, but also others: a pillowcase (the pillow itself), an embroidery pattern, a hoop (to secure the work), scissors.
The photos below show best schemes and templates that will help you make a beautiful applique. They can be printed using a printer at home or in a photo studio. To do this, just save the option you like by downloading the image to your desktop or downloading it.

Pig on the meadow (grass) photo

Piglets in caps


MK - toy pig on a spruce branch
A pig can be either a pet or an inanimate object used as a decoration for a beautiful Christmas tree. This is about holiday decoration, made with your own hands with a pig's face.
There are several options for master classes. Some involve creating a talisman-decoration from felt and thickened suede, leather and denim, while others are based on cheaper and more practical paper-based material. The choice depends on the ability to work with a particular material, as well as its availability at home.
The photo below shows examples of unusual toys that are easy to replicate even without experience in the creative field.


Pig potholder - third master class
A pot holder in the shape of a pig will be a useful and incredibly practical gift for the fair sex. A hand-sewn kitchen accessory will certainly attract the attention of mothers and grandmothers, as well as a beloved sister, close friend and even an aunt. The cute face of the 2019 symbol on the front side of the product will make cooking a more vibrant and interesting process, and the kitchen interior will be unique, thought out to the smallest detail.
When choosing a color scheme, it is better to prefer the classics of soft pink, coffee and black. The decision depends on what result you want to achieve. For example, if you want to make a pig, then it is better to make a choice in favor of a rich or pale pink shade, and a dark, calmer shade for the boar. The nose and ears can be highlighted in red and charcoal, the eyes can be sewn in the shape of small peas, and chestnuts, straw, a bow and even a cute scarf can be used as an addition.

Crocheted potholder in the shape of a pig photo

Potholder pattern photo


Pig (piggy) made of buttons - a simple and interesting Master class
The symbol of the year 2019 can be made from paper, fabric and beads, as well as small items found in every housewife’s needle case. We are talking about buttons of different colors and sizes, mounted on thick cardboard or a plain light-colored fabric. Not only the 25+ audience, but also children can make such a craft. preschool age and primary school students who have at hand step by step photo instructions.
Examples of work and a visual master class in the photo below will help you create incredibly beautiful and unusual crafts for the New Year, which you are unlikely to see among friends and relatives in the interior of the house.

Origami from paper and cardboard diagrams - paper master class No. 5
So that children do not watch their parents, but are busy with interesting things, you can try to interest them in the art of origami. Folding paper according to thoughtful patterns will help bring to life the figures of various animals, birds, mammals and inanimate objects.
Origami was first created in China many centuries ago, and since then it has gained many fans among people of different ages. In large cities, even training exercises are being created to master this difficult technique. Teachers who ideally know origami patterns teach children and inquisitive adults what they themselves can do. So why not try, on the eve of the Christmas holidays, to create a symbol of 2019 from a white A4 sheet.


Master class No. 6 - beaded pig, simple patterns
Weaving a pig, a pig and a boar from beads and wire is not as simple as it seems at first glance. Complex technology requires a lot of effort, time and patience. Each pattern involves connecting miniature beads of different colors together.
Important! Instead of thin aluminum wire, you can use fishing line, which does not break under load and can last for more than one year.


Master class No. 7 - felt pig, pattern
If a child loves soft toys and is always happy to receive a new plush pet as a gift from his parents, why not combine business with pleasure by creating a safe gift with your own hands that does not cause allergic reactions. A cute felt pig is a complicated craft, but it’s worth repeating again using the master class with photos below.
The symbol of 2019, made with the help of such tools as: a pattern, threads, felt, a needle, filler in the form of padding polyester or cotton wool, a glue gun, buttons and fabric paint to draw the eyes of a pig will help you create a masterpiece from nothing within a few hours.
To get the job done, just repeat step-by-step master class below to get a soft toy that your child will love and become his amulet for the next 365 days.


Master class Pig No. 8 - piggy bank (piggy) from a plastic bottle
It’s easy to create a capacious piggy bank with your own hands, personifying the shell of the patroness of 2019 - the Yellow Earthen Pig. True, comparing it with other crafts, it is better to make it by an adult. Due to the small plastic objects required in the master class that need to be cut out with scissors or a knife, sharp edges, wire and oil paint, creating crafts with children’s hands is not safe and is harmful to health. Therefore, if you make a masterpiece, then only for your parents.


Master class No. 9 - pig bowl for the garden and vegetable garden
If you have an empty 5-liter plastic bottle, paint and small bottles at home, making a pig-shaped bowl is not difficult. The step-by-step instructions are an almost identical version of the piggy bank. The only thing that distinguishes that craft from this one is the cutout on the top.

Flowers in a pig bowl photo

Master class No. 10 - piglet from foamiran MK
A small pig made from foamiran, or as it is also called - foam Eva, is becoming increasingly popular among needlewomen of different ages. Elastic rubber or a material somewhat reminiscent of a suede surface is what will help create a beautiful souvenir that can be presented to friends, colleagues and good acquaintances in the form of a small present.


Master class No. 11 - polymer clay pig
Making a pig or polymer clay is the same as making a pig from plasticine. Reproduce small, but very beautiful baby, not only mom and dad can do it, but also their child, using the basic step-by-step instructions, as in the photo selection below.


Master class No. 12 - pig made from satin ribbons
You can create not only crafts, but also beautiful accessories, which can be used to decorate a little princess’s hairstyle for a matinee or New Year’s celebration. Cute pig faces created from coral and peach satin ribbons- an interesting and very unusual addition to high ponytails, tufts of hair and small bumps.

Hair tie with pig (pig) photo

Master class No. 13 - pig made from felt (felt wool)
A soft and neat pig made of felt fabric can become not only a souvenir that can be put on the wall or given to a friend, but also a symbolic keychain, an addition to the key holder and simply a talisman directly related to the hand-made symbol of 2019.

Craft from a toilet paper roll
Pig from a toilet paper winder - allows you to use household items without waste. Step by step creation symbol of the year from improvised means will allow children under 7 years of age to develop their creative potential.
The photo shows several variations with pig.

Balloon pig
Despite the fact that balloons are usually used to decorate the interior for a birthday or the birth of a baby, the New Year is another reason to please yourself and your loved ones with a festive interior. A pig consisting of 10 or more balls will be a good subject for a New Year's photo shoot and a reason for a positive mood.


Symbol of 2019 made from newspaper tubes
DIY pig made from newspaper tubes and painted, can become an original piggy bank, a basket for fruits or vegetables, or a candy bowl. The choice in favor of one of the decorative items depends on the experience of the craftswoman in creating decorative items and the interior of the house itself.

Piglet made of clay, photo MK
Clay can be used as a base material to create a small talisman that brings good luck, health and love. A DIY symbol of the year made from polymer clay is a good start for creating simple and complex figures for the New Year.


Pig made from geometric shapes
Geometry in creating appliqués - will teach your child to create beautiful New Year cards and crafts for the holiday. Circles, triangles, cut ovals, squares - everything that can be combined in one craft.


Especially for men - a barbecue made from a gas cylinder
Pork can not only be cooked, but also used as a “frying pan”. A brazier made from an old gas cylinder in the shape of a large pig can be used as a brazier in a summer cottage.
Important! It is necessary to cut the gas cylinder with extreme caution, having washed it in advance.

Barbecue in the shape of a wild boar


Corrugated paper pig
DIY symbol of 2019 step by step instructions can be made from corrugated paper. To create a miniature pig, you only need corrugated paper, scissors and a round base for attaching small parts.
In addition to the big pigs, corrugated paper can be used for appliqués and 3D postcards.


DIY wooden figure photo
You can carve a pig out of wood if you know how to work with it. Or, as a last resort, buy a finished work in a store. The decision is always up to our readers.
Examples and ideas of finished works can be viewed below.


What other materials can you use to make a pig with your own hands? List:
1) scraps of fabric;
2) light bulbs;
3) LEGO constructor;
4) socks;
5) thread;
6) plush;
7) textiles;
8) shells;
9) eggs;
10) tomatoes.
Pig from nylon, step-by-step master class in the photo

DIY towel pig


Pig 2019 is the symbol of the year made from plywood in the photo:


Finished works and ideas in the photo:

DIY symbol of the year 2019 from a sock photo


