Christmas tree toy origami icicle. Christmas decorations. How to make origami from paper for a Christmas tree. Exclusive paper decorations
With the approach of the New Year, every family strives to create a festive atmosphere in the house. And the main attribute of the holiday is an elegant Christmas tree. You can buy Christmas decorations in the store or make them yourself from improvised materials. Such New Year's crafts look very beautiful and original. One of better ways The ornaments of the evergreen beauty are origami paper balls.
Schemes and jewelry options
Currently, there are a large number of origami schemes. Some of the most unusual are origami paper magic balls. It is from the simple transformation of a paper sheet into interesting figures that acquaintance with the origami technique begins. Balls made using the Kusudama technique are a real work of art, as they attract the attention of many people with their perfect shape.
 Through abundance color solutions they may well become an ornament on Christmas tree or an extraordinary gift to loved ones. Also very popular is the modular 3D origami technique, in which a whole figure is assembled from many identical parts (models).
To fold each module, one sheet of paper and the rules of classic origami are used. Due to the force of friction, the modules are held together. Creating a simple origami consists of folding paper shapes using mountain and valley folds.
Another technique is folding along the sweep, that is, a drawing showing all the folds of the finished model. And also very popular is wet folding, during which paper moistened with water is used. It allows you to make smooth and expressive lines.
Paper origami ball: module diagram
simple figurines
To make your own simple paper ball, you need:
- paper, such as multi-colored square blocks for writing;
- scissors and glue;
- mug or compass with a pencil.
You need to take prepared paper sheets and cut out circles from them. To make a ball, you will need 32 circles with a diameter of 10 cm: 16 of blue color and 16 red. Each resulting circle should be bent in half. And then you can start gluing the parts together. To do this, apply glue to the upper outer half of the blue circle and glue it to the lower outer part of the red element. In the same way, it is required to glue all the details with each other, alternating colors: red-blue-red-blue. The result is a stack of semicircular leaves glued together, resembling a book.
 After that, you should unfold the figure and proceed to the next step - gluing multi-colored pages of the ball together. Pages different colors must be connected by different scheme. The red ones need to be glued like this: open the red circle and mentally divide it into 6 parts. The upper and lower parts of the left semicircle must be greased with glue, as shown in the picture, and the middle part should be left untouched. Next, you need to connect them with the first and third parts of the right semicircle. After the glue dries, you get something similar to a "pocket". Similarly, connect all the red "pages" of the ball of paper.
Then you need to start gluing the blue "pages". To do this, unfold one of the blue circles and apply glue to the most protruding part (second) of the left semicircle (marked with a cross in the figure). Next, connect with the symmetrically located part of the right blue semicircle. Do the same with all blue "pages".
Then it is necessary to fold the ball blank again with a “book” and wait for the glue to dry completely. Now you need to unfold the craft with a fan and check that all the “pages” are glued together correctly. Then you should put a loop of thread and glue the first and last “pages” of the “book” with glue, forming a voluminous ball. That's all, the blue ball with the red core is ready.
By changing the place of gluing multi-colored "pages", you can get a variety of options for a paper figure. This ball model can be used as a basis for making Christmas decorations and garlands.
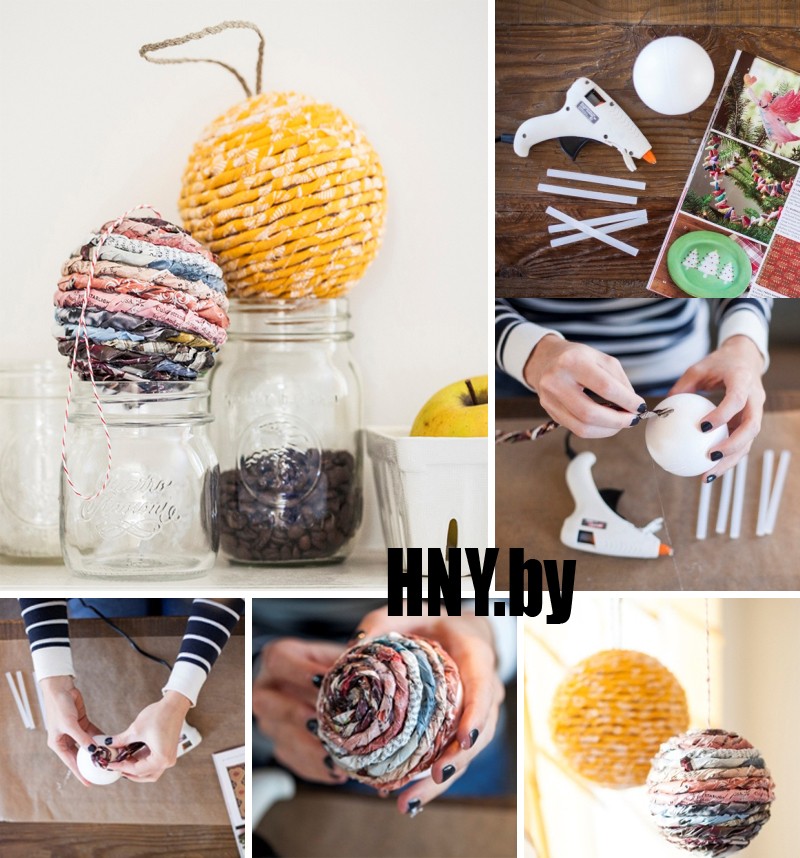
Corrugated paper toy
If you wish to do balloon flower-like paper then you need to prepare:
- wire;
- a thread;
- scissors;
- five sheets of corrugated paper measuring 60x40cm.
You need to take the paper and fold it like an accordion or into a roll. It is worth noting that the thicker the roll, the more petals will turn out and the more voluminous the ball will come out. Then you need to fasten the "accordion" in the center with a thread or wire and cut off both end sides of the "accordion" in the form of petals, and then carefully unfold them. In conclusion, you just need to spread the petals in different directions to get a voluminous craft.
Making crafts using the Kusudama technique
To make paper flower arrangement in the form of a ball, you need to prepare:
- colored paper;
- scissors;
- glue stick;
- simple pencil and ruler.
If you want to use a ball to decorate a Christmas tree, then approximately in the middle of the stage of fastening the flower modules, you need to attach a hanging cord inside.

According to a similar scheme, it is necessary to prepare 11 more flower elements and glue them together beautifully. Flower origami paper ball is ready.
Christmas ball of six modules
To create a ball, it is better to use double-sided colored paper: this way the New Year's origami will turn out bright and beautiful. Paper size can be any depending on the desired size of the ball. You will also need glue to assemble the parts together. Manufacturing technology:

Taking advantage step by step instructions and origami diagrams, you can do magical Christmas balls do it yourself.
Attention, only TODAY!
Many people think that the use of paper origami is not serious for the New Year and that it is child's play in craft classes, but this is actually not the case. By cutting out various paper figures from plain paper or simply using origami as a decoration, you can do a lot. Here's how to use kirigami and origami on New Year with your own hands in order to beautifully decorate your holiday.
How can they be used as Christmas decorations
Do-it-yourself origami crafts for the New Year can be found in a variety of ways. Jewelry from volumetric snowflakes, which look beautiful on the windows and become real New Year's additions to the hall, different, very beautiful napkins, isolated on black in an unusual way and even Santa Claus and Snow Maiden made of multi-colored paper - what could be better? Here are a few ways how you can interestingly decorate the New Year's beauty at home on your own using New Year's origami. 
First of all, thanks to the origami technique, various large hanging decorations can be made from paper for the New Year. For example, snowflakes that look just as good in a large room as store-bought room decorations and hanging garlands. White snowflakes made of plain paper can decorate a room with high ceilings. Even a beginner can make them using the scheme, but in combination with various decorations they will look very beautiful and stylish. You can choose various schemes decorations to make snowflakes look advantageous in your room. 


If you alternate them with various golden large balls decorated with artificial snow or white decorations, such as bows and other paper decorations, you get a very stylish, vintage winter look creating a Christmas mood. And by using monochromatic neutral-colored decorations (for example, matte white balls, beige and even black) in combination with multi-colored glitter paper snowflake stars, you can create bright and modern carnival looks. Such an interior will create a festive mood in the room where various concerts and events will be held. 


Origami Christmas trees can be used in New Year's decor tables and windows. If you bought an ordinary white tablecloth for the holiday, then you can arrange beautiful green Christmas trees on it among the glasses. Or surprise guests with unusual napkins that will create a festive mood. And you can also hang New Year's origami on windows or come up with a whole composition for the New Year, which will look very beautiful and stylish. Usually complex origami is made of paper to put an unusual Santa Claus and Snow Maiden under the Christmas tree, as well as various characters such as a snowman and even a deer. However, for those who are still unfamiliar with the art of origami, christmas toys it can be advised to start creating with simple decorations that are used in interior design. Here's what you can do yourself for beginners for the New Year. 


Large origami star snowflake
Beautiful and fairly simple do-it-yourself Christmas toys that you can make yourself from plain paper for a printer and a copier. For this you need to take:
- stapler;
- 6 or 8 sheets of plain white large paper;
- scissors;
- a thread or rope on which you can hang stars from a window, a Christmas tree or from the ceiling.
How to make a snowflake star


The paper must be cut so that squares of the same size are obtained. Then cut as shown in the diagram in order to get incompletely cut squares. After that, you need to connect the opposite ends with a stapler so that you get the voluminous part of the snowflake. Then, using a stapler, you need to connect the parts and the snowflake is ready. She can decorate the New Year's room, as well as various ones, just hang them on the Christmas trees. Large snowflakes will look interesting under the ceiling in a wide room, and small ones can be used as a complement to the New Year's decor. 

Also in origami, you can make ordinary voluminous snowflakes of a classical form. They look especially impressive if they are made of silver paper or gold. However, white origami snowflakes can also be a wonderful Christmas tree decoration or just an element. Christmas garlands from paper. There are diagrams on how to do them on the Internet. They can be completely different, but in any case, even a beginner will get a beautiful and bright snowflake. Such made crafts will harmoniously look in the house when creating New Year's decor.
small Christmas trees
For beginners, you can use origami Christmas toys - beautiful Christmas trees, which can be made from napkins and various other materials. The easiest option for beginners is a small voluminous Christmas tree on a leg. 
In order to make it, you need to take:
- green thick paper, the same color on all sides;
- a toothpick to hold the paper.
Now you can learn how to make a Christmas tree

At the very beginning, the paper must be folded in the same way as ordinary snowflakes. Then cut out a Christmas tree according to the template and put it on a leg from a toothpick. Such green beauties can be used to make napkins, as well as simply as an additional decoration for the New Year's table. 
You can also make original beautiful origami with your own hands, for example, Christmas trees from napkins. However, if you are using modular origami And complex schemes, then the napkins should be sufficiently dense. For origami you need to take various options thick paper, otherwise it may be damaged during the manufacture of the Christmas tree. 
New Year's crafts may be different. For example, you can create a beautiful voluminous Christmas tree from green thick paper. It is first folded like snowflakes to make a triangle, then it is cut on all sides so that there is the same distance between the cuts, and then the corners are bent in different directions. As a result, you should get a small voluminous Christmas tree. However, a simpler option can be made from soft napkins. To do this, 3 napkins need to be folded into triangles of different sizes, but the same shape. String the top ones on the lowest one, and after that put or put such Christmas trees on the table. They look spectacular and just on a regular plate, next to the cutlery. 
Having mastered the simple ones, you can proceed to more complex decorations and make other New Year's crafts. They will look no less beautiful in your New Year's interior, and maybe they will become the basis of a wonderful holiday composition for children.
We continue our acquaintance with the Japanese decorative art of making various handicrafts. In this article, we will make New Year's figurines for the Christmas tree. This will require knowledge from another article, where it was shown for beginners, Invite children to participate in the work. They must know the art of paper folding.
Individual modules can be folded even by small children. A slight movement of the hands and the modules turn into Christmas decorations.
Paper origami Strawberry - crafts for the Christmas tree
Such a Strawberry can be made in different options- as a souvenir on a plate (modular or any other) or as a Christmas tree toy.
Strawberries are assembled from 59 red modules. Leaves require 7 or 13 green modules.


- Take 3 red modules and arrange them as shown in the photo. Insert the corners of two modules into the pockets of the third.
- Continue connecting the modules in two rows. When there are 4 modules in the first and second row, start putting on the modules of the third row.


3. Complete three rows of 13 modules each. Use the last modules of the second and third rows to close the chain into a ring.
4. Remove the ring. To do this, press your fingers into the center of the workpiece from the bottom up, and, on the contrary, pull all the outer corners back, from top to bottom.
5. Run another row of 13 pieces, placing them in the same way as the previous ones, short sides out. Please note that the modules must be planted shallowly, turning towards the middle and trying to bring them together as close as possible.


6. For last row take 7 modules and put them on through one, that is, skipping 2 corners. Bring the modules together.
7. Insert the green modules into the pockets of the first row. They can be inserted into each pocket (13 pieces) or through one (7 pieces). If you plan to use the Strawberry as a Christmas tree toy or pendant, then you need to make a loop for it. In this case, do not yet insert the 2 green modules opposite each other.
8. Bend the wire for the eyelet as shown in the photo. You can use a paper clip for this purpose, trimming its ends a little.


9. Lay the wire so that its ends are in the places where there is free space for the modules. Grasp the ends of the wire with the corners of the green modules and insert the corners into the pockets.
10. Pass the ribbon through the loop. You can hang strawberries on the Christmas tree.

Christmas tree toy Strawberry is ready.
Video how to make origami Strawberry
You watched the video on assembling origami Strawberry in other versions. The author has a different vision of a three-dimensional figure.
Christmas toys Orange and Apple - modular origami master class
To create an Orange, you will need 190 orange modules and 10 green ones.


- Take 3 orange modules and arrange them as shown in the photo. Connect the modules together.
- Collect three rows of 19 modules each and close them in a ring.


3. Turn the ring inside out by lifting up all the outer corners at the same time.
4. Continue to put on rows of 19 modules each, placing the modules with the long sides out. The whole figure consists of ten rows. From about the fifth row, pay attention to the formation of a ball.
With your fingers from the inside, attach the workpiece desired shape. The modules of the last rows should converge closer and closer with corners to the center. You can press on the workpiece from above to flatten it.
5. Bend the wire for the eyelet, as in the photo for the Strawberry. You can use a paper clip for this purpose, trimming its ends a little.


6. Remove the 2 opposite modules from the last row. Put a loop in their place and insert the modules back. Thread the ribbon into the resulting loop.


7. Let's make leaflets. To do this, unfold 2 green modules and grease the valves of one of them with glue.
8. Insert the adhesive-lubricated valves of one module into the pocket of the second module.


9. Glue the valves of the second module on the reverse side.
10. The junction of the modules will become the central vein of the sheet. Screw the corners onto the stick on the sides of the central vein.


11. Squeeze the leaf a little at the back, forming the desired shape. The part bent in the photo will serve to attach the leaf to the Orange.
12. Make five leaves and attach them to the Orange, inserting the indicated parts into the gaps between the modules of the last row.

Christmas tree toy Orange is ready.
Video how to make origami Orange
Tip: Just like Orange, you can make a Christmas tree toy Apple. Choose any combination suitable colors. The leg can be made of wire wrapped in paper.
And then you get another Apple craft.

Christmas tree toy Apple is ready.

As a result, you just have to hang your own hand-made Christmas decorations on the Christmas tree and celebrate the New Year. Such toys are not sold in stores.
When winter comes and approach new year holidays I want to decorate my house beautifully. Hand-made crafts look original and unusual. In order to make, for example, kirigami or origami for the new year with your own hands, you need to master several techniques. One such technique is the origami technique. The art of folding paper without the use of scissors and glue came to us from Japan and very quickly spread throughout the planet. Now a lot of people are fond of this technique, and new schemes appear all the time.
In the technique of origami, you can make any new Year decoration. The main thing that is needed for this is desire and patience. So, here are some interesting crafts handmade origami for the New Year.


Thanks to the technique, I fold paper crafts, you can create origami New Year's toys. The rooster is the symbol of the coming year. It is not so difficult to assemble it, but in order for everything to work out, you must follow the scheme:


- It is necessary to take a square cut out of paper;
- Fold the square so that you get a triangle, and an inflection line is formed in the middle;
- Bend the edges of the square to this inflection line so that two vertical triangles form along the diagonal line;
- Next, you need to make two folds and perform another fold inward;
- The next step is to fold the cap;
- Next, the corners are driven away from both sides to form wings and two folds are made inward to form the head of a rooster;
- The rooster is obtained with its head down.
More details on how to create a paper rooster, master class


DIY origami tree


It does not always play a role what is donated, it is important that it be done from pure heart and if the present is made with my own hands, then it is valued even more, because the person who gave it spent his time.


A Christmas tree is a New Year's attribute, and a New Year's origami - a small paper tree looks original and very attractive. In general, you can come up with different New Year's origami, the main thing is not to be afraid to create and remember, everything will work out.


To know how to make Christmas tree origami, you need the following:
- Take a cut out square from green paper. Size 20x20 or more;
- Bend the square diagonally, unfold and create a second diagonal, so that you get two fold lines;
- Fold the sheet in half, rotate ninety degrees, open, rotate and fold in half again;
- After all these operations, you should get a square with folds marked crosswise;
- Then it remains just to assemble the Christmas tree;
- The square again needs to be bent in half, its side corners need to be bent inward. The result is a triangle;
- After this operation, a trunk is formed with four lower corners;
- The corners must be lifted up in order, while working on the table;
- Raising the corners, a rhombus is formed upward;
- The rhombus must be folded in half;
- The remaining corners must be folded, similarly forming three more rhombuses;
- The corners of the rhombus are further bent inward.
- The output is a voluminous spruce.


There is another technique to create New Year crafts called kirigimi. In this technique, snowflakes cut out of paper and other New Year paraphernalia are made. Jewelry made from this technique looks original and is fundamentally different from the origami technique, although outwardly they are very similar.


The main difference is that when making decorations using the kirigimi technique, you must use scissors and glue. When carving kirigimi, the tool must be sharp and of different sizes. This is necessary in order for the product of any size to look original and of high quality. It is very useful to engage in such a technique, as it develops thinking, imagination and Creative skills generally. Both adults and children find this activity interesting. Kirigimi is a great alternative to computer entertainment.
We offer kirigami templates for cutting New Year's


Kirigimi paper snowflakes


Snowflakes are the most popular decoration that you can prepare for the new year. Snowflakes can serve as an independent decoration, or they can complement other decorations, creating a complete stylistic composition.
The snowflake is cut out of paper, so no special tools are needed.
For manufacturing you need:


- Take six sheets of paper, scissors, a pencil, a ruler;
- Fold a sheet of paper so that four parts are obtained;
- Perpendicular to the fold line of each edge, make two-centimeter cuts;
- Having unfolded the paper, it will be necessary to roll up the cutouts, this will form a roll, and glue them with glue. After this operation, the snowflake will have rays;
- Since we prepared six sheets of paper, it is necessary to do the same operations with each of the sheets;
- After that, all the rays must be collected and connected with a stapler. It turned out a snowflake in the technique of kirigimi.


No bright balls from the supermarket, no lights flashing in different colors, no expensive designer sets for decorating Christmas trees can compare with DIY decorations.
Of course, such decorations from the supermarket will make the evergreen guest bright, modernly decorated, but they are unlikely to be able to carry the New Year mood so joyfully as the toys made on their own.
There are a lot of ways to make Christmas decorations, but the most simple, attractive and not requiring much time are toys made of paper. To create them, you may need quite a bit, improvised materials that are stored in every hostess at home. Stock up on a bit of patience and wings for a creative flight of fancy.
Christmas balls
What is the most common Christmas tree decoration? Of course, balls! You can always buy glass, plastic ones in the store, but we will try to make them from thick paper. This includes colored cardboard, old postcards and covers of unnecessary magazines. Colored cardboard balls, plain, will give the Christmas tree or the room that you want to decorate a single style, and multi-colored balls will bring the atmosphere of a holiday, magic and a winter fairy tale.
Before you sit down to do new toy, prepare:
- thick paper;
- use old magazines, cardboard boxes or candy boxes with bright patterns;
- glue, PVA is best;
- scissors;
- a compass or any other object that you can circle around to get an even circle.
Take your cardboard and circle twenty-one identical circles on it, then cut them out with scissors. Each circle is to be folded as follows: bend the circle in half twice, on one side and the other, then straighten it, this will mark the center of the circle.
Bend only one side of it again, so that the edge of the circle is exactly in the intended center. Bend again so the two sides, so you get a triangle. In one of the twenty circles, cut out this triangle, it will serve as a kind of stencil for the rest of the circles. All that remains for you is to impose a triangle on the rest of the circles, circle it and bend the edges of the circles outward along the office.
Take the first ten circles and glue them in a strip, alternating: five down - five up. Glue the resulting strip into a ring, this will serve as the basis for the toy.
Divide the remaining ten by five, and glue them into a circle. By gluing them, you will get two caps.
The top and bottom covers will be glued to the base in the same way. Consider a loop to hang your toy from.

Children can easily help you make such a New Year's toy: you will need scissors, colored paper, packing tapes.


See more:
A great idea for a Christmas tree toy is a miniature Christmas tree made of paper. You can make it from thick paper or old postcards, and you can hang your masterpiece on a regular thread.

By the way, if you do not have a real Christmas tree, you can make your own magical Christmas tree. See the article for more ideas:
Large volumetric snowflake
Snow is obviously the most important attribute of winter, and a snowflake is the main decoration of the house for the new year. A snowflake can be cut out of paper, glued to a window, as is often done. What about voluminous snowflakes? It is as easy to make as it is to cut. To create it, you only need scissors, a stapler and, of course, paper.

Cut 6 squares of the same size, bend each square diagonally, and then in half. Make parallel cuts along the folds with scissors. Expand the squares, and wrap the inner stripes and fasten them together. The resulting petals are interconnected with a stapler, although glue can also be used. Such a large snowflake can be sprinkled with sparkles or assembled into a garland. You can decorate it with a window, walls or hang it under a chandelier.


What could be easier decoration than large, voluminous paper candies? It is very easy to make them, for example, from old foil or beautiful wallpaper left over from the repair. Be sure to find paper with a bright pattern. And for this, you just need to measure a small rectangle, twist it into a tube, tie ribbons around the ends. If you are afraid that your toy will lose its shape, then twisting, you can put any unnecessary thing in the shape of a cylinder between the paper, for example, a cardboard cylinder from toilet paper.

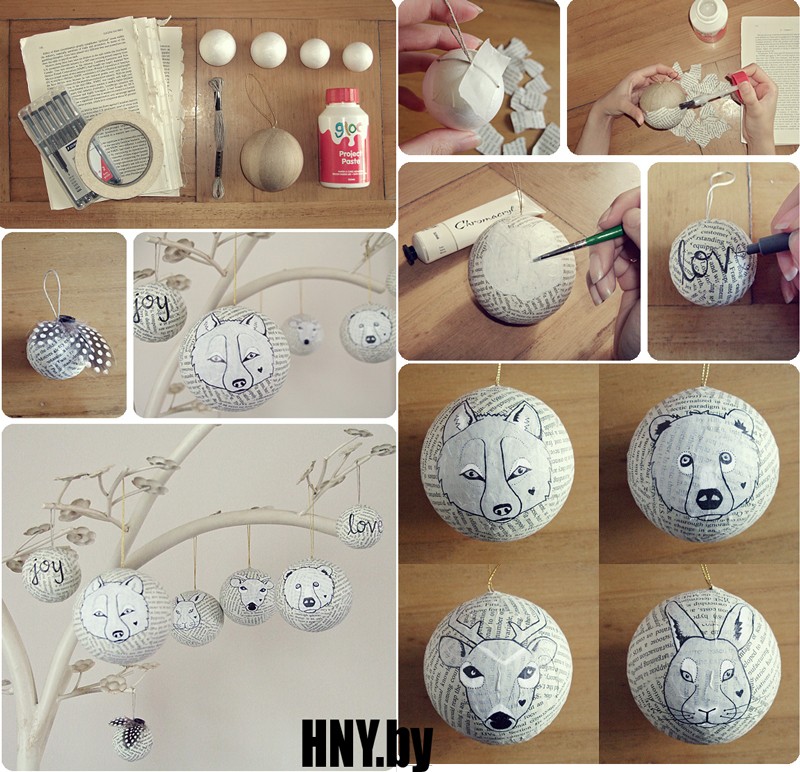
Toys with family photos
Some types of paper balloons can be made using family photos. Such New Year's toys will be the most special, because the important and significant moments of the outgoing year will remain with you, and the next New Year's toy will remind you of pleasant moments again. By the way, do not forget about pets, let them also remain on your memorable toy, because a dog, a cat or even guinea pigs are also waiting for the New Year holidays!

Flashlights from childhood
What about flashlights? You must remember from childhood how to make paper lanterns. With a little imagination, you can easily come up with a new design for a simple flashlight. To completely diversify simple craft, you can decorate it with sparkles, make it from colored paper or printed paper, paint it with paints, add new details. Everything to your taste.


Christmas paper angels
What about New Year's angels? Do you also remember how to make them? Angels can be made from golden paper or newspapers by coloring or adding glitter to them.


Christmas paper cones
What is a tree without cones? You can decorate a Christmas tree with ordinary cones from the forest, but you can make your own magical ones. There are several ways to make paper cones: it all depends on your preferences, availability of free time and patience. The easiest option is a bump from old postcards.


You may be interested in:


Lace garland
A magical lamp can be created from a simple luminous garland, for this you only need paper and small scissors, with which you can easily cut lacy snowflakes. You can find patterns for snowflakes on the Internet or print them out so that you can then cut out the figures according to the office. You can put light bulbs from a garland into the holes cut in snowflakes, hang such a garland on a window or on a Christmas tree, it will be very beautiful.

A small life hack: if you don’t have time to cut lacy snowflakes, or you can’t make them even and neat, buy lacy napkins in the supermarket, this will shorten your work time, and store napkins will look much neater. The garland will create a bright New Year's mood. Feel free to get to work!

See more garland ideas:
Cardboard Santa Claus
You can diversify the decoration of your home and Christmas tree with the help of snowflakes, flowers and lanterns, stars and balls, but what about the most important New Year's miracle - Santa Claus? You can make a funny garland out of little cardboard Santa Clauses, especially if you add different facial expressions to the grandfathers.

To make things easier, you can find toy stencils that only need to be cut and glued.

Christmas tree house
You can decorate the Christmas tree with a paper house. Such a toy looks especially great if you put an electric candle or a garland light bulb inside. Then the windows of the house will glow, as if someone lives in it. Paper houses are made very simply, you can do without a template. You will need paper or old postcards, scissors and glue.


Stars
You can decorate the Christmas tree with paper stars. They are made very simply, even kids can cope with such a task, but they look very original!


A New Year or Christmas wreath is usually used to decorate the front door or hang it on the wall. But you can make a mini paper wreath that will look great on the Christmas tree as a toy.

Well, if you want to make a real Christmas wreath with your own hands, then see:
Toys that you made for the holiday with your own hands are the key to a cozy holiday atmosphere. Happy New Year!
Help us become better: if you notice an error, highlight the fragment and click Ctrl+Enter.