Easy, simple crafts for kids. Do-it-yourself corrugated paper crafts: New Year's, mother's day, holiday, birthday, kindergarten. Easy, Simple Crafts for Kids Kindergarten Birthday Crafts
Children, as they say, are the flowers of life. And this saying is reliable and correct, because with the birth of a child, each person literally changes for the better. It becomes softer, kinder and more responsible. All families in which there is at least one baby are trying to surround him with care from both sides, parental love and warmth. But the time comes when the little ones grow up and they need to develop further socially, visiting kindergarten. So that the kids do not feel a lack of attention, educators, in addition to drawing, sculpting, singing, dancing, physical education, games, are engaged in making crafts from a variety of improvised materials, either plastic bottles, paper, or cardboard, dried tree leaves, cones, etc. . If you, as a teacher, are interested in this creative work that is useful for children, then we advise you to visit our article. In it, we will provide 11 photos of easy craft ideas for kindergarten with our own hands made quickly, simply and beautifully. Prepared videos from phased master classes, which contain an accessible description of all the works we have proposed, will reveal to educators the basics of children's applied art. They, in turn, will teach the kids to cope with the task on their own or with a little adult help. In one case or another, needlework will bring a lot of positive and skills to the younger generation, will allow you to learn the world as deep as possible.
paper bookmark
The most popular paper craft in kindergarten is the bookmark. It is easy to perform even with small children 4, 5, 6 years old. The bizarre muzzles of animals made by hand will look very organic. Below you can watch the master class with step by step instructions.
You will need:
- colored paper, size A4,
- scissors,
- pencil,
- glue.
Progress:
- To create a wonderful bright craft in kindergarten, you first need to draw a square on a sheet, measuring 20 X 20 cm. Divide this square with a pencil into 4 equal parts. You should get 4 squares, 5 X 5 cm in size.
- Divide the upper right and lower left square with lines so that triangles are obtained. You need to draw a line from the upper left corner to the lower right. The lines must be parallel. The outer triangles must be crossed out, they are not needed.
- We cut out a figure from paper with our own hands without taking into account the crossed out areas. Trim the top triangle. If the paper is laid flat, then in appearance it resembles a rhombus with two triangles glued.
- We fold each triangle in half and put it in turn on the base of the rhombus. The pocket that turned out is a bookmark. He puts on the corner of the page, thereby fixing it.
- On a pocket of colored paper, you can cut out any application and stick it. Like this interesting craft for a kindergarten with our own hands, we succeeded. Use the idea we have proposed, and let the photo serve as a good example for you.
Video: bookmark for books "Panda" using the origami technique
Christmas ball of pasta
A great option for children in kindergarten is pasta crafts. There are many variations of such pasta works, because they are available and everyone has in the house. So you can make a Christmas tree decoration with your own hands - a Christmas ball. See the description below for detailed instructions on how to make it. 
You will need:
- balloon,
- glue,
- pasta,
- dye.
Progress:
- Inflate the balloon to the desired size and tie off.
- Then we apply glue to each pasta, gluing them together.
- After you have made a small blank of several pasta with your own hands, we attach the blank to the ball (for convenience, you can fix it with PVA glue by gluing it to the ball). Thus, we glue the entire ball with pasta, leaving a gap from one piece near the knot. Now we are waiting for everything to dry, with Moment glue the drying process will be faster, but if the craft is done together with the child, it is better to use PVA.
- When everything is dry, pierce the ball with a needle and pull it out through the hole, and then glue the remaining pasta.
- You can attach a string or ribbon to your Christmas tree decoration could be attached to the tree. Such a ball can be painted with paints, or you can leave it in its original form. Such a beautiful craft can be easily done with a child of 5, 6, 7 years old, both at home and in kindergarten, with the help of an adult. Remember our idea and the photo adjacent to it, it will certainly come in handy.
Video: Christmas balls handmade pasta
Plasticine cow
For babies junior group you can offer to create a plasticine ladybug with your own hands. Crafts from this improvised material can develop not only the motor skills of the hands, but also the imagination of the child both at home and in kindergarten. A cool creation is designed for children 7, 8, 9, 10 years old, which can be done very simply on your own. In order to carry out such creative work right, see our master class with step-by-step instructions and a photo idea. 
You will need:
- plasticine (red, black and white),
- plastic cover, diameter 10 - 12 cm,
- pen,
- white sheet of paper.
Progress:
- In order to get a colorful and fun children's craft made with our own hands, we need to mold a round body from red plasticine, and from a black spot on it. Also, black plasticine is used to form the legs and head.
- It is necessary to take a plastic transparent cover and draw a flower resembling a camomile on it with a pen.
- Place a white sheet under the bottom of the lid so that the outlines of the pattern are visible. Then glue the flower along the contour of the image different colors plasticine. Here in such a simple performance, you can create other types of crafts for holidays such as March 8, Easter, New Year 2018 and more. Decorate them with exhibitions in kindergarten or just become original gift for friends and relatives.
Video: making a ladybug from plasticine with your own hands
Bee
Regarding our photo idea, an ordinary plastic bottle with a volume of 0.5 liters can also serve as a material for children's crafts. Such a good craft for children in kindergarten or at home will please everyone, because with your own hands, work will seem exciting and completely uncomplicated. In order to figure out how to do it, let's see a step-by-step instruction with a detailed and understandable description. 
You will need:
- plastic bottle 0.5 l and 1.5 l;
- colored paper;
- paints;
- scissors.
Progress:
- A 0.5 liter bottle must be painted with paints or glued yellow colored paper on it.
- In a similar way, make bold black lines on the bottle with your own hands.
- On the paper cover, cut out the eyes, mouth and antennae of the future bee.
- We cut out the wings from a 1.5 liter bottle and glue them with glue. The result is a pretty yellow bee from an ordinary waste material. A good handmade craft for children in kindergarten. It will perfectly decorate any group, playground, annual themed exhibitions and more.
Video: making a bee from a plastic bottle
Vase
Another way to use waste plastic bottles in crafts is to make a vase with your own hands. Such a bottle can be transformed into a decorative vase with a cute muzzle of cats or other animals. Best photo the idea for kindergarten children is presented in our article with a full description and step-by-step instructions. Help the kids create something similar and creative, give them the opportunity to be proud of themselves and their achievements. 
You will need:
- Plastic bottle,
- Paints,
- Sponge (for painting),
- Marker,
- Scissors.
Progress:
- To create DIY crafts, you need to cut the bottle in half and take only the lower part for creativity.
- We cut off so that the edges are even and leave two triangles so that we get ears.
- With white paint, using a sponge, completely paint over our workpiece.
- Draw triangles on the ears and nose with a brush in pink.
- With a marker we draw a muzzle of a cat.
- Our craft in the form of a vase or pot for fresh flowers is ready. She, if desired, can be placed in a kindergarten group, somewhere on the street in the yard, or presented to her mother on March 8 as an unprecedented originality. Such a value will be very dear and pleasant to her!
Video: do-it-yourself master class on creating a vase from a plastic bottle
Craft "Cipollino"
For handicrafts in kindergarten, you can use fruits and vegetables. From onions that have already sprouted, you can make the Cipollino craft with your own hands. Such a creation can be easily done with a child of 3, 4, 5 years. To correctly and without problems fulfill the idea provided by us, see the detailed description below with a clear photo. 
We will need:
- Small head of onion
- Jar (the hole diameter of the jar should be smaller than the onion),
- colored paper,
- Scissors,
- Glue,
- markers,
- Plasticine.
Progress:
- On the bulb itself, it is necessary to draw eyebrows, a mouth and cheeks with a felt-tip pen, and make eyes and a nose with your own hands from plasticine.
- Paste the jar with paper and draw the torso of the cartoon character on it.
- Insert the "head" of the craft into the jar. It turns out very nice and believable Cipollino. For kindergarten - this is a real find that will appeal to all the kids and teachers. Even if your baby is developing at home, you can diversify his leisure time with this creative work.
Octopus
Woolen threads can also be used as a material for children's crafts. Of these, you can make a fun octopus with your own hands, which your child will really like. This job is very easy to do and won't take much of your time. You can watch the master class with detailed description our suggested idea with a photo to create such a creation yourself. 
We will need:
- Woolen threads (60 threads, 35 cm long) and a little more for tying,
- Ribbon,
- Small plastic ball (for head)
- Colored paper (for the eye), or you can use ready-made ones from the store,
- Scissors.
Progress:
- To make crafts in kindergarten or at home, we take the chopped threads and put them together, tie them in the middle with a thread and put a ball under it. Wrap the thread around it and tie under the ball. This will serve as the head of the future octopus.
- From the remaining threads, weave pigtails in the form of his tentacles with your own hands.
- Draw eyes on paper, cut and glue, or use purchased ones.
- Tie ribbons on your head to decorate the craft. Our octopus from the available material at hand is ready.
Video: do-it-yourself master class on making an octopus from threads
Butterfly
One of the simple crafts in kindergarten or at home is a butterfly from paper napkins, even a child of 3, 4, 5 years old will cope with such work. This article presents step by step wizard class on this idea with a photo so that you can easily deal with it. Such a handmade butterfly will delight anyone, and most importantly, it can be conveniently fixed anywhere - in a group on curtains, flowers, or even at home as a creative unusual decoration. 
You will need:
- Napkins,
- Pin,
- colored paper,
- felt-tip pen,
- Scissors.
Progress:
- It is necessary to take napkins of two colors of different sizes and stack them on top of each other, with a smaller napkin on top. Gather in the middle.
- We place the napkins in a clothespin with our own hands, which will serve as the body.
- On a clothespin we draw a muzzle for our beauty, and we make antennae from colored paper and attach them to the clothespin. All our crafts in the form of a butterfly - beauties are ready. For kindergarten, this would be a wonderful idea.
Video: master class on creating a butterfly from a do-it-yourself napkin
Bug
From ordinary flat stones of a small size, you can make various bugs with your own hands together with children in kindergarten. To do this, it is desirable to be able to draw. Such a bug will appeal to everyone, without exception, both adults and children. And if you create them in large quantities, they will look great on a shelf or in a pot with fresh flowers. To complete this craft, below you can see Full description with step by step instructions. 
You will need:
- A pebble that resembles the shape of a beetle,
- Paints,
- Glue,
- colored paper,
- Scissors.
Progress:
- In order to create a beautiful craft for a kindergarten with your own hands quickly and easily, you need to cut out the base for the antennae and paws and glue them under the bottom of the stone.
- Paint the stone itself with paints in the form of a bug. That, in general, is the whole complexity of this creative work.
Hedgehog
You can make a hedgehog from an ordinary cone. This New Year's craft handmade, decorate the Christmas tree in kindergarten and bring pleasure from the process of independent work to all children. Below you can see detailed instructions how to make such a cute hedgehog. 
You will need:
- Cone,
- Plasticine.
Progress:
- We glue the muzzle on the sharp part of the plasticine cone, on the muzzle we also make eyes and the tip of the nose with our own hands.
- Now we make paws, also from plasticine. So we get a very cute and prickly hedgehog.
- Additionally, you can make a clearing by forming leaves from plasticine and molding a mushroom. Such a beautiful craft will become great idea for children's skills in applied arts.
Video: DIY master class on making a hedgehog from cones
Mushroom "Fly agaric" from a plastic kinder egg

To make the stay of children in kindergarten more interesting and memorable, it is necessary, of course, to include lessons, so to speak, of labor in general classes. In addition to drawing, it will be exciting for children to make something with their own hands from cardboard, paper, plasticine, plastic, fabric, and more. Waste funds can also become improvised materials. Various boxes, bottles, magazines and much more that parents can easily bring for children's games. Today we want to offer you, dear teachers, to organize an unusual activity with children that will teach them how to create small mushrooms "Amanita" with their own hands, as in the photo idea, from a simple plastic kinder egg. They, of course, are found in large numbers in every home where there are kids. So, let's start creating crafts, referring to our provided master class with step by step description course of action.
For work you will need:
- plastic kinder egg;
- cardboard or plastic cover for the stand;
- red cardboard for the mushroom cap;
- sequins for dots;
- stationery glue "Moment";
- satin or other ribbon;
- scissors;
- finished ladybug for decor.
Process of creation:
- We want to warn adults right away that despite the simplicity of the work, your help and close attention will still be required. Since glue and scissors will appear in the work, and this is not so safe for the guys. We take our plastic base in the form of a kinder egg and glue a satin ribbon to its bottom, folded in such a way that it resembles green grass in its appearance.
- Flowers can be made from colored cardboard or use ready-made plastic blanks. We attach them with clerical glue to the grass, as in the photo.
- Then we will need to create a mushroom cap. Red cardboard will help us with this. We turn it in the right way and glue the edges. Instead of black dots, we attach sequins for a more expressive look, and on top of the fly agaric we plant a ladybug bought in a store.
- We make a fly agaric “skirt” from a chiffon piece of fabric and fasten it along the edges of the red hat.
- We install the finished craft on a plastic cover or cardboard using stationery glue. So our product is ready, which will serve great decoration for a group in kindergarten. With your own hands, you can create other types of originality that will expand the imagination of the kids.
Finally
So our article has come to an end, which has provided you with a lot original photos ideas for crafts for kindergarten with their own hands made. We hope that some of them you still liked and you will certainly include them in your program. child development even at home. Moreover, the materials at hand can be so diverse and accessible that your imagination will immediately play out, giving birth to completely new creations. Transfer your skills to children in an accessible way, teach them to love and respect art with early years. This will allow the younger generation to be a little kinder to each other, more attentive to the world around us and its inhabitants, teach us to love and appreciate everything that is so beautiful and fragile around us.
Parents of children attending preschool, aware that every holiday is necessarily accompanied by children's crafts for the kindergarten. Some may find this task to be a waste of time. But for the majority, this is still an entertaining and creative process, as well as an opportunity to spend time with a child with interest.
It is important to keep in stock according to the season natural materials and then any task for the manufacture of works will not be taken by surprise.

Reserves of natural material
When traveling to the sea, you can pick up small stones and shells. In walks in nature, stock up on beautiful leaves, cones and twigs. At the summer cottage, you can plant decorative pumpkins - this is a good raw material for products that is subject to long-term storage.

Leaves can be stored in a book. It is better to hold the cones in the oven and pour boiling water over them, destroying all the bugs. It’s also best not to throw away toilet paper or paper towel cartons, and save plastic bottles with caps. Designate a place for these items by placing everything neatly in the box.
Crafts for kindergarten - this is what the child must cook with his own hands. The degree of difficulty is determined based on the age category.

With skillful direction, the child will be able to create an application, drawing, and mold a plasticine product on his own. Taking into work natural materials in the form of leaves and cones.

DIY craft ideas for kindergarten below will tell you how best to use non-standard tools, such as pasta or plastic dishes.

Plastic bottles can already be classified as standard materials, the possibilities for working with them are endless. Use matches, napkins, and sushi sticks, they are all great tools.

Products in autumn version can be performed as compositions or as independent works. Perky hedgehogs, old foresters or alien creatures in a flying saucer - all this can really be done by children's hands using raw materials given by nature.
Winter style products
In winter we have associations new year holidays, and also do not forget about the day of the defenders of the fatherland.

On February 23, military items will be relevant. Can be crafted Greeting Cards. Excellent products are made from fabric, but parents should take part in the creation, since it is necessary to cut.

The body is created from fabric, while the corners at the bottom should be stitched, this is necessary for stability. Next, fill the bag with padding polyester and tighten the thread.

It remains to create a face. The nose can be made from a beige bead. Eyes can be used ready-made or create an application. Embroider eyelashes, and build antennae from threads tied into a bundle. Give a tone with blush or lipstick.

Hands are made of fleece or cloth and glued. Alternatively, attach one handle to the cap. Ideas are endless, you can supplement the work with shoulder straps.

Works in the style of autumn
Products in autumn style are distinguished by the fact that for the manufacture materials given by nature are used. Leaves, cones and acorns of this raw material are in abundance in autumn, which is perfect for crafts on a site in a kindergarten.
As a rule, competitions of works are arranged in the autumn period. The kid is able to create an application on his own with a little help from his parents.

For products from vegetables and fruits, a knife is used, so the work must be carried out strictly under supervision. Paints are often used in gardens. But you can also replace them with material, for example, autumn leaves will serve as stamps for creating a forest.
Note!


You can tell the kids how the birds need their help and make a feeder together.

This contributes not only to the development in creativity, but also brings up a sense of caring for animals.

In winter, the death of birds is very high, because because of the frost it is difficult for them to survive, so care will be taken when creating a feeder.

For the feeder you need: a tree, a box and plastic bottles. Wooden feeders are known for their durability. But not everyone can handle this material. Cardboard is easy to use, but it will not stand up in wet weather.

In this case, the cardboard feeder can be updated periodically, and the baby will like its decoration. Plastic is the most unpretentious material. Easy to work with and will hold up after rain. The work uses a mock knife, so the process is carried out under the guidance of adults.
Note!


Street layouts
You can build situations that convey the meaning of reality, such a game will help you learn the movement on the road, study the signs. Street markings can be drawn with paints on cardboard, houses can be built from boxes. Decorate the urban landscape with greenery and, most importantly, make road signs and a traffic light.
Road signs can be printed from the Internet. A sign stand can be made from a plastic bottle cap and a sushi stick, and fastened with plasticine.

It is easy to create houses from cardboard boxes or glue them from cardboard and paint the facade. Trees are created from cardboard or natural materials.

If you finely chop the green threads and sprinkle them on cardboard, pre-lubricated with glue, you get grass. The soil is easy to create with grits glued to the surface.


Note!

One side has a background color and the other side has three traffic light colors. Glue a thread between the halves and the circle is easily glued so that you can turn it to the hole of one side or another.

bottle craft
Wall panels, plot compositions and toys can be performed in various techniques. It is very easy to make crafts from plastic bottles for kindergarten.
You can make a penguin. This will require two plastic bottles, with the bottom cut to the required size. And the part is placed one inside the other. For convenience, several cuts can be made in the inside.

With help acrylic paints coloring the toy. We make a pom-pom from threads - to decorate the hat.

The scarf is made of braid or fleece, it will successfully hide the junction of the bottles. For the stability of the scarf, you can put it on glue or double-sided tape. Colored paper is used for wings and paws.

Photo crafts in kindergarten


In the kindergarten where my children go one of these days there will be an anniversary - 40 years. Kindergarten teachers offer to take part in congratulations. What can be done interesting for the anniversary of the kindergarten?
It all started with the fact that the kindergarten methodologist recorded video congratulations from each group. She is preparing a video about the kindergarten and wanted to insert wishes and congratulations from the parents of the groups. From each group of the kindergarten, one parent was asked to congratulate the kindergarten on its 40th anniversary. The teacher of our group approached me and asked me to resolve this issue.
The next morning, at breakfast, while the children were still sleeping, I began to look at sites with congratulations from the kindergarten. After reading a lot of poems, she quickly composed her congratulations:
Our beloved kindergarten
celebrates 40 years
Group “……” the whole team congratulates
We wish you a lot of laughter
And obedient children
High salaries for everyone,
The atmosphere is friendly.
And we also wish you
Good health!
Joy, love, patience,
Prosperity for many years!
Actually, I told him on the video, to the methodologist. And off we go… I decided to make a wall newspaper.
I must say right away that the idea is not mine!
The wall newspaper in the photo was completely made by myself. The tree and the grass are painted with paints (gouache "Luch", beautiful paint!) on a large drawing paper. The sheet on which the poem is written is taken Here. It has a poem printed on it. The sheet is cut out and pasted on whatman paper.

Maple leaf taken Here.

When printing, I changed the size of 13x18 and 10x15. I cut and traced on colored paper of different colors: yellow, red, green, orange. Next, cut out from colored paper. You can print on colored paper right away, and then cut it out, but I have thin colored paper and the printer chewed it up.
Pasted on the crown of the tree randomly.
On each maple leaf written wishes. You can give each parent a piece of paper so that they write congratulations. Collect and paste. It’s hard to organize, you can’t catch all the parents, and I don’t have time to do it either. Therefore, I wrote all the wishes myself. Poems taken Here. A wonderful site, a lot of congratulations for all occasions - I recommend it!
The wall newspaper took me three days, 2-3 hours a day. To be honest, it wasn't easy! What happened - I like it!
Natalia Arsentievna Drobatun
On anniversary of kindergarten in all groups, parents prepared their crafts for the exhibition. taken in this exhibition and educators. I also decided to do birthday cake for kindergarten.
For work I needed:
colorful,
PVA glue,
pencils, pen
To make the cake, I needed a base frame. For this I used the old baby drum which has long since aged.

I dismantled it, pasted it over with white landscape paper.

The napkin was cut into 4 pieces. I wound one part on the handle and fixed it with PVA glue.

Then she began to pull the napkin to the middle on both sides, did it in small sections, rearranging it with her fingers, and then carefully removed it from the pencil.
It turned out here are such blanks-tubes for the cake. I have 4 colors: blue, white, orange and red.

Then I glued the tubes to the base in a circle. Here's what I got.

For the second tier, I used a Raffaello candy box.

For this tier, I prepared double tubes.

The napkin was cut into 2 pieces. I took 2 pencils and began to wind the napkin on both sides towards each other, fixed it with glue, and then began to pull it to the middle, carefully removed it from the pencil. The tubes are glued to the base. The second tier is ready.

For the third tier, I used the frame from the finished adhesive tape, glued it with multi-colored tubes of napkins.
We begin to collect the cake, glue the tiers together with PVA glue.
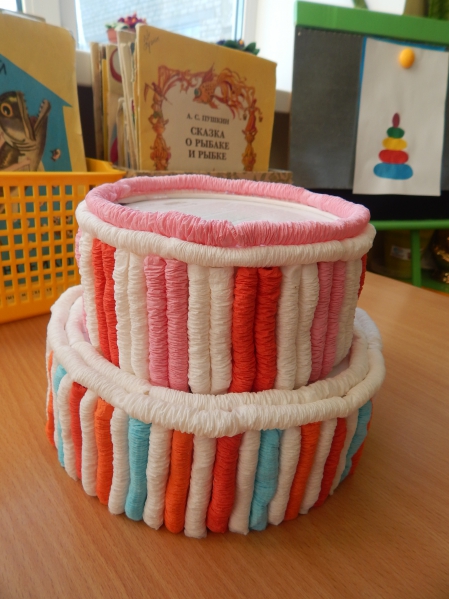
Decorate the cake with roses. I also made them from tissue paper.
We take a napkin, cut it in half, wind it on a pencil not reaching the edge by 3 cm, fix it with glue,

move from both sides to the middle, remove from the pencil.

These are rose petals. We begin to collect a rose in a circle

We glue the roses in a circle on the cake, at the top there is a large red rose,


This is such a beautiful cake. Too bad it's not edible.
Corrugated paper is an excellent material for creativity. This article provides you with beautiful craft ideas and handicraft tips.
corrugated paper— universal material for needlework and creativity. From it you can make a huge variety of crafts: gifts, jewelry, decor, packaging. The advantage of paper is that it keeps its shape perfectly and has a huge amount of color solutions capable of satisfying everyone.
IMPORTANT: There are two types corrugated paper: thin and dense. For needlework, it is best to use thick paper, as it can be transformed.
For example, try do voluminous Christmas tree . This craft will come in handy on the eve of the New Year holidays. It can be sent to children's competition in the kindergarten (school) or decorate the house at New Year's time.
There are several basic ways and secrets to create such a Christmas tree:
In order for you to get a beautiful and voluminous cone-shaped Christmas tree, you must have:
- corrugated paper sheet
- Cardboard sheet
- Scissors
IMPORTANT: In work, use dry glue in the form of a pencil. It does not leave wet spots and the work is neat.
Work step by step:
- A cone should be made from a sheet of cardboard. To do this, you need to draw a large and even semicircle.
- Cut out a semicircle, form a cone and seal the edges with glue.
- Corrugated paper should be cut into strips 5 cm wide.
- Each strip should be folded in half and formed with your fingers on it. three-dimensional pattern by pulling the paper.
- Now you need to wrap a strip of corrugated paper around the cone and glue it.
- Start gluing from the base and gradually move to the top.
- Ready product you can decorate with a cardboard star and beads that imitate toys and jewelry.
Realistic corrugated paper Christmas tree:
- For this craft, you should choose thick corrugated paper dark green.
- Use a thick wire as a base.
- Cut the corrugated paper into strips 10 centimeters thick. Each strip should be cut with scissors for twisting needles.
- We twist each incised strip with our fingers into a small tube.
- As a result, you will get the basis for the Christmas tree branch.
- The base should be wrapped around the wire, fixed at the base and smeared with dry glue on the paper.
- Having made a number of branches, make a Christmas tree. The craft is ready!

 Realistic corrugated paper Christmas tree
 Fluffy corrugated paper Christmas tree:
- You will need a package of thick corrugated paper.
- It should be cut into strips. The bottom layer is the widest. It should be 25 cm wide and 20 cm long.
- With each new layer, you should reduce the base by 2 cm in diameter.
- A sheet of paper should be compressed with an accordion and tied with a thread in the middle.
- The edges of the sheet should be torn or cut in a zigzag.
- One layer of herringbone consists of two pieces of corrugated paper, folded like an accordion and tied with thread.
- You can fasten the layers together using a clerical stapler or by stitching with a thread.

 How to make a Christmas tree base out of paper?
  How to assemble a Christmas tree from corrugated paper?
 Craft - corrugated paper snow maiden, how to do?
Thick corrugated paper can be useful for those who create New Year's compositions. With its help, it will be possible to make outfits for the Snow Maiden. The doll itself must be bought in a store or.
Corrugated Paper Doll Decor Ideas:

 Snow Maidens from corrugated paper
 Craft - corrugated paper snowflakes
Corrugated paper is great to create a magnificent and very beautiful snowflake, which you can decorate any room on New Year's Eve. For this you will need:
- Cardboard
- corrugated paper
- Scissors
- PVA glue
Work step by step:
- Draw a snowflake on cardboard
- cut her out
- Cut thin strips of corrugated paper, they do not have to be even.
- The cardboard base should be liberally smeared with glue and attached to it a strip of corrugated paper twisted into a rose.
- Do not lift the product to a vertical position until it is completely dry.
IMPORTANT: You can wind each strip of paper around the tip of a pencil, and then attach it to glue.

 How to attach corrugated paper to the base to make a snowflake?
  Fluffy crepe paper snowflakes
 Craft - "Mother's Heart" for Mother's Day from corrugated paper
"Mother's Heart" — interesting option crafts that you can give to your loved one or mother on any occasion. His big size and with an incredible volume, the craft conveys your feelings and literally “declares your love”.
In order to make such a heart, you will need thick cardboard base and thin corrugated paper packaging. Cut out a heart from the base. From corrugated paper - many pieces of square shape.
PVA glue is applied to the base. Each square of corrugated paper is wrapped around the tip of a pencil and thus transferred to the glue. Due to the fact that the edges of each patch are not even, you get a lush and relief pattern on the surface of the heart. A ribbon should be attached to the finished product, on which it is suspended.

 What should be the cut piece of corrugated paper?
 How to attach corrugated paper to the heart?
 Easy and simple children's crafts from corrugated paper in kindergarten
Corrugated paper can help transform any children's craft. Working with it is very simple and you can buy paper at any art and stationery store at an affordable price.
Ideas for crafts for children in the kindergarten from corrugated paper:
Eg, make a craft out of cardboard. Cut flowers, spread with glue and wrap in corrugated paper. Use material of different colors.

 Volumetric craft corrugated paper
 Very simple and beautiful from corrugated paper are obtained butterflies. To do this, you need to cut out two ovals from paper and twist the base for the body, as well as the antennae. The two parts are combined by twisting together.
 Corrugated Paper Butterfly
 A children's card can become very delicate and elegant if decorate her voluminous flower corrugated paper like a snowdrop. To do this, cut out a few white petals and the base for the leaf, as well as the green stem.
 Cards with voluminous snowdrops made of corrugated paper
 Adult children can do three-dimensional picture corrugated paper, gluing various shapes. Such an application will be very colorful and “lush” due to the lightness of the material.
 Application from corrugated paper "owl"
 Other crepe paper craft ideas:
 Christmas tree, flowers and corrugated paper bouquets
  Corrugated Paper Fire Truck
 Craft - voluminous corrugated paper rose
Corrugated paper roses very bright, beautiful and realistic. It can be both simple and complex crafts. Children can try rosette from a twisted tube of corrugated paper. It should simply be folded into a serpentine and glued to a cardboard surface.

 simple rosette corrugated paper
  Heart decorated with crepe paper roses
 More complex rose can be made from corrugated paper, cut into circles and folded into a cone. For such crafts, it is best to choose thin paper, it is more delicate and the petals will seem very realistic.
Such a rosette is attached to the stem - a wooden skewer wrapped in green paper. The stem is decorated with leaves, if desired, you can make spikes.

 Step by step creation corrugated paper roses with photo
 There is another way to create a voluminous corrugated paper rosette on a stem. To do this, you must first cut some petals, similar to real rose petals and a long strip. A strip (one or even several) should be wound around the tip of the skewer and glued with PVA.
You will get a kind lump, which will be the basis of the bud. Try to give it not a round, but an oval shape. Glue each petal onto the base one by one. Finally, make a stem and leaves from green paper at the base of the bud.
How to make a crepe paper rose step by step
 Bouquet of roses from thick corrugated paper
 Beautiful rose corrugated paper with twisted petalsINTERESTING: You can also make a voluminous rosette from one continuous strip of corrugated paper with an edge cut out in semicircles. After you wind the bud, use the tip of a skewer to wrap each petal so that it looks beautiful.
Crafts - do-it-yourself corrugated paper flowers
Corrugated paper can make beautiful chrysanthemum, which is easy to decorate the room if desired. It is made from several sheets collected in an accordion and tied with thread. Such a chrysanthemum, as a rule, is attached to a fishing line to hang, or simply glued to the wall.
Corrugated Paper Chrysanthemumway folding corrugated paper a tube can get a lot beautiful flowers. To do this, you just need to correctly process the edge of the cut corrugated tape: cut out this or that pattern.
 Dandelion, carnation, peony and crepe paper chrysanthemum
 Colorful flower made of multi-colored corrugated paper
 INTERESTING: Corrugated paper is often used by needlewomen to make bouquets with sweets. One of the most popular flowers is the crocus, which is very easy to make.
 Corrugated paper tulip with candy
 Do-it-yourself corrugated paper bouquet
A corrugated paper bouquet with its beauty can only be compared with a real living bouquet. Try to diversify the usual roses and chrysanthemums with wild flowers, for example, bluebells.

 How to make a bell paper out of crepe paper?
 Simple and very effective tulips are obtained from corrugated paper. In order to make them, you need two pieces of paper 10 cm long and 4 cm thick.
They should be twisted and in the place where they twisted, folded in half. The resulting petal has a beautiful deflection inward. Fold four petals together and fix them on a skewer in a bud.
 Corrugated paper tulip
 Bouquet of corrugated paper tulips
 Other ideas for creating flowers for a corrugated paper bouquet:

 Corrugated paper orchid. The middle is painted with paint - bitmap
 Small yellow flower corrugated paper step by step
 Do-it-yourself spray rose from corrugated paper in a bouquet
 Craft - corrugated paper cone
An interesting piece of corrugated paper is a bump. It should be made from thick corrugated paper. You should cut a wide ribbon of dark Brown and manually process one of its edges by pulling the paper and folding it into a pigtail.  The finished product can be decorated spruce branch corrugated paper
Craft - corrugated paper birthday cake
corrugated paper cake This is a kind of gift wrapping. You can hide a gift for a newborn in it, for example, from diapers, clothes, diapers and other things. You can also put sweets or any other sweets with surprises that will be relevant on your birthday in such a box. The cake is decorated with corrugated paper flowers, ribbons and other decorations.
Ideas for creating a corrugated paper cake:
 Beautiful corrugated paper cake
 Colorful corrugated paper cakes
  Cake decorated with corrugated paper
 DIY corrugated paper sweets
Corrugated paper candy is a beautiful package in which you can "hide" any gift. To make candy, you will need a large sheet and some decorative elements: ribbons, beads, serpentine, and so on.

 Candy gift wrapping
 Recently, more and more popular gifts are bouquets of sweets made of corrugated paper. There are a lot of ideas for creating such flower packages: large, small, different types.

 Candy bouquet
 Video: "Christmas tree made of corrugated paper using the trimming technique"