Christmas trees made of paper for the new year scheme. DIY paper Christmas tree - the best ideas for the New Year. Video on how to make a decorative Christmas tree from threads and PVA glue
We will send the material to you by e-mail
Not everyone is born to be a great artist, and sometimes people are simply afraid to try their hand at handicrafts, and for good reason. If you follow the tips and instructions from the editors of the site, it will not be difficult at all to make beautiful and elegant Christmas trees out of paper and cardboard (volumetric) for the New Year!
Paper is always in demand, and especially on New Year's Eve, because it is such a wonderful material for applied art! With careful handling and storage, paper products can last more than one holiday, and modern material is bright and colorful, which allows you to fully use such decorative crafts in the interior.

We offer you to learn how paper Christmas trees are made and make the same beauty yourself.
We create a volumetric Christmas tree
For those who do not remember how to work with paper, we will remind you of a few simple rules:
- We do not allow any errors in paper sizes. If you need a square - it will be a figure with equal sides, you need a rectangle - let it be a rectangle, even and beautiful;
- all fold lines are usually carefully ironed with a fingernail - the accuracy of the folds allows you to assemble full-fledged high-quality products;
- paper should not be of poor quality and tear at the slightest attempt to bend or cut it.


To assemble a voluminous fluffy Christmas tree, you need scissors, colored paper and a little glue.
| Illustration | Action Description |
|---|---|
 | We use green paper. We turn the sheet into a square, bending one corner so that the edges coincide with each other. Cut off the remaining strip and discard. |
 | We need fold lines, so we fold the sheet and iron the resulting folds, first along one diagonal of the square, then along the other. Then fold the paper in half. |
 | Unfold the product incompletely, leaving one corner folded. |
 | We bend a free corner to the folded part, as in the photo. |
 | Now the resulting trapezoid needs to be turned into a square by pulling it from the middle of the base and bending it to the right corner. |
 | It turns out such a figure in a spread. |
 | We bend sequentially each of the corners to the center. We turn the product over and do the same on the other side. Unfold one corner and bend it inward. |
 | So we do with every corner. |
 | Cut off the lower part of the resulting tie. |
 | It is necessary to make cuts on the sides of the product. |
 | At each side of the Christmas tree, we bend the upper part from the notch to the base. |
 | We straighten the branches of the fluffy beauty! |
Funny prickly Christmas tree made of paper tubes
Everyone has heard about weaving from newspapers, but not everyone is ready to master it. But trying to make tubes out of paper and sticking them on the base of the Christmas tree is a simple and interesting task.

Those wishing to learn weaving from newspaper tubes you should be patient: first you need to prepare a considerable number of tubes. To do this, the newspaper is cut into strips 5 cm wide. Each strip is wound on a thin knitting needle at an acute angle, gluing the free tip with a PVA tube at the end. After that, they decide how they will paint the product: immediately the tubes or the finished craft. Staining is done in any convenient way. Someone dips the blanks in paint, in stain, someone paints them with a brush on the grid. The finished Christmas tree can be painted from a spray gun.


Video: beautiful wicker tree
Cute fluffy Christmas tree for drop-down cards
Paper Christmas trees for the New Year can be made by a child under the guidance of an adult. For crafts you need colored paper, base for postcards, PVA glue, a simple pencil and scissors.


How to make a Christmas tree box out of cardboard or thick paper: great gift wrapping
Sometimes you puzzle over what to pack a New Year's souvenir or delicious gift. Handmade packaging will always touch the heart of the donee, so let's spend some time in creative work.


Advice! It is better to decorate the box with beads, snowflakes, sequins.
Let's make a voluminous Christmas tree out of paper and cardboard with our own hands and decorate the interior
There are many simple and chic ideas for using a paper Christmas tree to decorate your Christmas room. A voluminous beauty, even if not brought from a store and not grown in the forest, will serve wonderfully to lift the mood for the holiday.
Volumetric Christmas trees: conical base
First of all, we are wondering how best to make a cone for a Christmas tree out of cardboard. A dense, durable cone is a guarantee that the product will last all the New Year holidays without deformation.

Cardboard, thick paper and the remains of wallpaper are suitable for the cone.
How beautiful to decorate a cone base
A cardboard cone is easy to use different decorations turn into a fairy tree. The simplest solution available to everyone is braiding a cone with paper fringe. Fringe is best made from corrugated paper.But if it is absent, then the usual color one will do: we cut the strips of the desired width, glue them into one long strip. If they are carefully folded several times without crushing the edges, then you can immediately cut a beautiful fringe along the entire length.

Christmas trees made of cardboard from the blades
Following the principle of creating a product from the blades, it is easy to make a Christmas tree of any size. The essence of the work is the preparation of two, three or four identical patterns of the silhouette of a New Year's tree with slots at the top and bottom. No glue is needed for assembly, the craft will stand without problems.


From two templates, a four-blade Christmas tree is obtained.
Volumetric Christmas trees: carved art of vytynanka
Many are familiar with the paper cutting technique called vytynanka. We propose to create a Christmas tree magical beauty using paper, a pencil (or a printed template), scissors, and a cutter.
Christmas tree paper templates
It is worth taking a look at the idea of a Christmas tree in such a wonderful technique:


Article
Favorite craft of all the kids - do-it-yourself paper tree, but adult craftswomen will also like such creativity, because using a very simple and affordable material, you can get an original element New Year's decor, Christmas tree toy or a gift for your beloved grandmother. you can do at home with your kids while having fun with your family.
DIY paper Christmas tree
Lush Christmas tree do-it-yourself paper you will get from separate circles, they will all be of different diameters, so for such a craft you may need a compass and a simple pencil, with which you outline on a green sheet necessary elements. To cut them out, we will use scissors, and then glue the elements to the base with glue. As a base, you can use a pencil, a wooden skewer or a juice tube.
This will be the first experience of working with a compass for children, so before giving them a tool, tell them about safety precautions and the rules for working with it. Then make sure that the child draws several circles on a sheet of different diameters. Their number depends on the desired size and splendor of the finished Christmas tree. Each circle should be of such a diameter that it is 2 cm smaller than the previous one. Each circle is one tier of our future craft, so when you draw the contours, they must be carefully cut with scissors, and even if the edges are slightly uneven, this will not affect the beauty of the finished craft, because we will make each tier wavy.
Next, you need to fold each circle: once in half, then the resulting semicircle in half again, and this sector in half again. In total, we will add each circle three times. We should get clear lines, so we need to draw along the folds with scissors.
The corner of each folded circle should be cut off so that a hole is obtained in the center of the expanded element, the diameter of which matches the diameter of the base - a tube or a pencil. After that, the circles can be straightened.
The base also needs to be decorated, pasted over with green paper or wrapped with tape. When all the elements are ready, it can be assembled do-it-yourself tree paper craft, for this, all the elements must be strung on a tube: from the largest circle at the bottom to the smallest one at the top.
It remains only to decorate the top, for this you can glue a bead or a decorative red star. Sequins, small beads or sparkles can be glued to lush "twigs".

DIY Christmas tree: paper craft
There is another option, how to make a Christmas tree out of paper, for which you will need the same set of tools and materials as for the previous craft. The main materials are a green leaf, a pencil and compasses, a ruler and scissors, PVA glue. And we will use a wire and a needle.
In this case, we will also assemble a Christmas tree from individual elements of different diameters, the outline of which we will draw with a pencil and a compass. The lowest tier will be of the largest diameter, but in this case we need to draw each circle cut out correctly, because it should get cone-shaped needles, as shown in the photographs.
After you draw a circle, you need to draw another one inside, stepping back from the edge of half the radius. Then it must be divided by a ruler into twelve identical sectors.

In the next step, we need scissors, with which we will make cuts along the line of each sector. The incision should reach the contour of the inner circle, after which at the end of each sector it is necessary to roll up the cone and glue it with PVA glue. When you fold all the cones on one blank - there should be 12 of them, you can proceed to the next blank, which must be drawn in the same way, cut and glue the cones.
In this case, the wire will be collected do-it-yourself paper tree, master class suggests that our air herringbone be stable. One end of the wire must be coiled. To make a spiral, you need to wind the wire around the pencil, laying layer on layer, point the rest of the segment up.
In the center of each circle, make a hole with a large needle, and then string all the layers onto the wire. can also be made in the form of a paper cone.
How to make a paper Christmas tree with your own hands
We have already performed DIY Christmas tree toys made of paper and New Year cards using the quilling technique. This time we will not make a flat figure, but with the help of quilling we will create a voluminous Christmas tree. You can cut the strips yourself or buy a ready-made quilling kit.
The stripes should be half a centimeter wide. The sheet must be drawn into strips, and then cut into them. Four more stripes one centimeter wide - for the base, and for decoration - thin stripes of yellow and red. We will perform quilling elements without special tools, and we will wind the stripes only with a toothpick.

When working with paper, in order to ensure reliable fixation of the elements, it is enough to use only PVA glue, and it will last for a long time.
First we will wind green strips of 5 mm - we will need four of them different lengths. 30, 20, 15, 10 cm - they must be twisted onto a toothpick, then loosened a little so that the spiral is not tight and fix the tip on a drop of glue. With your fingers, you need to squeeze one edge of the spiral to get the shape of a “drop”, and then bend it a little. As a result, we got a "drop", reminiscent of the popular paisley print.

Wide strips must be wound tightly around a toothpick, because this will be the trunk of our future Christmas tree. The tip of the strip must be fixed with glue so that the spiral does not unwind.
We need a strip 30 cm long for the top: it should also be first twisted into a spiral, and then slightly dissolved and shaped into a drop.
Although it is very easy to do do-it-yourself paper tree, video the lesson may come in handy for you to get to know the quilling technique better, because the beginner still does not know how to create the “drop” or “eye” elements correctly, how to twist the strips correctly.
When we collect the Christmas tree, we should use Moment glue, which provides instant fixation of all elements. You can glue each tier with the trunk first, and then collect the layers, or vice versa, first glue the parts of the trunk, and then glue the “drops” - twigs. Christmas tree star made of paper with your own hands can also be made using the quilling technique.
The parts of the trunk must be glued together sequentially, and a toothpick should be inserted into the center, which will ensure the strength of the base. Then you can glue the branches: we will start with the smallest “droplets” that are glued on top, and the largest branches will go below.
We will use thin red and yellow stripes to make. This time, the paper can be twisted without a toothpick, but the tip must be fixed with glue, and then the balls must be glued to the twigs.
We can twist the stand for such a Christmas tree from white stripes, and make snowdrifts using napkins rolled into lumps, you can also decorate the stand with snowdrifts using cotton wool. We will get the original craft "Christmas tree in the snow", which the student will be happy to do.

Christmas tree made of corrugated paper do it yourself
We have already considered several original ideas how can be performed do-it-yourself corrugated paper tree. Corrugation is an ideal material for creating beautiful New Year's crafts, it will be interesting to work with him for both preschoolers and adult craftswomen. There are many ideas for making such crafts, but they all come down to one technique: first you need to make a cone from cardboard, and then glue this cone with paper elements.

The cone can be made in any size using a piece of cardboard, whatman paper or a piece of wallpaper. You can roll the sheet into a cone, glue the edges, and then cut off the excess paper from the bottom. This option is suitable if you are making a large cone. A small cone can be rolled up by first drawing the base. On a sheet of cardboard, you need to draw a "sector". Draw a quarter circle with a compass, draw straight intersecting lines along its radii with an angle of 90-120 degrees.

Then cut out this sector and glue it along the junction. From below, the joint can be fixed with a stapler, glue the edges with double-sided tape. The cone-shaped base for your future Christmas tree can remain hollow, because the corrugation is a very light material, and an empty base will withstand such a load. To give the base a finished look, you need to glue a circle from below. The radius of the circle should be one centimeter larger than the radius of the base of the cone. Then the edges of the circle must be cut in increments of one and a half centimeters around the entire circumference. The depth of the incision should be one centimeter. Bend the resulting incisions up and grease with glue, and glue the bottom into the cone-shaped base.

Christmas tree toy made of paper with your own hands
If you take a small cone-shaped base, no more than 10 cm high, then you will get an original New Year's do-it-yourself Christmas tree toy made of paper, which can become a decoration for a festive tree. In addition to cardboard for gluing the base, you can also use plastic bottle. You need to cut off the neck and bottom from it, you are left with a straight cylinder, which must be cut in a straight line on one side. We will twist the resulting piece of plastic into a cone.

The corrugation should be cut into strips 5 cm wide. We will glue these strips to the cone in layers, and not in a spiral. One edge of the strip should be wavy, twisting with your fingers, as shown in the picture. Then the second edge must be glued to the base, starting from the lowest tier. The second tier should cover the place of gluing the bottom strip. So you should cover the entire cone with corrugated strips, and you will get a fluffy Christmas tree.
The base-cone can be used for other children's crafts, it can be pasted over using the trimming technique using squares of napkins or corrugations, it can be pasted over with strips of wrapping paper, candy wrappers or foil.

If you want to hang a toy on a sprig of spruce, then you need to glue a satin ribbon on top and make a loop from it, tie a bow on top.
You and your child will love how easy it is to make and how adorable it can look.
Christmas tree from paper plates
To make a Christmas tree out of paper plates, we need to color them bright green. After the paint has dried, cut the plate into pieces.

We collect a Christmas garland from fluffy wire and beads.

Glue the pieces of a disposable plate onto the background sheet of paper, starting from the bottom. We get the application "herringbone". We decorate the Christmas tree with beads and a star. We supplement the application with cotton wool snowflakes.

Christmas tree made of accordion paper
Considering how simple the one we offer is, absolutely any child can do it with their own hands.
So what you need:
- a sheet of thick green paper (for example, scrapbooking paper);
- hole puncher;
- two wooden skewers for barbecue or Chinese sticks;
- bright narrow braid, cord, foil and other decorative materials;
- glue;
- scissors;
- thick brown cardboard for the trunk.

Cut out a triangle from green paper - this will be the Christmas tree. We fold it with an accordion,

in the center of which we make a large through hole with a hole punch.


We give the accordion the shape of a triangle.

We insert wooden sticks into the hole, pick up the Christmas tree a little.

We wrap the lower part of the sticks with brown cardboard tape, glue it well - we get a stand. A small souvenir is ready!


On the folds of the Christmas tree we glue a golden cord, braid, foil or colored paper - like garlands. We decorate the top with a star, a bow or a snowflake.


Christmas tree made of paper strips on a cardboard roll
A very simple but effective Christmas tree can be made from paper and a toilet paper roll.
Cut out wide strips from green paper. We cut these strips on one side.

We apply glue to the strip and wrap the cardboard roll around it. We do the same with the rest of the strips.

We make the last strip a little narrower than the previous ones. Glue it to the very top of the cardboard roll.

Glue a paper cone.

We cut it at the base.

Glue the cone to the top of the cardboard roll. This will be the top of the tree. The craft is ready!

Christmas tree from pieces of colored paper
A voluminous Christmas tree made of pieces of colored paper looks very impressive. To make it, cut out a semicircle. Separate one segment of the circle with a pencil.

Cut out small squares from thin colored paper. Green paper craft will look beautiful different shades. Apply PVA glue to the base-semicircle. We wind a piece of green paper on a pencil and glue it on a semicircle. We glue green pieces of paper one after another, leaving the segment separated by a pencil unfilled.

After the entire semicircle is filled, roll it up with a cone. Glue it in a place not filled with pieces of paper (we separated it with a pencil at the beginning of work).

We take a cardboard cylinder from toilet paper. We cut it on one side. Color it in Brown color- this is the future trunk of our Christmas tree.

Glue the top of the Christmas tree to the cardboard roll. We decorate the craft with any bright New Year's materials- pompoms, beads, rhinestones or decorative buttons. Christmas tree made of pieces of paper - ready!

There are many options for how to make a Christmas tree out of paper, so you can invite your child to make his own choice and make the Christmas tree that he likes the most.
Herringbone from twisted corrugated paper
For example, a very elegant Christmas tree is easy to make using green corrugated paper or napkins.
Making a white cardboard cone

wrap it in green colored paper.

You can immediately make a cone out of green cardboard. You can fasten the cone not only with glue, but also with tape or a stapler. If adhesive tape is used, it must be glued on the inside so as not to impede subsequent finishing.
We cut tissue paper into thin strips and make a fringe on one side. We twist each strip with any wooden stick. It is convenient to use matches, toothpicks or barbecue skewers for this purpose.


We carefully glue our cone with curls.

From red tissue paper we make bows that can be decorated with white beads or buttons.

We glue the bows to the Christmas tree, complement them with golden beads.

Decorate the top with a golden bow.

You can make a simplified version of this craft.
Herringbone from strips of corrugated paper

Roll up a cardboard cone.

Cut the paper into long strips.

We wrap the cone with strips of paper, while forming folds. One strip - one row.

Having wrapped the Christmas tree, we decorate it with bright beads and decorative stars.

Here is a Christmas tree made of paper with your own hands!


For children younger age this would be more affordable.
Good afternoon dear friends. We continue to prepare for the new year and prepare crafts for this holiday that can easily be turned into gifts. In the last article, we analyzed in a general way, and today we will narrowly create Christmas trees. Link to previous article.
Today's crafts will be exclusively made of paper. And there are so many instructions that even a child can handle the creation of a Christmas tree with a normal approach. And if it seems a little to you, then you can try to make or create with your own hands.
Well, for now, we will begin to create beautiful forest beauties that will decorate your home throughout the holidays. And if you make a few pieces, you can collect a whole fabulous forest on the window.
Take a regular piece of paper. Of course, ideally it is better to take green, but white is also suitable. We bend the sheet in two along the long side and apply the diagram shown in the photo below.

After drawing the pattern, cut along the lines and bend as shown below. We make three blanks, and then glue them together. It turns out very beautiful and stylish. I am sure you will not see such Christmas trees anywhere else.

The following set of templates for making will allow you to create a 3D Christmas tree. You need to save and print the templates. We draw the diagram on a sheet of paper folded in two along the long side. And then cut out.


We cut out along the main contour, and where the lines go inside, we only cut. We bend the cuts at the end. Here, too, it is necessary to make two identical blanks in order to glue them at the end and get the volume.

If there is a desire, then you can cut out not just a Christmas tree. And a Christmas tree with a deer or a small Christmas tree standing next to it.


If desired, any craft can be painted to distinguish it from the rest of the Christmas trees. You can also use paints that glow in the dark.

And here is the proof that the kids love to needlework on their own.

Here are our beauties and ready. It turned out just gorgeous. How do you like this idea?

For the next Christmas tree, it is better to immediately take colored paper and make a green Christmas tree right away. The tree is obtained created from eyelets and curlicues.


On that account, if something was not clear to you from the photo, I will leave a video clip on creating such a masterpiece.
Christmas tree in origami technique (a simple diagram for children with a description)
Many have been able to fold various figures from a sheet of paper since childhood. Well, remember the airplanes did or the boats did all this simple technique origami. And I just can’t help but talk about the fact that you can make a Christmas tree using the origami technique.

In order to fold the Christmas tree, you need to find an old book without a thick cover or a scribbled notebook. Found? Now let's continue, we wrap all the pages from the left corner to the middle. And so each. Therefore, a book that is too thick will not work.

Then once again we bend all the pages into a bag.

The lower tail will need to be cut with scissors. Try to do everything slowly and carefully.

The product is completely ready. It remains only to straighten all the pages and sprinkle with sparkles.

How about this idea. The Christmas tree is made a little more complicated, but it turns out more beautiful. First, practice on a white sheet, and then when you understand the whole process, you can do it from green.


The next beauty can be offered to make the kids at the labor lesson in primary school. All instructions are provided below.


How to make a voluminous Christmas tree from corrugated paper for the New Year 2019
As promised above today will be various options making forest green beauties. And for the next craft, you will need special corrugated paper or crepe paper. You will get a very beautiful Christmas tree.
You will need to find:
- cardboard or thick paper
- corrugated green paper
- scissors
- red paper
- various bows
- beads
Production stages:
We make a beautiful tall cone out of cardboard and glue it with green paper.


Make the strips about 10 cm long. We wind each strip on a thin wooden stick or on a small brush to make such a bud.

Fluff each bud and glue to a paper cone. On a cone about 10-15 cm high, you will need to make over a hundred of these curls. To decorate the Christmas tree, you can use both ready-made bows and homemade ones. Christmas balls can be made from cotton balls sprinkled with sparkles.

If the first option is too difficult for you, I suggest another option for making Christmas trees from corrugated paper. It is less labor intensive.
We make the base of the Christmas tree from cardboard. Srep paper will need green color 18 cm wide and 2 meters long. We fold it in two along the entire length. We apply glue on the edge, leaving a free strip of 2 cm.

We glue and tighten to make a small skirt.

Next, with this blank we decorate our cone in a spiral. Don't forget to glue the strip to the cone. At the end, we decorate with impromptu toys.

Or here's another option for making a New Year's beauty. We cut multi-colored strips 2-3 cm wide and wrap each strip of cardboard cone to the very top.

Or you can do it like this.

New Year's beauty from colored paper and cardboard
To make such a Christmas tree, you need to make some blanks of three semicircles of different diameters. On each semicircle we make small incisions to make a fringe.

After using scissors, we twist the fringe. And we glue the cones from the blanks. Well, further, on a large cone we put on less on the middle smallest one. At the end, we will make a beautiful star.


And here is a similar option, but only in the video there is a small life hack how to quickly and beautifully cut these circles.
But such Christmas trees will look very organic on holiday table. All are made from the same paper circles of various shapes. By the way, if the issue of making salads is still open for you, here are some tips for you.


Or here is such an option for making Christmas trees from simple wrapping paper.

Well, if you want to make something big beautiful and warm, you can make a big beautiful New Year's beauty. What to do big Christmas tree you need to glue several sheets of cardboard. Twist a cone out of them.

Wrap the resulting cone in beautiful wrapping paper.

After removing all unnecessary, decorate the Christmas tree with impromptu toys and an asterisk.

You can also make a Christmas tree out of cardboard, but we will not make cones.

You will need to print this stencil.

Next, we cut out the resulting stencil, apply it to the sheets of cardboard, circle it and cut it out. Fold in the middle. We make 8 identical blanks.

Let's go through the edges with a hole punch. If there is a figured hole puncher, you can use it. We glue the middles with double-sided tape.

After we sew with white threads along the holes made. And cut out an asterisk.

At the end, it is desirable to decorate with artificial snow and white sparkles.

From paper circles and a wooden stick, try to make such a multi-colored Christmas tree.

Or try making the same Christmas tree out of candy wrappers and magazine clippings. At the end, coat the Christmas tree with glue and sprinkle with flour or sugar.

You can glue a Christmas tree out of paper handprints. Preschoolers will love this one.

And here is another master class for creating a Christmas tree from a glossy magazine.


And with such a Christmas tree you can decorate your workplace. You will need a green sheet of A4 paper. We cut out a triangle, in the middle we make a hole with a standard hole punch. We unfold the accordion and put it on an impromptu trunk. Which can be made from the same sheet of paper twisted into a tight tube.


On the Internet, you can find such tips. By the way, individual elements can be used as decoration for the space around them.

A Christmas tree made of loops is something new, I really wanted to do something like that myself.

Another option for making crafts from loops.

Here is another idea on how to make a Christmas tree from improvised means.

Let's go back a little to decorating the office table. The next Christmas tree will be made from reminder leaves.

And even a schoolboy will cope with this task.

Maybe you have not tried to make a quilling Christmas tree yet? So here's a good idea for you.

Master class on making a New Year's tree from napkins
Yes, yes, even from napkins you can make a beautiful New Year's beauty.

To make you look so beautiful. You need several layered napkins. We draw circles on a napkin, cut out and in the center each circle is chopped off with a stapler. After each layer, crumple forming a circle. Here are some photo tips to help you.


You can arrange such a Christmas tree in the style of a topiary.
Tree stencils for cutting and printing
If you prefer the style of vytynanok and you like painstaking work. I propose to make a Christmas tree to decorate windows. Using this template, you can make a Christmas tree in 3D.

We will make slots in one workpiece from the top and the other from the bottom. And let's put them together.


The stencil is printed.

It is folded in two and gradually cut out.

One craft is assembled from two blanks.

And here are just your templates that will help you create this amazing beauty.


Do-it-yourself volumetric Christmas tree for a New Year's card
Certainly each of our friends or acquaintances under New Year will wait for gifts and congratulations. And for each gift or congratulation, you can make an original postcard. And I will help you with my tips on how you can make a beautiful postcard out of paper with your own hands.

To make the simplest postcard, you will need to print a small blank. Make cuts along the lines and bend and glue to the main background.


If something is not clear to you, here is a help in the form of a video clip.


Or try making a postcard like this.


Paper Christmas tree on the wall
Who said that crafts should be small and remote. I propose to make a large Christmas tree that will be mounted on the wall. There are immediately finished options, and there is an option in the form of coloring that you can color as you wish.
The first Christmas tree will be like this. We will make it from cut strips.

The second option will need to be downloaded and printed. Then collect on a large sheet of whatman paper.


Of course, these are far from all the options for Christmas trees that can be made to new year holidays and decorate your house, office or room with them. But these options seemed to me the most beautiful and more New Year's. I congratulate you on the upcoming new year.
The Christmas tree is the most important idea for creativity in preparation for the New Year. The stories revolve around her. New Year's cards, toys, home decorations. And it is not surprising that even the ways of making a Christmas tree from such simple material, like paper, there is a huge amount. And each option is different from the other.
Some crafts are easy to make and even a child can make them, others require a certain skill, perseverance. Some models of volumetric Christmas trees are not ashamed to give, they look like works of art.
Selecting the required material
To make a Christmas tree out of paper with your own hands, a wide variety of paper and cardboard is used. In most cases, this is ordinary colored paper and cardboard, although Christmas trees made from corrugated paper also look interesting. In addition to colored paper and cardboard, often required:
- scissors;
- ruler;
- pencil;
- glue;
- stapler;
- stationery knife;
- wire.
For postcards: simple but original
First, let's look at Christmas trees that look great on postcards or as New Year's toys on big forest beauties.

A simple version of the Christmas tree consists of several squares of paper or cardboard rectangles of different sizes:
- Cut out five squares from paper from largest to smallest. If you're making a Christmas tree out of designer cardboard, cut out 2:1 aspect ratio rectangles and go straight to step 3.
- Fold them in half.
- Fold the top corners down towards the middle. So that the free edges are at the bottom.
- Start gluing from the top.
- The top corner of each module must overlap the previous part.

A similar modular Christmas tree is made up of 5 origami modules. This model, made of designer cardboard, can be hung on a Christmas tree. See step by step wizard Class. Squares can be made in any size, but they do not have to be the same. For example, make the largest square with sides 10 cm, and let the others differ from each other by one centimeter.
 |
Take a square sheet of designer cardboard. |
 |
Fold it in half diagonally, then unfold and connect the other two corners. |
 |
On a sheet of cardboard, you should get these fold lines. |
 |
Now, along these fold lines inward, we start one of the faces of the cardboard pyramid. |
 |
Then we put the opposite side inside. |
 |
We smooth the folds with our fingers. |
 |
On both sides, we got two free edges. We take the top layer by the corner and bend it to the middle of the triangle. |
 |
We do the same on the other side. |
 |
The module can be glued to the postcard using double-sided tape. |
 |
Subsequent modules are nested inside the previous ones in turn. It turned out the original Christmas tree. Glue a ribbon or thread through the top of the tree to hang it as a decoration. |
We propose to study step by step instructions for the manufacture of a paper Christmas tree from loops. It is suitable for making postcards, appliqués or hanging decorations if you attach a loop to it. From the materials you need only a square sheet of green colored paper. Also, prepare a ruler, pencil, scissors and glue.
 |
We take a square sheet of paper. If you have an A4 paper, fold it diagonally with the sides aligned and cut off the excess. |
 |
We retreat from the fold one centimeter and draw a parallel line with a simple pencil. |
 |
Set aside one centimeter along one of the cut lines. |
 |
Then we draw parallel lines, connecting the points with a line parallel to the fold. |
 |
We cut two sides at once along the lines, having previously secured a sheet of paper with paper clips so that it does not move. |
 |
Then we unfold the workpiece. |
 |
Now the task is to glue all the strips to the middle. First, we perform the operation with one side. Then on the other. |
 |
Cut off the top at an angle. |
 |
At the top, you can cut a star out of red paper and glue it with glue. |
To decorate a postcard, a Christmas tree made of paper tubes is suitable.

- It is necessary to cut several strips of different lengths from colored paper, cardboard, remnants of wrapping paper, candy wrappers.
- A round pencil will serve as a template.
- Just wrap a strip of paper around the pencil, placing it lengthwise.
- Glue the tube along the cut.
- From the finished tubes, form a Christmas tree.

The Christmas tree is placed not only outside the postcard, but also inside. When opened, the card turns into volumetric figure. And it's very easy to make it. It is necessary to fold several sheets of colored paper of different sizes with an accordion and glue it to opposite sides of the postcard.
Try folding a triangular sheet of paper like an accordion from the base to the top.
Volumetric models: schemes, instructions, master classes
Light options for voluminous Christmas trees can be made in half an hour with your child. And most of the time will take its decoration.
cone based
The simplest option is a cone made of colored cardboard or a regular landscape sheet wrapped in colored paper or corrugated paper. First, take a sheet, roll it into a cone, secure the edges with a stapler or glue. cut the cone so that it is stable.
If corrugated paper is planned on top, then it is best to put it on double-sided tape. Cut off thin strips of tape and stick along the cone in several places. Wrap the cone with paper, tuck the excess edges inward.

You can decorate such Christmas trees with buttons, ribbons, bows, rhinestones, carved pictures, in general, whatever your heart desires. Decorations are simply glued on.
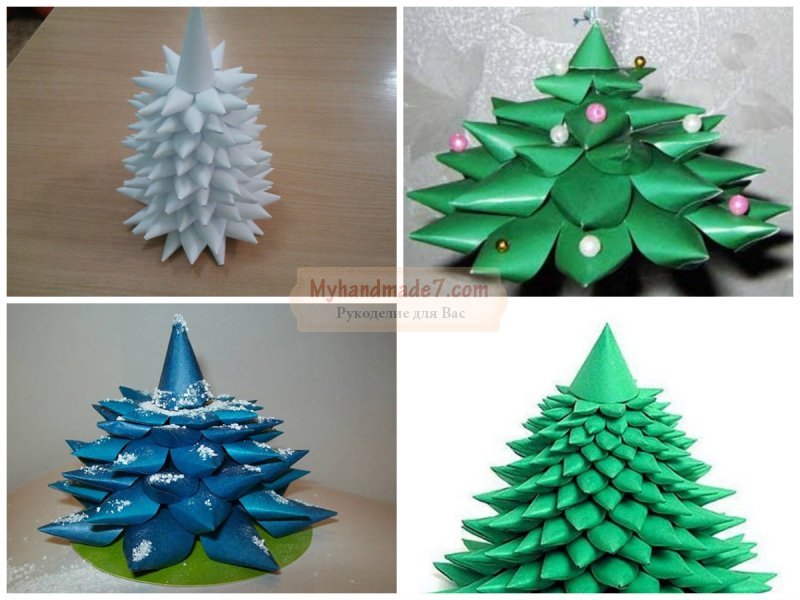
But this is a “smooth” Christmas tree, and there are also options with “needles”, also based on a cone. Corrugated paper "needles" may look like this:


Just make a fringe out of paper. After gluing the needles in a circle on the cone, you get the following result:

The needles can be curled a little so that it does not fit too tightly to the base, but is fluffy, for this they use a pencil or scissors. The paper is wound on a pencil, and the tip of the scissors is drawn along the fringe.
And how do you like the Christmas tree for the New Year, in which the needles are made of circles of green paper of different shades? It looks beautiful, but the work is painstaking and will take time.

There is another manufacturing option.

The base is a cone, which is pasted over in a spiral with a pigtail of crumpled paper. Glue is applied to the base. The tape is slightly overlapped.
Video: how to make a corrugated paper pigtail for a Christmas tree
Fir-trees-vytynanka
Openwork voluminous Christmas trees, made of paper using the vytynanka technique, are original in themselves, and if they are also decorated with beads, then there will be no limit to their charm.

In order to make such beauty, you will need a clerical knife or nail scissors (they are not very convenient to work with), but first of all you need a template. Pre-print the template or simply transfer the drawing you like to paper from the monitor screen. It is best to cut the pattern with a knife, placing a wooden board. The number of parts at your discretion: from 2 pieces or more. The more details, the more magnificent the Christmas tree. When all the details are cut out, put them together, sew with a running stitch with a needle and thread along and bend so that the sectors are evenly spaced.
We suggest you choose the appropriate templates:


We considered the case when the parts are fastened in the middle, but there are options when they are glued along the edges. For this, 4 parts are used. During gluing, the edges should be clamped with paper clips so that the parts do not stick out.

Origami
Previous options for making bulky Christmas trees have all involved cutting and gluing. But it can be done by folding. This method refers to the ancient Japanese art of origami. See how to make a figurine in the video.
Video: three-dimensional origami Christmas tree
Video: origami Christmas tree - variation
Modular
common paper christmas trees, which are assembled from modules. For example, from circles of cardboard. You will need:
- compass;
- scissors;
- wooden stick;
- glue;
- beads;
- base.
Draw a circle on a sheet of cardboard with a compass, cut it out. Fold four times. Cut off the tip from the top. Then form an accordion along the folds. Then you should string the parts on a skewer. They start from the top, glue is applied to the hole in the bottom part so that the part does not slide along the skewer. The basis can serve as a spool of thread, a wine cork. The scheme is clearly shown in the photo.

Modules are also performed using the quilling technique. For example, from 9 tiers of 6 quilling droplets in each, a wonderful Christmas tree is obtained.

In addition to paper, you will need scissors, glue and a wooden skewer.
- Cut out narrow strips from a sheet of paper.
- Fold the droplets and rings using the quilling technique.
- Make a base around the skewer.
- Put a ring on the skewer, secure with glue.
- Then assemble a module of six drops, gluing them together, and put them on a skewer.
- Then again comes the ring and the new module.
- So alternate to the very top.
Note! Modules must be different sizes. Start with the largest in diameter, end with the smallest.
It is quite difficult and time-consuming to make a Christmas tree that looks like this:

Video: making a corrugated tree
This is another stylized Christmas tree made of round elements. To make it, you will need several circles of paper of different diameters and a wire on which these circles will subsequently be fixed. The circle is divided into 12 sectors with a pencil, cut them without reaching the middle and glue each petal.

The process is shown in detail in the video.
Video: making a needle Christmas tree
And one more interesting option- from newspaper tubes.


